 弹吉他的兔子
1. SpringBoot的诞生
先了解一下spring
spring是如何简化开发的,主要通过以下4点:
- Spring Bean,生命周期由spring 容器管理的ava对象
- IOC,控制反转的思想,所有的对象都去spring容器getbean
- AOP,切面编程降低侵入
- xxxTemplate模版技术,如RestTemplate,RedisTemplate
随着2003年spring诞生以来,它支持集成的开源软件越来越多,当spring开发大型项目就需要引入很多配置文件,导致有大量的配置工作要做,降低开发效率,并且配置容易出错,后来人们就称spring为配置地狱。2014年4月,Spring Boot 1.0.0 发布。 Springboot 是为了人们更容易使用spring诞生,简化了spring应用的搭建与开发过程,它的核心思想是约定大于配置,默认配置很多开源框架的使用方式。
Spring 并没有重复制造轮子,它只是将目前各家公司开发的比较成熟、经得起实际考验的服务框架组合起来,通过 Spring Boot 风格进行再封装屏蔽掉了复杂的配置和实现原理,最终给开发者留出了一套简单易懂、易部署和易维护的分布式系统开发工具包。
Spring Cloud 是为了解决微服务架构中服务治理而提供的一系列功能的开发框架,并且 Spring Cloud 是完全基于 Spring Boot 而开发,它 利用 Spring Boot 特性整合了开源行业中优秀的组件,整体对外提供了一套在微服务架构中服务治理的解决方案。
参考:https://blog.csdn.net/adingyb/article/details/80707471
简单记住springboot:
- 自动配置
- springboot不是新东西,是spring的增强版
- 约定定大于配置
- 集成了市面上所有常用的依赖,而且帮你管理版本依赖
- 内置web容器,如tomcat,jetty
2. 快速搭建springboot项目
有两种方式,通过官网的Spring Initializr创建

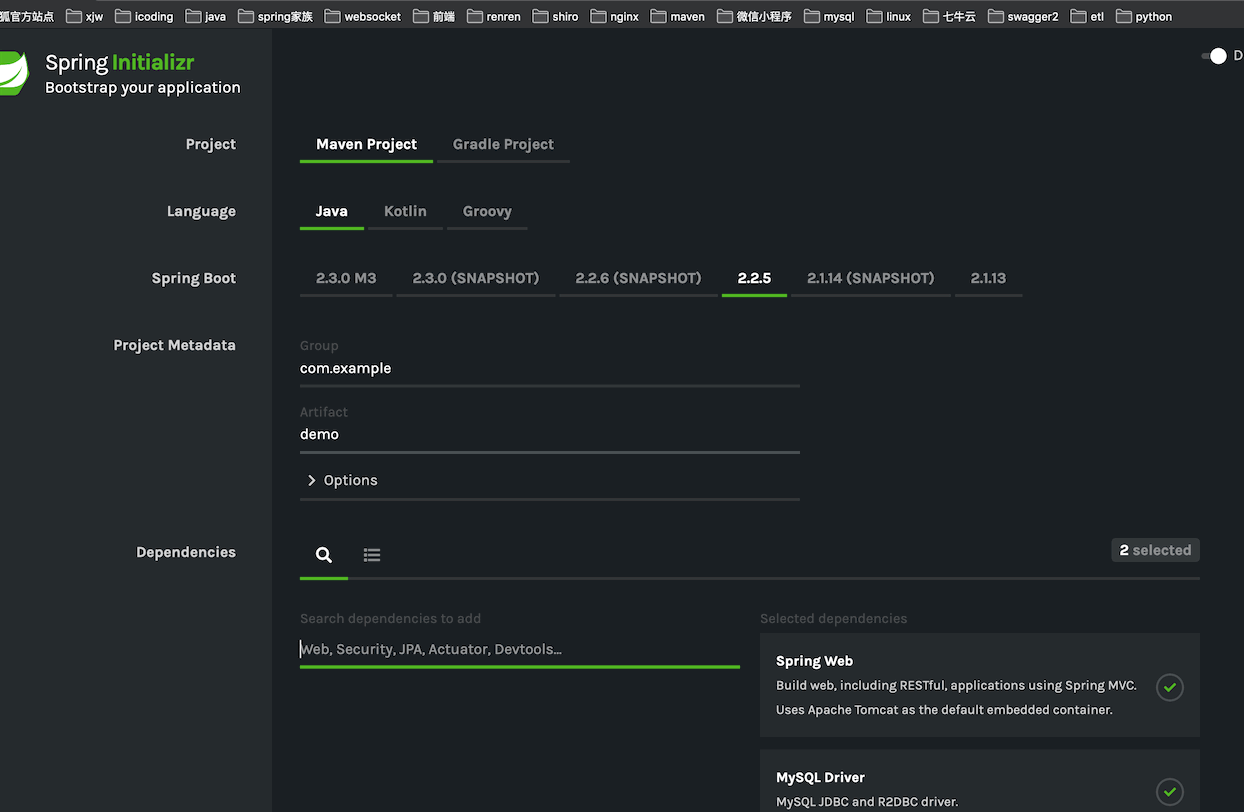
或者idea的Spring Initializr,选择需要的场景依赖包,如web,mysql driver。
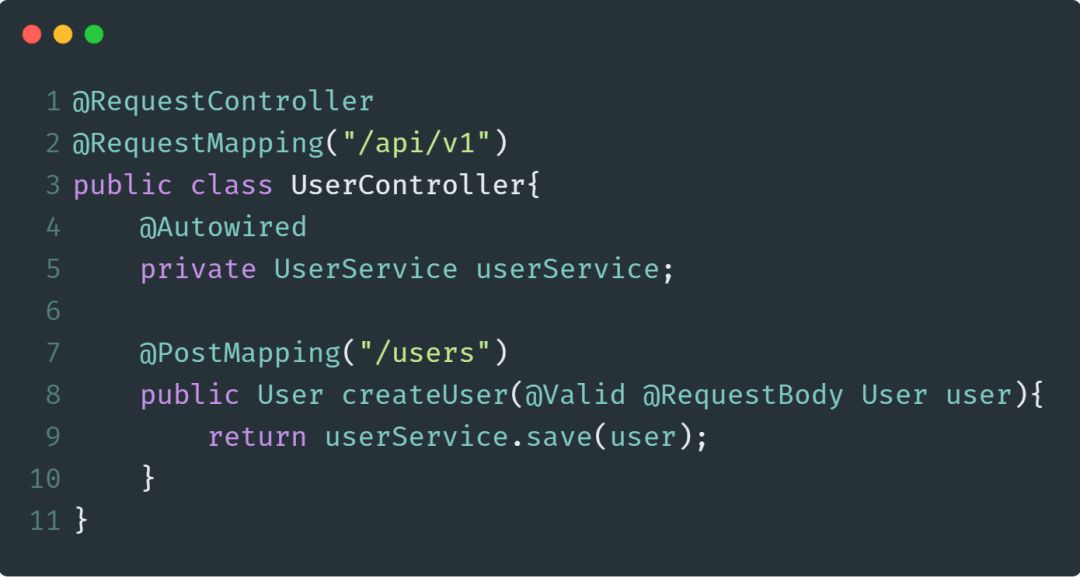
创建完项目后,就可以开始编写controler,service业务了,编写一个controller
@RestController
public class HelloController {

	@RequestMapping("/hello")
	public String hello(){
		return "hello world";
	}
}
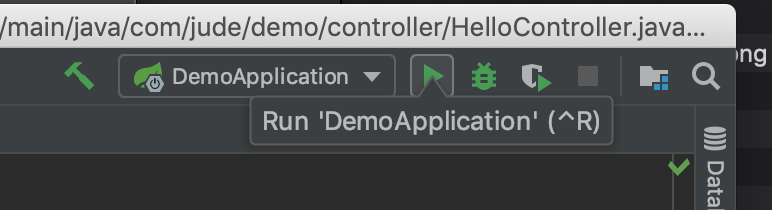
启动DemoApplication测试,注意DemoApplication只会扫描同层级的包及子包,上级的包不扫描
单体应用如何发布,maven把项目打成jar包,放到服务器上,通过java -jar <项目jar包名称> 执行即可,使用nohup命令后台执行。
3. 初探原理
分析pom.xml
父依赖
所有的springboot项目都会一个父依赖spring-boot-starter-parent
<parent>
  <groupId>org.springframework.boot</groupId>
  <artifactId>spring-boot-starter-parent</artifactId>
  <version>2.2.5.RELEASE</version>
  <relativePath/> <!-- lookup parent from repository -->
</parent>
点进spring-boot-starter-parent的pom定义,发现它只过滤application配置文件,它还有一层父依赖是spring-boot-dependencies
<!--父依赖spring-boot-dependencies SpringBoot 版本依赖控制-->
<parent>
	<groupId>org.springframework.boot</groupId>
  <artifactId>spring-boot-dependencies</artifactId>
  <version>2.2.5.RELEASE</version>
  <relativePath>../../spring-boot-dependencies</relativePath>
</parent>
....
<resources>
	<!-- 在src/main/resources目录下,仅application文件是资源文件,对它们进行过滤 -->
  <resource>
    <filtering>true</filtering>
    <directory>${basedir}/src/main/resources</directory>
    <includes>
      <include>**/application*.yml</include>
      <include>**/application*.yaml</include>
      <include>**/application*.properties</include>
    </includes>
  </resource>
	<!-- 同样在src/main/resources目录下,除application文件的其他文件也是资源文件,但是它们不会被过滤 -->
  <resource>
    <directory>${basedir}/src/main/resources</directory>
    <excludes>
      <exclude>**/application*.yml</exclude>
      <exclude>**/application*.yaml</exclude>
      <exclude>**/application*.properties</exclude>
    </excludes>
  </resource>
</resources>
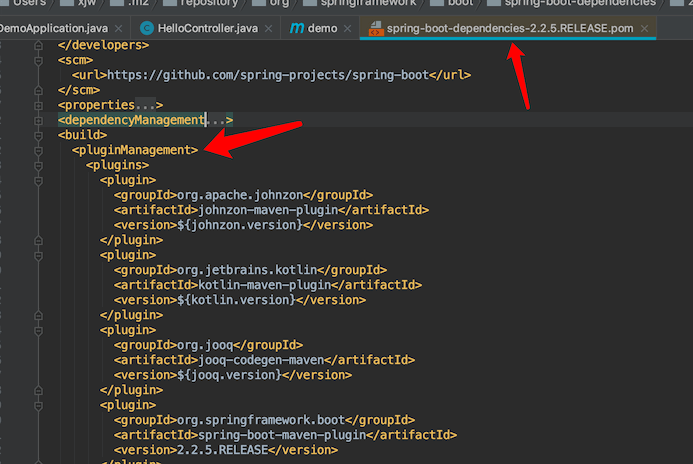
点进spring-boot-dependencies的pom定义,发现它管理很多常用依赖包的版本和插件的版本。
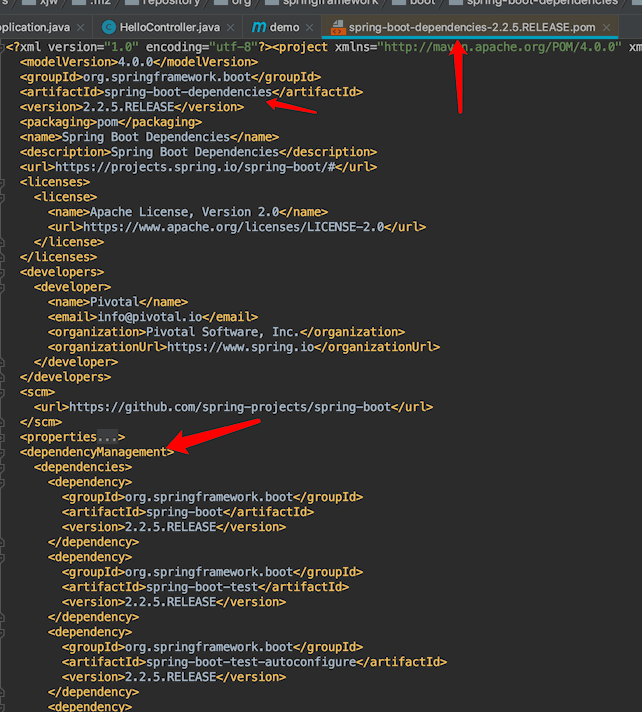
所以我们pom导入spring-boot-start-parent父依赖后,再导入其它依赖包时都不需要写版本号了,spring-boot已经帮我们管理好了。
启动器
spring-boot-starter-xxx 就是所谓的启动器,它是对某个业务常用依赖包的一个整体依赖,后面的xxx就是对应的场景依赖,如spring-boot-starter-web就是web应用的场景依赖包,我们使用springboot写web应用都要用到这个包。
<dependency>
	<groupId>org.springframework.boot</groupId>
  <artifactId>spring-boot-starter-web</artifactId>
</dependency>

官方的启动器命名格式是spring-boot-starter-*,*就是应用场景的名称,如果需要创建自己的启动器,命名格式是thirdpartyproject-spring-boot-starter,thirdpartyproject就是自己的第三方应用名称。查看如何创建自己的启动器
后面我也会尝试创建一个简单的启动器例子
插件
<build>
  <plugins>
    <!--打包插件,把项目打成jar发布-->
    <plugin>
      <groupId>org.springframework.boot</groupId>
      <artifactId>spring-boot-maven-plugin</artifactId>
    </plugin>
  </plugins>
</build>
启动类
@SpringBootApplication
@SpringBootApplication
public class DemoApplication {
	public static void main(String[] args) {
		SpringApplication.run(DemoApplication.class, args);
	}
}
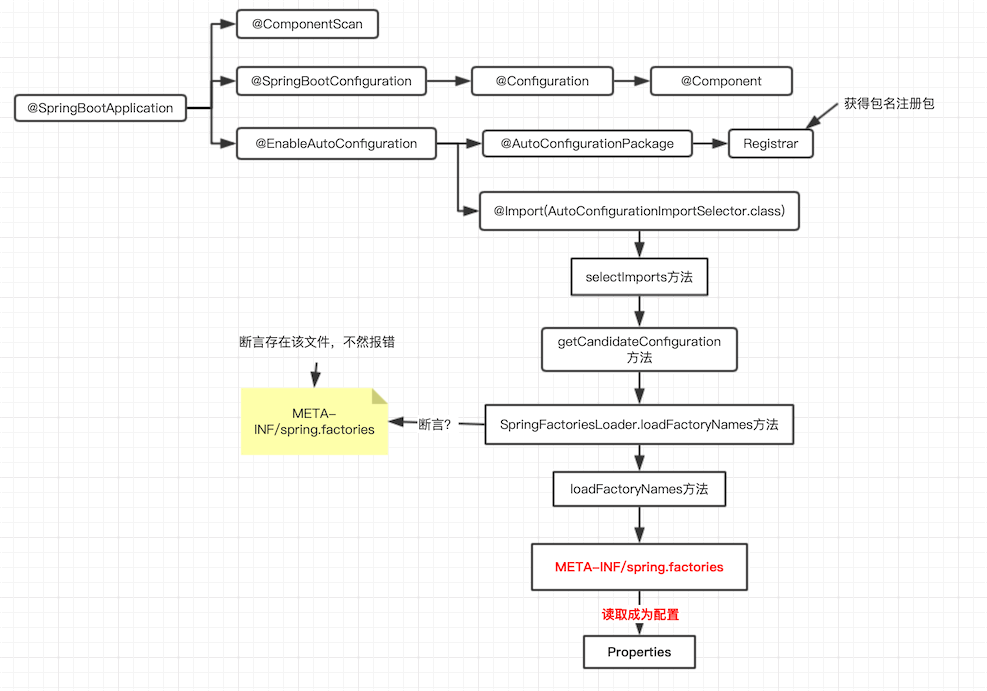
作用:标注了这个注解,就代表这个类是我们的一个启动类,SpringBoot 应用!点击@SpringBootApplication源码,它包含了3个主要的注解:@SpringBootConfiguration、@EnableAutoConfiguration、@ComponentScan ,下面逐一分析它们的作用
// 源码
@SpringBootConfiguration
@EnableAutoConfiguration
@ComponentScan(excludeFilters = { @Filter(type = FilterType.CUSTOM, classes = TypeExcludeFilter.class),//这个注解就是扫描包,将包中的bean注入到spring中,相当于springmvc中的xml配置文件的ComponentScan标签
		@Filter(type = FilterType.CUSTOM, classes = AutoConfigurationExcludeFilter.class) })
public @interface SpringBootApplication {

}
-
@ComponentScan 这个注解就是扫描包,将包中的bean注入到spring容器中,相当于springmvc中的xml配置文件的ComponentScan标签
传统的xml配置文件:applicationContext.xml
<bean id="" class=""></bean>
<import></import>
<mvc:component-scan="">
注解配置applicationContext
@Configuration @Import @ComponentScan class ApplicationContext{ @Bean // 方法名就是xml中对应的id,返回类型就是xml中对应的class public User user(){ } } -
@SpringBootConfiguration
点进源码,发现它是一个配置类和一个组件,启动时注入bean
@Configuration public @interface SpringBootConfiguration { } //点进@Configuration,发现它包含@Component注解 @Component public @interface Configuration { } -
@EnableAutoConfiguration(重点)
读字面意思都知道它是开启自动配置功能的,点进源码:
@AutoConfigurationPackage //自动配置包,注册包
@Import(AutoConfigurationImportSelector.class)	// 导入自动配置类
public @interface EnableAutoConfiguration {
}
分析@AutoConfigurationPackage ,自动配置包,注册包
@Import(AutoConfigurationPackages.Registrar.class)	// 内部类
public @interface AutoConfigurationPackage {
}
// Registrar源码
static class Registrar implements ImportBeanDefinitionRegistrar, DeterminableImports {
  // 注册SpringbootApplication同级目录的包
		@Override
		public void registerBeanDefinitions(AnnotationMetadata metadata, BeanDefinitionRegistry registry) {
			register(registry, new PackageImport(metadata).getPackageName());
		}

		@Override
		public Set<Object> determineImports(AnnotationMetadata metadata) {
			return Collections.singleton(new PackageImport(metadata));
		}
	}
分析 @Import(AutoConfigurationImportSelector.class) 导入自动配置类
如何分析一个类,看下面3点:
1、构造器
2、初始化常用方法
3、如果有继承,则重点看重写了的方法!
分析AutoConfigurationImportSelector,点进它的源码,发现没有构造器,第一个就是重写了的selectImports方法,下面是分析截图
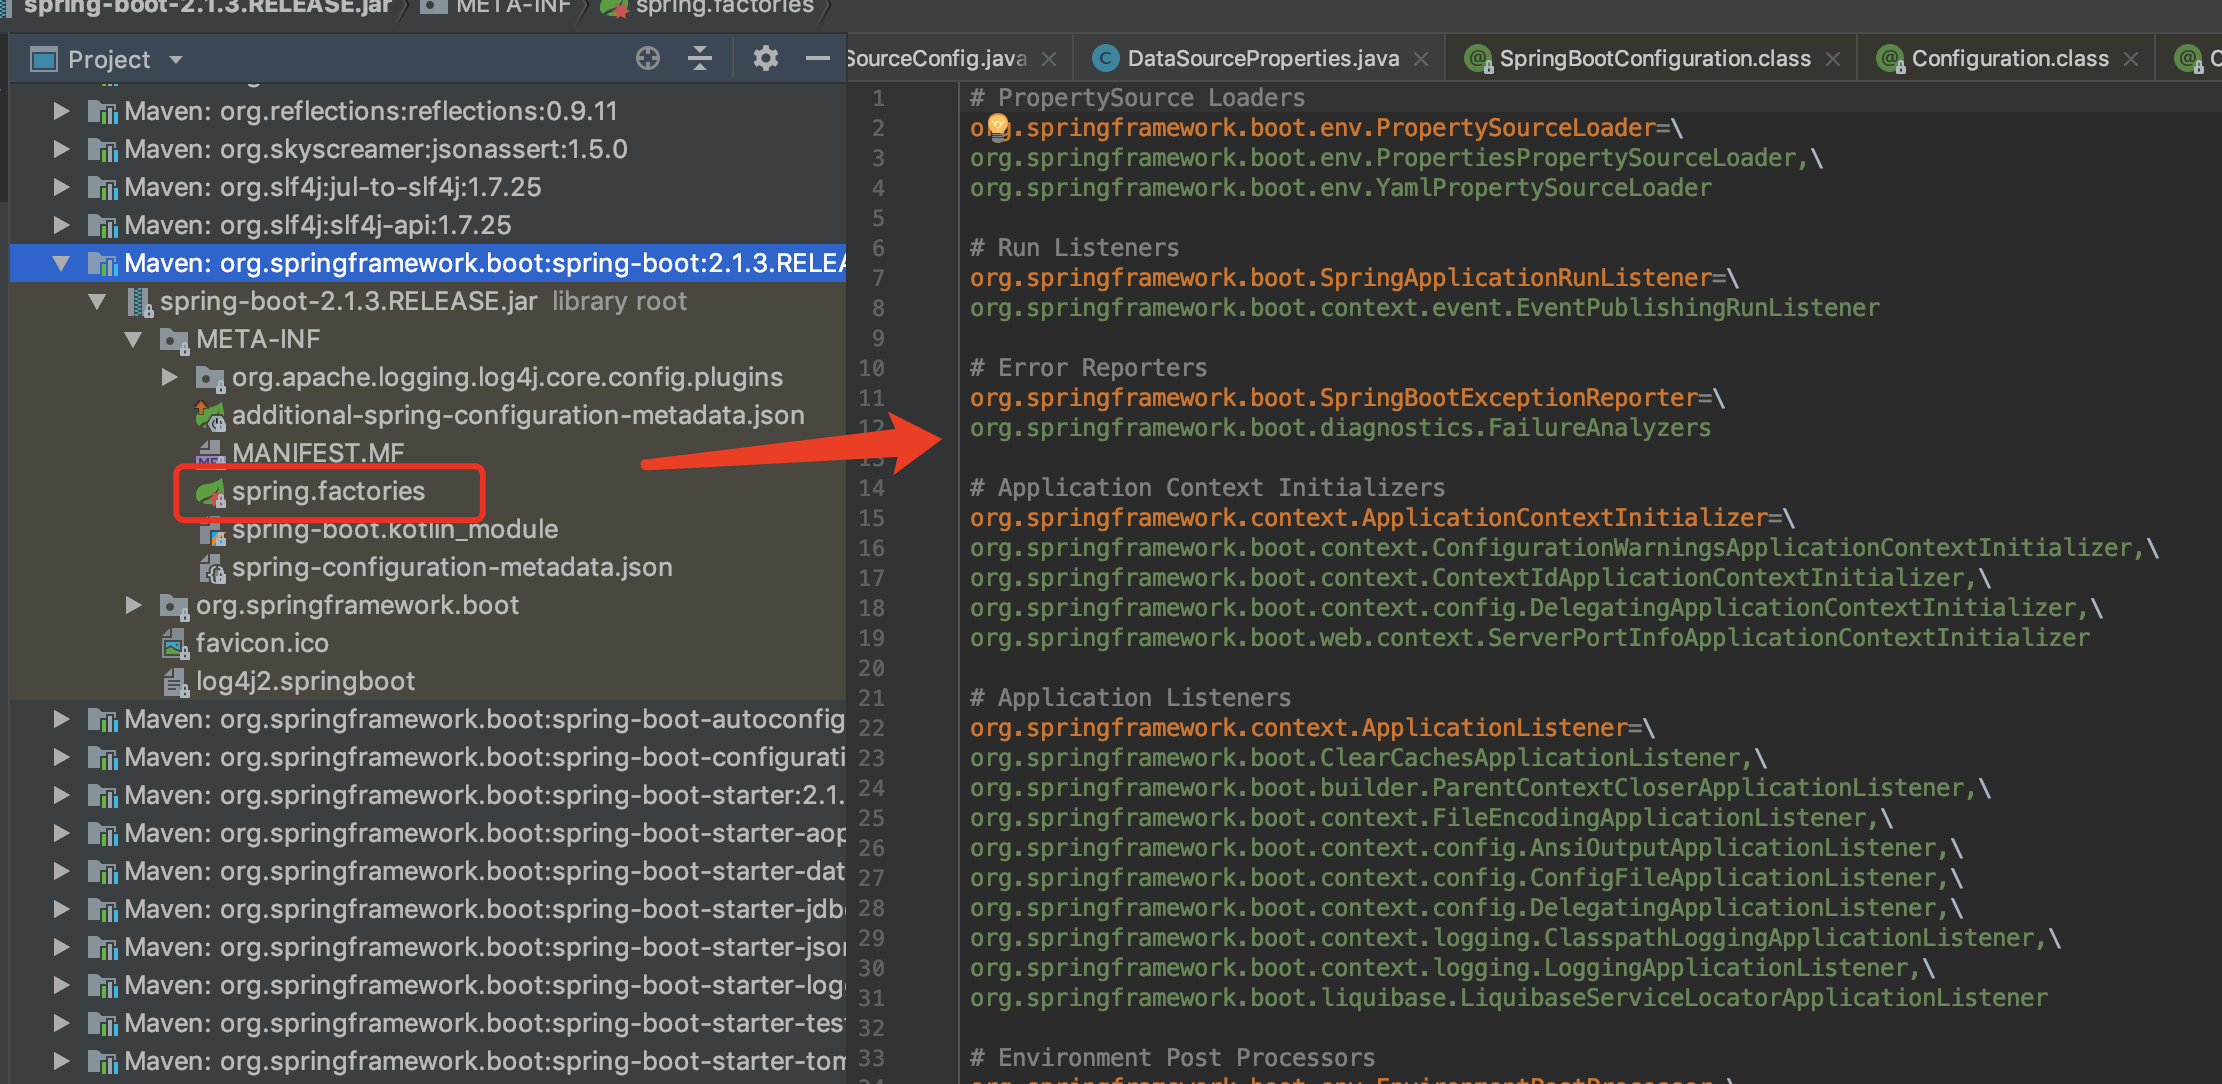
点进
getCandidateConfigurations方法,发现它会断言存在META-INF/spring.factories这个文件,不然就报错,显然这个文件很重要。
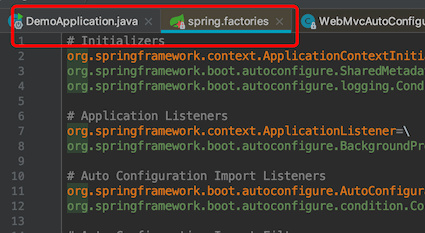
再来点进
loadFactoryNames方法
发现一定要从 META-INF/spring.factories 文件中读取资源信息,那就全局搜索一下这个文件(windows按两下shift,Mac就按两下⇧),下面是文件内容,就是加载用的配置类名路径,最终selectImports方法就是返回这些配置类名路径的数组
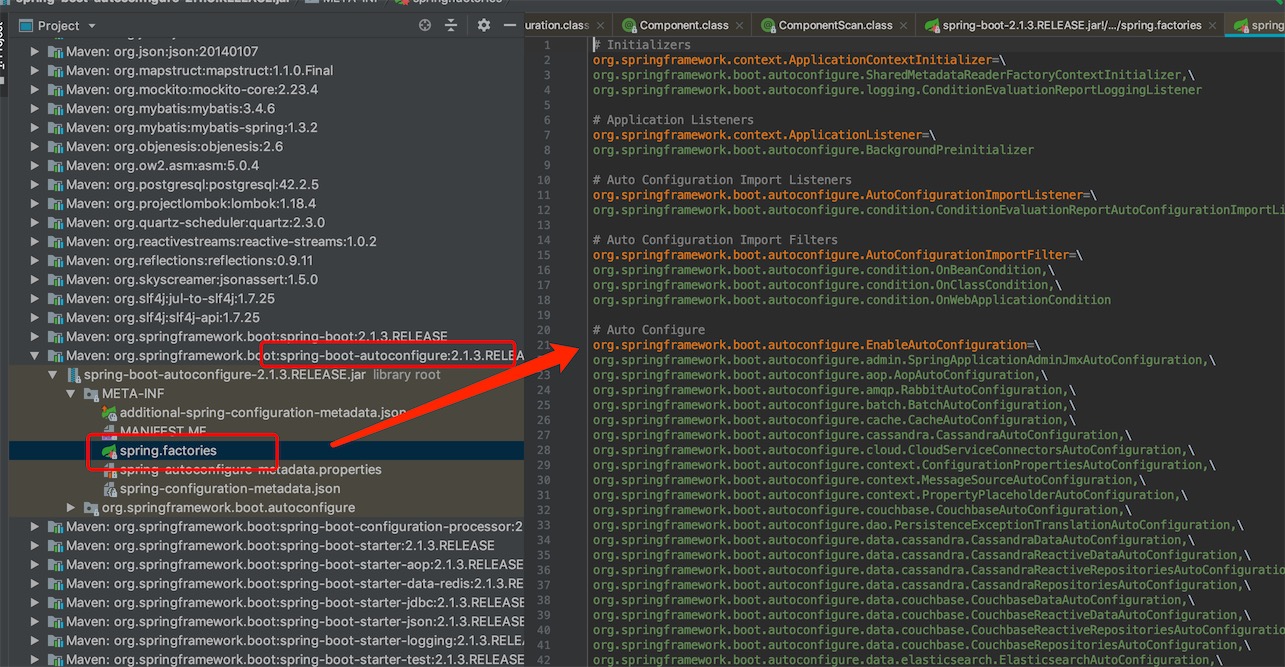
# Initializers  初始化参数
org.springframework.context.ApplicationContextInitializer=\
org.springframework.boot.autoconfigure.SharedMetadataReaderFactoryContextInitializer,\
org.springframework.boot.autoconfigure.logging.ConditionEvaluationReportLoggingListener

# Application Listeners 监听器
org.springframework.context.ApplicationListener=\
org.springframework.boot.autoconfigure.BackgroundPreinitializer

# Auto Configuration Import Listeners
org.springframework.boot.autoconfigure.AutoConfigurationImportListener=\
org.springframework.boot.autoconfigure.condition.ConditionEvaluationReportAutoConfigurationImportListener

# Auto Configuration Import Filters 过滤器
org.springframework.boot.autoconfigure.AutoConfigurationImportFilter=\
org.springframework.boot.autoconfigure.condition.OnBeanCondition,\
org.springframework.boot.autoconfigure.condition.OnClassCondition,\
org.springframework.boot.autoconfigure.condition.OnWebApplicationCondition

# Auto Configure 自动配置类
org.springframework.boot.autoconfigure.EnableAutoConfiguration=\
org.springframework.boot.autoconfigure.admin.SpringApplicationAdminJmxAutoConfiguration,\
org.springframework.boot.autoconfigure.aop.AopAutoConfiguration,\
org.springframework.boot.autoconfigure.amqp.RabbitAutoConfiguration,\
org.springframework.boot.autoconfigure.batch.BatchAutoConfiguration,\
org.springframework.boot.autoconfigure.cache.CacheAutoConfiguration,\
org.springframework.boot.autoconfigure.cassandra.CassandraAutoConfiguration,\
org.springframework.boot.autoconfigure.cloud.CloudServiceConnectorsAutoConfiguration,\
.......
得出结论:
加了@SpringBootApplication注解的启动类,启动加载的时候会从所有jar包的META-INF/spring.factories读取配置,返回具体结果。
@SpringBootApplication分析思维导图如下:
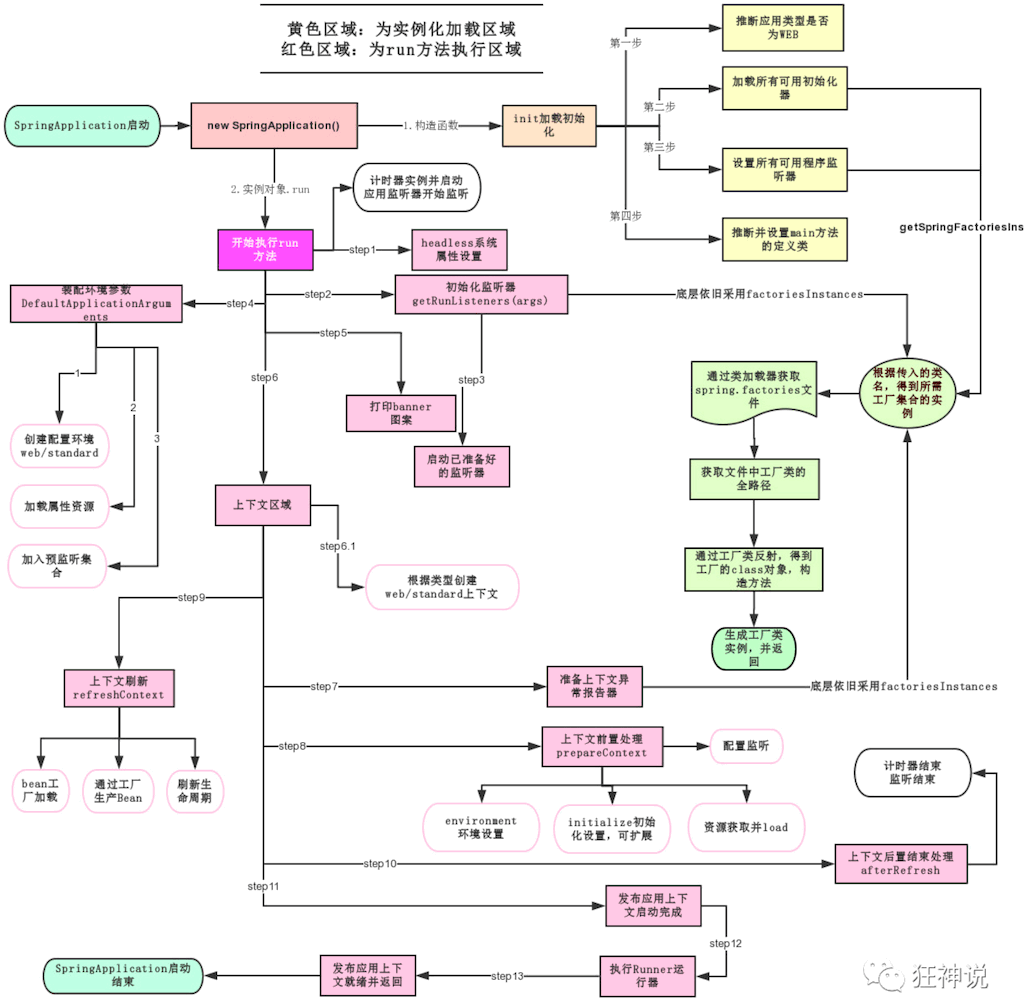
分析SpringApplication.run方法
点进run方法
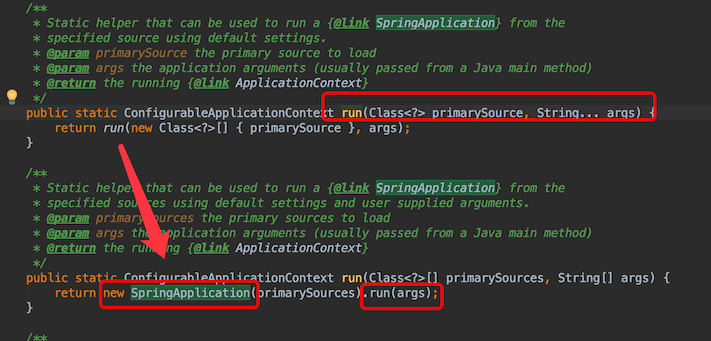
从代码看出先构造SpringApplication实例,再执行run方法,参数primarySources就是xxApplication启动类,上面我们已经分析过了,它加载的时候会从spring.factories读取配置,看SpringApplication的构造器
public SpringApplication(Class<?>... primarySources) {
		this(null, primarySources);
}

public SpringApplication(ResourceLoader resourceLoader, Class<?>... primarySources) {
		this.resourceLoader = resourceLoader;
		Assert.notNull(primarySources, "PrimarySources must not be null");
		this.primarySources = new LinkedHashSet<>(Arrays.asList(primarySources));
  // 1、推断当前引用的类型,是否是Web应用
		this.webApplicationType = WebApplicationType.deduceFromClasspath();
  // 2、加载初始化器
		setInitializers((Collection) getSpringFactoriesInstances(ApplicationContextInitializer.class));
  // 3、设置监听器
		setListeners((Collection) getSpringFactoriesInstances(ApplicationListener.class));
  // 4、推断main方法
		this.mainApplicationClass = deduceMainApplicationClass();
	}
再看实例调用的run方法
public ConfigurableApplicationContext run(String... args) {
  StopWatch stopWatch = new StopWatch();
  // 计时器启动
  stopWatch.start();
  ConfigurableApplicationContext context = null;
  Collection<SpringBootExceptionReporter> exceptionReporters = new ArrayList<>();
  // 1.headless系统属性设置
  configureHeadlessProperty();
  // 2.初始化监听器
  SpringApplicationRunListeners listeners = getRunListeners(args);
  // 3.启动监听器
  listeners.starting();
  try {
    // 4.1 创建配置环境
    ApplicationArguments applicationArguments = new DefaultApplicationArguments(args);
    // 4.2 加入监听集合,初始化环境
    ConfigurableEnvironment environment = prepareEnvironment(listeners, applicationArguments);
    // 4.3 加载属性资源
    configureIgnoreBeanInfo(environment);
    // 5.打印banner图案
    Banner printedBanner = printBanner(environment);
    // 6.创建上下文
    context = createApplicationContext();
    // 7.准备上下文异常报告
    exceptionReporters = getSpringFactoriesInstances(SpringBootExceptionReporter.class,
                                                     new Class[] { ConfigurableApplicationContext.class }, context);
    // 8.上下文前置处理(监听,环境设置,initialize初始化设置,资源获取并load到上下文)
    prepareContext(context, environment, listeners, applicationArguments, printedBanner);
    // 9.刷新上下文(bean工厂加载,生产bean,刷新生命周期)
    refreshContext(context);
    // 10.上下文后置结束处理
    afterRefresh(context, applicationArguments);
    // 11.计时器结束(监听结束)
    stopWatch.stop();
    if (this.logStartupInfo) {
      new StartupInfoLogger(this.mainApplicationClass).logStarted(getApplicationLog(), stopWatch);
    }
    // 监听启动上下文
    listeners.started(context);
    // 12.执行runner运行器
    callRunners(context, applicationArguments);
  }
  catch (Throwable ex) {
    handleRunFailure(context, ex, exceptionReporters, listeners);
    throw new IllegalStateException(ex);
  }

  try {
    // 上下监听运行
    listeners.running(context);
  }
  catch (Throwable ex) {
    // 启动失败处理
    handleRunFailure(context, ex, exceptionReporters, null);
    throw new IllegalStateException(ex);
  }
  //13.应用上下文就绪并返回
  return context;
}
run方法思路参考图
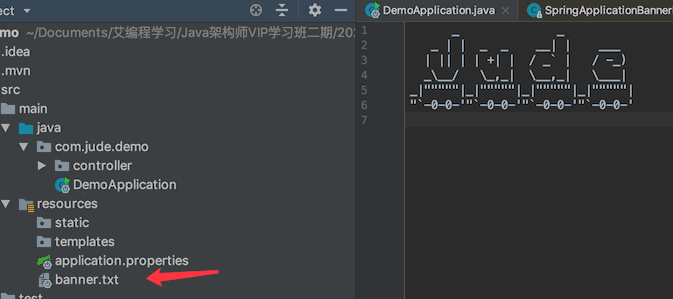
自定义banner图案
banner可以是图片或者txt文本,我们在resource下新建一个banner.txt文件,banner文本可以在线生成 https://www.bootschool.net/ascii
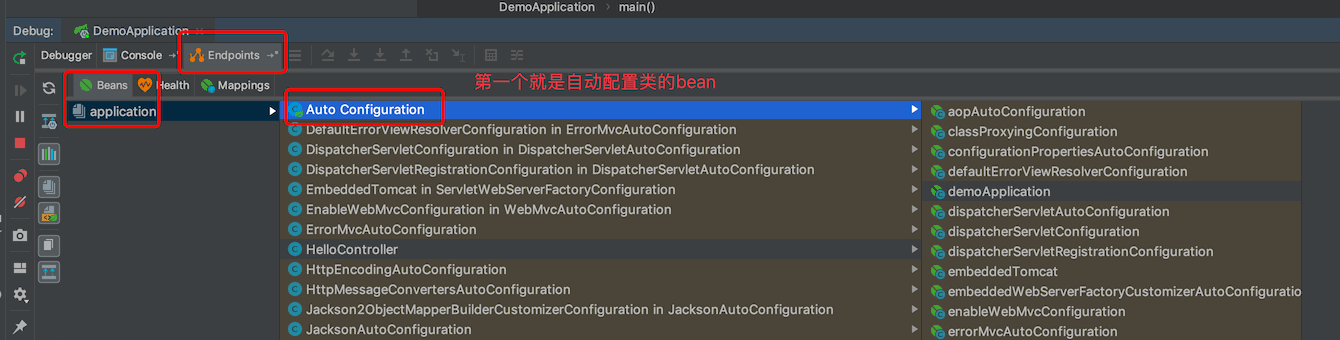
通过Debug模式,我们可以看到SpringbootApplication启动成功后,加载到Spring容器的所有bean
小结
此时我们已明白了:
1、搞懂了启动器(导入需要的场景依赖,并且管理好版本)
2、启动类注解@SpringbootApplication明白了,启动加载的时候会从spring.factories读取配置,返回具体结果。
3、run方法的流程
还需要弄明白的:
1、spring.factories文件里面的配置到底是怎么样的
2、所有配置类那么多,怎么控制生效?
3、配置类和配置文件有什么关系?
下面会慢慢讲到,继续往下。
4. Yaml学习
YAML 是一种可读性非常高,与程序语言数据结构非常接近。同时具备丰富的表达能力和可扩展性,并且易于使用的数据标记语言。
YAML是 “YAML Ain’t a Markup Language”(YAML不是一种标记语言)的递归缩写。这么命名的方式,表示 YAML 强调的不是标记,而是数据本身。
基本语法规则(很接近 Python 的语法规则): 1.大小写敏感 2.使用缩进表示层级关系 3.不允许使用 TAB 键来缩进,只允许使用空格键来缩进 4.缩进的空格数量不重要 5.使用”#”来表示注释
基础语法
springboot的默认全局配置文件
-
application.properties
语法:key = value // 单一
-
application.yaml // 大小写严格,数据类型支持多,符合程序员的审美
语法:key:[空格]value ,注意value前有空格;
以空格的缩进来控制层级关系,只要是左对齐的一列数据,都是同一个层级的;
值的驼峰写法和用“-”隔开是一样的值,如:lastName 和 last-name 都是可以的;
全局配置文件的作用:修改Springboot自动配置的默认值
properties和yaml同时配置时,同一配置项的值properties的优先级大于yaml。
例子:
key/value
字符串说明:字符串默认不用加上单引号或者双引号,双引号转义字符生效,单引号转义字符失效。
如果key中存在特殊字符如:/、.、*等,我们可以使用”[]”进行转义
name: "hello\nworld"
#结果:
hello
world
name: 'hello\nworld'
#结果:
hello\nworld
对象 、map
student:
	name: coding
	age: 3
	happy: false
	testMap: {"[/api/**]": anon)
可以缩减为行内写法,跟json一样,注意空格
student: {name: coding,age: 3,happy: false}
数组、list
animals:
	- dog
	- cat
	- pig
同样也可以使用json格式的写法
animals: [dog,cat,pig]
注入配置文件测试
在application.yml中配置person的值
person:
  name: jude
  age: 3
  happy: false
  birthday: 2020/03/16
  books:
    - 码出高效
    - Java8学习笔记
    - Steve Jobs Legend
  dog: {name: 小虎,age: 1}
新建一个配置类
/**
 * @ConfigurationProperties的作用:
 * 1、绑定配置文件中的对象
 * 2、属性值一一对应,并且注入
 */
@Component
@ConfigurationProperties(prefix = "person")
@Data
public class Person {
	private String name;
	private Integer age;
	private Boolean happy;
	private Date birthday;
	private List<String> books;
	private Dog dog;
}
单元测试
@SpringBootTest
class DemoApplicationTests {
	@Autowired
	Person person;

	@Test
	public void contextLoads() {
		System.out.println(person);
	}
}
结果:

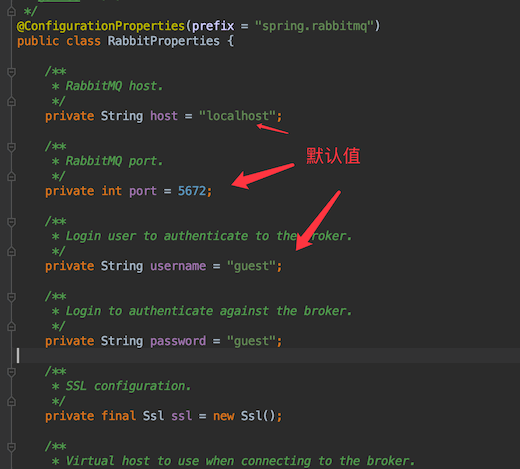
同理自动配置类也是通过@ConfigurationProperties前缀注入默认值的,如rabbitmq:
总结:
- application.yml配置属性结合xxxConfiguration配置类使用
扩展-使用@PropertySource注解注入配置值
-
@PropertySource + @Value (个人觉得麻烦,不推荐使用)
resource目录下,新建属性文件person.properties
name=huang
age=1
happy=false
配置类
@Component
@PropertySource(value="classpath:person.properties")
@Data
public class Person {
	@Value("name")
	private String name;
	@Value("age")
	private Integer age;
	@Value("happy")
	private Boolean happy;
}
测试,采用自动注入的方式,去获取值
-
@PropertySource + @ConfigurationProperties
可以使用yml的格式,yml也支持占位符
person:
  name: jude${random.uuid}
    age: ${random.int}
    happy: false
    birthday: 2020/03/16
    books:
    - 码出高效
    - Java8学习笔记
    - Steve Jobs Legend
    dog: {name: 小虎,age: 1}
配置类
@Component
@ConfigurationProperties(prefix = "person")
@PropertySource(value = "classpath:person.yml")
@Data
public class Person {
  @value("name")
	private String name;
  @value("age")
	private Integer age;
  @value("happy")
	private Boolean happy;
}
使用properties一定要注意乱码问题,勾选下图的选项去解决idea,设置Editor->File Encoding

注意
直接使用@Value注解从application.yml文件获取属性,假如配置以下属性
mybatis-plus:
  configuration:
    log-impl: org.apache.ibatis.logging.stdout.StdOutImpl
在配置类中获取
@Configuration
@AutoConfigureAfter(EnvironmentConfig.class)
public class MybatisPlusConfig {

  // 注意冒号:表示当没有配置对应属性时,变量logImpl为null,即默认值
   @Value("${mybatis-plus.configuration.log-impl:}")
   Class<? extends Log> logImpl;

  // 没有配置,则name=jacob
  @Value("{person.name:jacob}")
  String name;

   private SqlSessionFactory buildSqlSessionFactory(DataSource dataSource, String typeAliasesPackage, String mapperLocations, GlobalConfig globalConfig) throws Exception {
        MybatisSqlSessionFactoryBean sqlSessionFactory = new MybatisSqlSessionFactoryBean();
        sqlSessionFactory.setDataSource(dataSource);
        sqlSessionFactory.setMapperLocations(new PathMatchingResourcePatternResolver().getResources(mapperLocations));
        sqlSessionFactory.setTypeAliasesPackage(typeAliasesPackage);
        MybatisConfiguration configuration = new MybatisConfiguration();
        configuration.setJdbcTypeForNull(JdbcType.NULL);
        configuration.setMapUnderscoreToCamelCase(true);
        configuration.setCacheEnabled(false);
        //configuration.setLogImpl(org.apache.ibatis.logging.stdout.StdOutImpl.class);
        if (logImpl != null) {
            configuration.setLogImpl(logImpl);
        }
        sqlSessionFactory.setConfiguration(configuration);
        sqlSessionFactory.setPlugins(new Interceptor[]{
                paginationInterceptor
        });
        sqlSessionFactory.setGlobalConfig(globalConfig);
        return sqlSessionFactory.getObject();
    }
}
yaml的多环境配置
properties配置不同的环境需要多个文档,如application-dev.properties,application-test.properties application-prod.properties。
使用yaml 不需要多个配置文件,只需要多文档块server:
port: 9090
spring:
profiles:
active: prod # 激活prod环境
#使用 --- 分割文档块
---
server:
port: 9091
spring:
profiles: dev # 开发环境
---
server:
port: 9092
spring:
profiles: prod # 生产环境
如果yaml和properties都配置了,优先级是使用properties的。
JSR303数据校验
开启注解@Validated,依赖包是jakarta.validation-api,启动器spring-boot-starter-web已包含该依赖
@Validated
public class Person {
	@Email
	private String email;
	private List<String> books;
	private Dog dog;
}
常见参数:
@NotNull(message="名字不能为空")
@Max(value = 120,message="年龄最大不能超过120")
@Email
// 空检查
@Null
@NotNull
@NotBlank	检查约束字符串不是Null还有被trim后的长度是否大于0
@NotEmpty 检查约束元素是否为Null或者是Empty
// Boolean检查
@AssertTrue  验证Boolean对象是否为true
@AssertFalse 验证Boolean对象是否为false
// 长度检查
@Size(min=,max=) 验证对象(Array,Collection,Map,String)长度是否在别定范围内
@Length(min=,max=) 验证String字符串在[min,max]之间
// 日期检查
@Past 验证Date 和 Calendar 对象是否在当前时间之前
@Future 验证Date 和 Calendar 对象是否在当前时间之后
@Pattern 验证对象是否符合正表达式的规则
还可以自定义数据校验规则
如果不开启@Valiated 注解,可以配合@Valid注解在控制层按需是否校验实体类,即加了@Valid就校验,不加就不校验。
5. 自动配置原理
ConditionOn注解
回到上面的问题:从spring.factories加载配置类那么多,怎么控制生效?
通过@ConditionalOnXX 条件判断注解,判断这个配置类是否生效,我们点进其中一个的配置类源码分析一下

// 表示这是一个配置类
@Configuration(proxyBeanMethods = false)
// 绑定配置文件的封装属性类HttpProperties,如果配置文件有就使用配置文件的值,没有就使用HttpProperties里的默认值
@EnableConfigurationProperties(HttpProperties.class)
// @ConditionOnxxx spring底层注解
// 判断是否web应用
@ConditionalOnWebApplication(type = ConditionalOnWebApplication.Type.SERVLET)
// 判断是否存在类CharacterEncodingFilter,不存在,该配置类失效
@ConditionalOnClass(CharacterEncodingFilter.class)
// 判断是否有配置spring.http.encoding.enabled的值为true,如果false,该配置类失效,默认为true
@ConditionalOnProperty(prefix = "spring.http.encoding", value = "enabled", matchIfMissing = true)
public class HttpEncodingAutoConfiguration {
	// 注入绑定HttpProperties配置文件
	private final HttpProperties.Encoding properties;

	public HttpEncodingAutoConfiguration(HttpProperties properties) {
		this.properties = properties.getEncoding();
	}

  // 注入对应bean
  // 如果application.yml配置值,就会注入到SpringBoot自动配置的bean中
  // 注册bean的时候,springboot自动关联了HttpProperties
	@Bean
	@ConditionalOnMissingBean
	public CharacterEncodingFilter characterEncodingFilter() {
		CharacterEncodingFilter filter = new OrderedCharacterEncodingFilter();
		filter.setEncoding(this.properties.getCharset().name());
		filter.setForceRequestEncoding(this.properties.shouldForce(Type.REQUEST));
		filter.setForceResponseEncoding(this.properties.shouldForce(Type.RESPONSE));
		return filter;
	}

	@Bean
	public LocaleCharsetMappingsCustomizer localeCharsetMappingsCustomizer() {
		return new LocaleCharsetMappingsCustomizer(this.properties);
	}

	private static class LocaleCharsetMappingsCustomizer
			implements WebServerFactoryCustomizer<ConfigurableServletWebServerFactory>, Ordered {

		private final HttpProperties.Encoding properties;

		LocaleCharsetMappingsCustomizer(HttpProperties.Encoding properties) {
			this.properties = properties;
		}

		@Override
		public void customize(ConfigurableServletWebServerFactory factory) {
			if (this.properties.getMapping() != null) {
				factory.setLocaleCharsetMappings(this.properties.getMapping());
			}
		}

		@Override
		public int getOrder() {
			return 0;
		}
	}
}
认识@ConditionalXX扩展注解
| @Conditional注解 | 判断是否满足当前条件 |
|---|---|
| @ConditionalOnJava | 系统的java版本是否符合要求 |
| @ConditionalOnBean | 容器中存在指定Bean |
| @ConditionalOnMissingBean | 容器中不存在指定Bean |
| @ConditionalOnExpression | 满足指定的SpEl表达式 |
| @ConditionalOnClass | 系统中有指定的类 |
| @ConditionalOnMissingClass | 系统中没有指定的类 |
| @ConditionalOnProperty | 系统中指定的属性是否有指定的值 |
| @ConditionalOnResource | 类路径下是否存在指定资源文件 |
| @ConditionalOnWebApplication | 当前是否web环境 |
| @ConditionalOnNotWebApplication | 当前不是web环境 |
| @ConditionalOnJndi | JNDI存在指定项 |
总结
1、Springboot启动会从spring.factories加载大量的自动配置类(分析@SpringBootApplication注解可知)
2 、我们的配置文件能自动配置生效的原因
- xxxAutoConfiguration: spring.factories文件中的自动配置类,根据条件注解@ConditionalXX判断生效,如果生效成功注入bean
- xxxProperties: 封装配置文件中的相关属性类(可以有默认值),@EnableConfigurationProperties绑定配置文件属性类,@ConfigurationProperties前缀注入配置文件的属性值
3、spring容器中配置类属性的时候,通过xxxProperties类获取配置文件中的属性,如果没有就使用默认的,有就使用自动配置的
查看自动配置报告
我们怎么知道那些配置类加载成功了?
配置文件applicaton.yml修改debug为true
debug: true
启动后看控制台
Positive matches: # 匹配成功加载的类
-----------------

   AopAutoConfiguration matched:
      - @ConditionalOnProperty (spring.aop.auto=true) matched (OnPropertyCondition)

   AopAutoConfiguration.ClassProxyingConfiguration matched:
      - @ConditionalOnMissingClass did not find unwanted class 'org.aspectj.weaver.Advice' (OnClassCondition)
      - @ConditionalOnProperty (spring.aop.proxy-target-class=true) matched (OnPropertyCondition)
.....
Negative matches: # 没有匹配成功加载的类
-----------------
	ActiveMQAutoConfiguration:
      Did not match:
         - @ConditionalOnClass did not find required class 'javax.jms.ConnectionFactory' (OnClassCondition)

   AopAutoConfiguration.AspectJAutoProxyingConfiguration:
      Did not match:
         - @ConditionalOnClass did not find required class 'org.aspectj.weaver.Advice' (OnClassCondition)

Unconditional classes: # 没有条件的类
----------------------
org.springframework.boot.autoconfigure.context.ConfigurationPropertiesAutoConfiguration
整合组件套路
1、starter依赖
比如mybatis
<dependency>
  <groupId>org.mybatis.spring.boot</groupId>
  <artifactId>mybatis-spring-boot-starter</artifactId>
  <version>2.0.0</version>
</dependency
每一个 starter 基本都会有一个自动配置类,命名方式也是类似的,格式为: xxxAutoConfiguration ,比如Mybatis的自动配置类就是 MybatisAutoConfiguration ,Redis 的自动配置类是RedisAutoConfiguration ,WEB 模块的自动配置类WebMvcAutoConfiguration 。
2、注意@Conditionalxxx注解
自动配置生效的条件,比如 WebMvcAutoConfiguration 类上标了一个如下注解:
@ConditionalOnMissingBean(WebMvcConfigurationSupport.class)
以上这行代码的意思就是当前IOC容器中没有 WebMvcConfigurationSupport 这个类的实例时自动配置类才会生效,这也就是在配置类上标注 @EnableWebMvc 会导致自动配置类 WebMvcAutoConfiguration 失效的原因。
其次需要注意方法上的 @Conditionalxxx 注解,Spring Boot会在自动配置类中结合 @Bean 和 @Conditionalxxx 注解提供一些组件运行的默认配置,但是利用 @Conditionalxxx (在特定条件下生效)注解的 条件性 ,方便开发者覆盖这些配置。
比如在Mybatis的自动配置类 MybatisAutoConfiguration 中有如下一个方法:
@Bean
@ConditionalOnMissingBean
public SqlSessionFactory sqlSessionFactory(DataSource dataSource) throws Exception {}
表示当 SqlSessionFactory 类型的对象在 IOC容器 中不存在才会注入。
言外之意就是如果开发者需要定制 SqlSessionFactory ,则可以自己的创建一个SqlSessionFactory 类型的对象并且注入到IOC容器中即能覆盖自动配置类中的,比如在Mybatis配置多数据源的时候就需要定制一个 SqlSessionFactory 而不是使用自动配置类中的。
下面列出常用的condition注解:
-
@ConditionalOnBean :当容器中有指定Bean的条件下进行实例化。
-
@ConditionalOnMissingBean :当容器里没有指定Bean的条件下进行实例化。
-
@ConditionalOnClass :当classpath类路径下有指定类的条件下进行实例化。
-
@ConditionalOnMissingClass :当类路径下没有指定类的条件下进行实例化。
-
@ConditionalOnWebApplication :当项目是一个Web项目时进行实例化。
-
@ConditionalOnNotWebApplication :当项目不是一个Web项目时进行实例化。
-
@ConditionalOnProperty :当指定的属性有指定的值时进行实例化。
-
@ConditionalOnExpression :基于SpEL表达式的条件判断。
-
@ConditionalOnJava :当JVM版本为指定的版本范围时触发实例化。
-
@ConditionalOnResource :当类路径下有指定的资源时触发实例化。
-
@ConditionalOnJndi :在JNDI存在的条件下触发实例化。
-
@ConditionalOnSingleCandidate :当指定的Bean在容器中只有一个,或者有多个但是指定了首选的Bean时触发实例化。
3、 注意EnableConfigurationProperties注解
EnableConfigurationProperties 这个注解常标注在配置类上,使得 @ConfigurationProperties 标注的配置文件生效,这样就可以在全局配置文件( application.xxx )配置指定前缀的属性了,在Redis的自动配置类 RedisAutoConfiguration 上方标注如下一行代码:
@EnableConfigurationProperties(RedisProperties.class)
这行代码有意思了,我们可以看看 RedisProperties 的源码,如下
@ConfigurationProperties(prefix = "spring.redis")
public class RedisProperties {
  private int database = 0;
  private String url;
  private String host = "localhost";
  private String password;
@ConfigurationProperties 这个注解指定了全局配置文件中以 spring.redis.xxx 为前缀的配置都会映射到 RedisProperties 的指定属性中,其实 RedisProperties 这个类中定义了Redis的一些所需属性,比如host , IP地址 , 密码 等等。
@EnableConfigurationProperties 注解就是使得指定的配置生效,能够将全局配置文件中配置的属性映射到相关类的属性中。
4、注意Import注解
Spring 3.x 中就已经有的一个注解,大致的意思的就是快速导入一个Bean或者配置类到IOC容器中。这个注解有很多妙用,后续会单独写篇文章介绍下。
@Import 这个注解通常标注在自动配置类上方,并且一般都是导入一个或者多个配置类,因此如果自动配置类没有配置一些东西时,一定要看看 @Import 这个注解导入的配置类。
比如 RabbitMQ 的自动配置类 RabbitAutoConfiguration 上有如下一行代码:
@Import(RabbitAnnotationDrivenConfiguration.class)
这行代码的作用就是添加了 RabbitAnnotationDrivenConfiguration 这个配置类,使得Spring Boot在加载到自动配置类的时候能够一起加载。
5、注意@AutoConfigurexxx注解
@AutoConfigurexxx 这类注解决定了自动配置类的加载顺序,比如 AutoConfigureAfter (在指定自动配置类之后)、 AutoConfigureBefore (在指定自动配置类之前)、 AutoConfigureOrder (指定自动配置类的优先级)
为什么要注意顺序呢?因为某些组件往往之间是相互依赖的,比如 Mybatis 和 DataSource ,肯定要先将数据源相关的东西配置成功才能配置 Mybatis 吧。 @AutoConfigurexxx 这类注解正是解决了组件之间相互依赖的问题。
比如 MybatisAutoConfiguration 上方标注了如下一行代码:
@AutoConfigureAfter(DataSourceAutoConfiguration.class)
6、 注意内部静态配置类
有些自动配置类比较简单没那么多套路,比如 RedisAutoConfiguration 这个自动配置类中就定义了两个注入Bean的方法,其他的没了。
但是有些自动配置类就没那么单纯了,中间能嵌套 n 个静态配置类,比如 WebMvcAutoConfiguration ,类中还嵌套了 WebMvcAutoConfigurationAdapter 、 EnableWebMvcConfiguration 、ResourceChainCustomizerConfiguration 这三个配置类。如果你光看 WebMvcAutoConfiguration 这个自动配置类好像没配置什么,但是其内部却是大有乾坤啊。
6. 自定义启动器
参考官网,https://docs.spring.io/spring-boot/docs/2.2.5.RELEASE/reference/html/spring-boot-features.html#boot-features-custom-starter
A full Spring Boot starter for a library may contain the following components:
- The
autoconfiguremodule that contains the auto-configuration code.- The
startermodule that provides a dependency to theautoconfiguremodule as well as the library and any additional dependencies that are typically usefuThe
autoconfiguremodule contains everything that is necessary to get started with the libraryThe starter is really an empty jar. Its only purpose is to provide the necessary dependencies to work with the library.
启动器包含两个模块:autoconfigure module 和 starter module,其中 starter module是一个空jar,只是用来提供依赖包的。
步骤:
1、具体业务service
2、xxxProperties
3、xxxAutoConfiguration
4、将自动配置类xxxAutoConfiguration放到META-INF/spring.factories下
5、autoconfigure 模块 mvn install
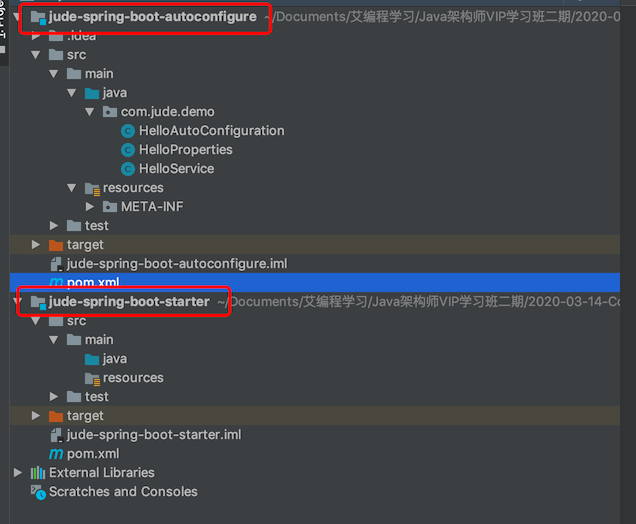
下面用idea来走一波 建一个空项目 spring-boot-starter-diy
![]()
给项目创建两个子模块:sarter模块与autoconfigure模块的maven项目,如下:
autoconfigure模块pom:
<parent>
		<groupId>org.springframework.boot</groupId>
		<artifactId>spring-boot-starter-parent</artifactId>
		<version>2.2.5.RELEASE</version>
		<relativePath/> <!-- lookup parent from repository -->
	</parent>
	<groupId>com.jude</groupId>
	<artifactId>jude-spring-boot-autoconfigure</artifactId>
	<version>0.0.1-SNAPSHOT</version>
	<name>jude-spring-boot-autoconfigure</name>
	<description>Demo project for Spring Boot自动配置类</description>

  <dependencies>
    <dependency>
      <groupId>org.springframework.boot</groupId>
      <artifactId>spring-boot-autoconfigure</artifactId>
    </dependency>
    <dependency>
      <groupId>org.springframework.boot</groupId>
      <artifactId>spring-boot-autoconfigure-processor</artifactId>
      <optional>true</optional>
    </dependency>
  </dependencies>
starter 模块pom:
<modelVersion>4.0.0</modelVersion>
	<groupId>com.jude</groupId>
	<artifactId>jude-spring-boot-starter</artifactId>
	<version>1.0-SNAPSHOT</version>

	<!--自己编写的启动器,需要导入自己编写的自动配置类-->
	<dependencies>
		<dependency>
			<groupId>com.jude</groupId>
			<artifactId>jude-spring-boot-autoconfigure</artifactId>
			<version>0.0.1-SNAPSHOT</version>
		</dependency>
	</dependencies>
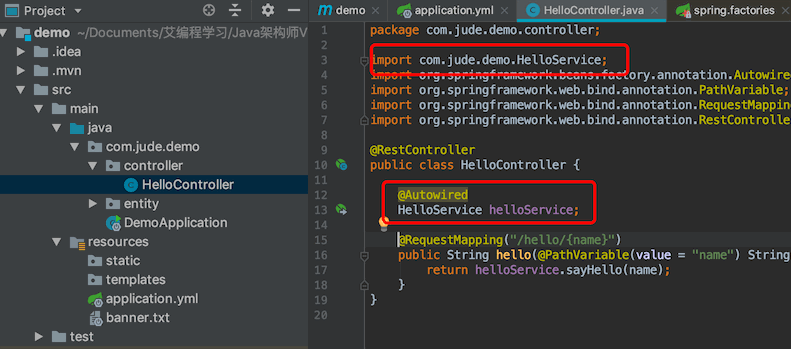
autoconfigure模块编写业务HelloService
public class HelloService {
	// 注入封装的配置属性类
	HelloProperties helloProperties;

	public HelloProperties getHelloProperties() {
		return helloProperties;
	}

	public void setHelloProperties(HelloProperties helloProperties) {
		this.helloProperties = helloProperties;
	}

	public String sayHello(String name){
		return helloProperties.getPrefix() + name + helloProperties.getSuffix();
	}
}
编写配置文件的属性类HelloProperties
// 关联配置文件
@ConfigurationProperties(prefix = "jude")
public class HelloProperties {
	private String prefix;
	private String suffix;

	public String getPrefix() {
		return prefix;
	}

	public void setPrefix(String prefix) {
		this.prefix = prefix;
	}

	public String getSuffix() {
		return suffix;
	}

	public void setSuffix(String suffix) {
		this.suffix = suffix;
	}
}
编写自动配置类
// 自动配置类
@Configuration(proxyBeanMethods = false)
@ConditionalOnWebApplication	// 条件是web应用才生效
@EnableConfigurationProperties(HelloProperties.class)
public class HelloAutoConfiguration {
	@Bean
	public HelloService helloService(HelloProperties helloProperties){
		HelloService helloService = new HelloService();
		helloService.setHelloProperties(helloProperties);
		return helloService;
	}
}
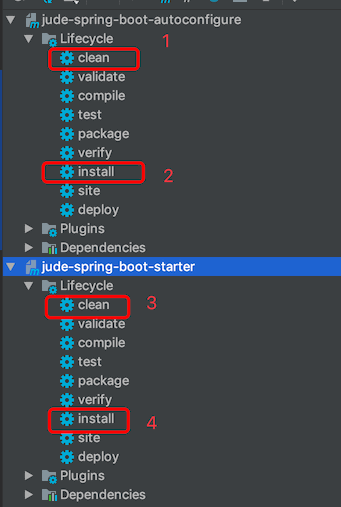
autoconfigure模块 和 starter 模块 mvn install
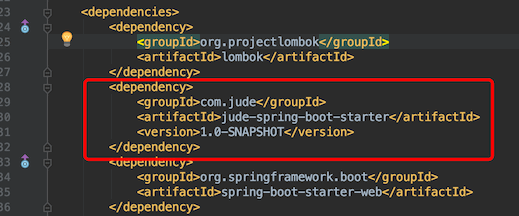
demo项目引入starter模块
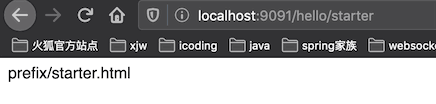
application.yml添加配置
jude:
  prefix: prefix/
  suffix: .html
浏览器访问 /hello/starter
7、SpringBoot面试题
1、什么是 Spring Boot?
Spring Boot 是 Spring 开源组织下的子项目,是 Spring 组件一站式解决方案,主要是简化了使用 Spring 的难度,简省了繁重的配置,提供了各种启动器xxxAutoconfiguration 和xxxProperties,开发者能快速上手。
2、为什么要用 Spring Boot?
简单记住springboot:
- 自动配置,上手容易
- springboot不是新东西,是spring的增强版
- 约定定大于配置
- 集成了市面上所有常用的依赖,而且帮你管理版本依赖
- 内置web容器,如tomcat,jetty,可以独立运行
3、Spring Boot 的核心配置文件有哪几个?它们的区别是什么?
Spring Boot 有两种配置文件:
- bootstrap (.yml 或者.properties)
- application (.yml 或者 .properties)
区别:
bootstrap 是应用程序的父上下文,也就是说 bootstrap 加载优先于 applicaton。bootstrap 主要用于从额外的资源来加载配置信息,还可以在本地外部配置文件中解密属性。这两个上下文共用一个环境,它是任何Spring应用程序的外部属性的来源。bootstrap 里面的属性会优先加载,它们默认也不能被本地相同配置覆盖。
应用场景:
-
application 配置文件这个容易理解,主要用于 Spring Boot 项目的自动化配置。 -
bootstrap 配置文件有以下几个应用场景。1)使用 Spring Cloud Config 配置中心时,这时需要在 bootstrap 配置文件中添加连接到配置中心的配置属性来加载外部配置中心的配置信息; 2)一些固定的不能被覆盖的属性; 3)一些加密/解密的场景;
4、Spring Boot 的配置文件有哪几种格式?它们有什么区别?
.properties 和 .yml,它们的区别主要是书写格式不同。
app.user.name = javastack
app:
	user:
		name: javastack
另外,.yml 格式不支持 @PropertySource 注解导入配置。
5、Spring Boot 的核心注解是哪个?它主要由哪几个注解组成的?
启动类上面的注解是@SpringBootApplication,它也是 Spring Boot 的核心注解,主要组合包含了以下 3 个注解:
-
@SpringBootConfiguration:组合了 @Configuration 注解,实现配置文件的功能。
-
@EnableAutoConfiguration:打开自动配置的功能,也可以关闭某个自动配置的选项,如关闭数据源自动配置功能:
@SpringBootApplication(exclude = { DataSourceAutoConfiguration.class }) -
@ComponentScan:Spring组件扫描,只会扫描同级与子级目录下的包,上级的包需要手动添加扫描
@ComponentScan(basePackages = {"com.jude.edu","com.jude.common"})
6、开启 Spring Boot 特性有哪几种方式?
1)继承spring-boot-starter-parent项目
2)导入spring-boot-dependencies项目依赖
7、Spring Boot 需要独立的容器运行吗?
可以不需要,内置了 Tomcat/ Jetty 等容器。需要的要手动排除spring-boot-starter-web依赖中的tomcat依赖的导入,才能正常启动应用
8、运行 Spring Boot 有哪几种方式?
1)打包用命令或者放到容器中运行
2)用 Maven/ Gradle 插件运行
3)直接执行 main 方法运行
9、Spring Boot 自动配置原理是什么?
正如上面文章中 初探原理的内容,简要总结如下:
启动类上@SpringBootApplication注解包含 @SpringBootConfiguration、@ComponentScan、@EnableAutoConfiguration 3个主要注解,它们就是SpringBoot自动配置的核心。
-
SpringBootConfiguration 它是一个配置类和一个组件,注入Bean到spring容器中
-
@ComponentScan 扫描Bean,相当于springmvc中的xml配置文件
-
@EnableAutoConfiguration 启动加载的时候调用
loadFactoryNames方法加载类路径及所有jar包下META-INF/spring.factories,返回具体结果的初始化参数、过滤器Filter、监听器Listener、映射的自动配置类路径信息放入缓存cache,后续创建自动配置的相关bean等初始化操作
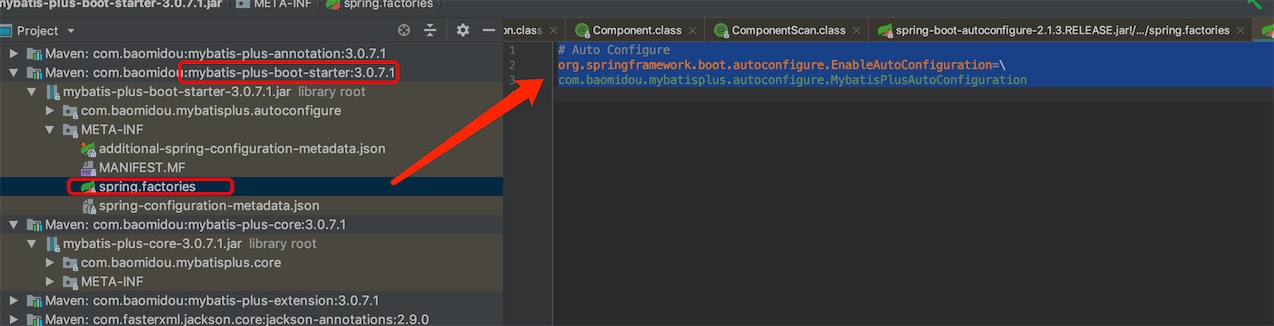
我们看看springboot 2.1.3 /META-INF/spring.factories文件
再来看看spring-boot-autoconfig 2.1.3 /META-INF/spring.factories文件
再来看看mybatis-plus-boot-starter 3.0.7下的/META-INF/spring.factories文件
我们来看看数据源自动配置类DatasourceAutoConfiguration
@Configuration
@ConditionalOnClass({ DataSource.class, EmbeddedDatabaseType.class })
@EnableConfigurationProperties(DataSourceProperties.class)
@Import({ DataSourcePoolMetadataProvidersConfiguration.class,
		DataSourceInitializationConfiguration.class })
public class DataSourceAutoConfiguration {

	@Configuration
	@Conditional(EmbeddedDatabaseCondition.class)
	@ConditionalOnMissingBean({ DataSource.class, XADataSource.class })
	@Import(EmbeddedDataSourceConfiguration.class)
	protected static class EmbeddedDatabaseConfiguration {

	}
  ....
}
通过@Import注解引入其它配置类,@ConditionOnClass条件注解,依赖于其它类的存在这个配置类才生效。
自定义一个自动配置类
第一步,添加配置类
    import org.slf4j.Logger;
    import org.springframework.context.EnvironmentAware;
    import org.springframework.core.env.Environment;
    import com.oceanpayment.common.utils.logger.LoggerUtils;

    public class EnvConfig implements EnvironmentAware {
        private final Logger logger = LoggerUtils.getLogger(this);
        private Environment env;

        public String getStringValue(String key) {
            return env.getProperty(key);
        }

        public Long getLongValue(String key) {
            String value = getStringValue(key);
            try {
                return Long.parseLong(value);
            } catch (Exception e) {
                logger.error("字符串转换Long失败:{} = {}", key, value);
            }
            return 0L;
        }

        public int getIntValue(String key) {
            return getLongValue(key).intValue();
        }

        @Override
        public void setEnvironment(Environment environment) {
            this.env = environment;
        }
    }
第二步,添加自动配置类
@Configuration
@ConditionalOnClass(PropertyResolver.class)
public class EnvAutoConfig {

    @Bean
    public EnvConfig envConfig() {
        return new EnvConfig();
    }
}
第三步,创建META-INF/spring.factories文件,添加自动配置映射
org.springframework.boot.autoconfigure.EnableAutoConfiguration=\
com.oceanpayment.common.config.env.EnvAutoConfig
这样就搞定了。
查看自动配置报告
项目启动了,怎么查看所有激活的和未激活的自动配置?
有下面5种方式:
- spring-boot:run运行的在对话框Enviroment中加入debug=true变量
- java -jar xx.jar –debug
- main方法运行,在VM Argumanets加入-Ddebug
- 直接在application文件中加入debug=true
- 如果集成了spring-boot-starter-actuator监控,通过autoconfig端点也可以查看。
启动后会在控制台看到以下自动配置报告信息:
========================
AUTO-CONFIGURATION REPORT
=========================
Positive matches:
-----------------
   AopAutoConfiguration matched:
      - @ConditionalOnClass found required classes 'org.springframework.context.annotation.EnableAspectJAutoProxy', 'org.aspectj.lang.annotation.Aspect', 'org.aspectj.lang.reflect.Advice'; @ConditionalOnMissingClass did not find unwanted class (OnClassCondition)
      - @ConditionalOnProperty (spring.aop.auto=true) matched (OnPropertyCondition)
   ...

   EnvAutoConfig matched:
      - @ConditionalOnClass found required class 'org.springframework.core.env.PropertyResolver'; @ConditionalOnMissingClass did not find unwanted class (OnClassCondition)
   ErrorMvcAutoConfiguration matched:
      - @ConditionalOnClass found required classes 'javax.servlet.Servlet', 'org.springframework.web.servlet.DispatcherServlet'; @ConditionalOnMissingClass did not find unwanted class (OnClassCondition)
      - @ConditionalOnWebApplication (required) found StandardServletEnvironment (OnWebApplicationCondition)

   ErrorMvcAutoConfiguration#basicErrorController matched:
      - @ConditionalOnMissingBean (types: org.springframework.boot.autoconfigure.web.ErrorController; SearchStrategy: current) did not find any beans (OnBeanCondition)
   ...

Negative matches:
-----------------
   ActiveMQAutoConfiguration:
      Did not match:
         - @ConditionalOnClass did not find required classes 'javax.jms.ConnectionFactory', 'org.apache.activemq.ActiveMQConnectionFactory' (OnClassCondition)

   AopAutoConfiguration.JdkDynamicAutoProxyConfiguration:
      Did not match:
         - @ConditionalOnProperty (spring.aop.proxy-target-class=false) found different value in property 'proxy-target-class' (OnPropertyCondition)

   ArtemisAutoConfiguration:
      Did not match:
         - @ConditionalOnClass did not find required classes 'javax.jms.ConnectionFactory', 'org.apache.activemq.artemis.jms.client.ActiveMQConnectionFactory' (OnClassCondition)

   BatchAutoConfiguration:
      Did not match:
         - @ConditionalOnClass did not find required class 'org.springframework.batch.core.launch.JobLauncher' (OnClassCondition)
   ...
Positive matches:已经启用的自动配置
Negative matches:未启用的自动配置
从报告中看到自己添加的EnvAutoConfig已经自动配置了。
11、你如何理解 Spring Boot 中的 Starters?
Starters可以理解为启动器,它包含了一系列可以集成到应用里面的依赖包,你可以一站式集成 Spring 及其他技术,而不需要到处找示例代码和依赖包。如你想使用 Spring JPA 访问数据库,只要加入 spring-boot-starter-data-jpa 启动器依赖就能使用了。
Starters包含了许多项目中需要用到的依赖,它们能快速持续的运行,都是一系列得到支持的管理传递性依赖。
Starts分类
-
应用类启动器
spring-boot-starter-web:使用Spring MVC构建web 工程,包含restful,默认使用Tomcat容器
-
生产启动器
spring-boot-starter-actuator:提供生产环境特性,能监控管理应用
-
技术类启动器
spring-boot-starter-logging: 默认的日志启动器,默认使用Logback
12、如何在 Spring Boot 启动的时候运行一些特定的代码?
可以实现接口 ApplicationRunner 或者 CommandLineRunner,这两个接口实现方式一样,它们都只提供了一个 run 方法,
import org.springframework.boot.*
import org.springframework.stereotype.*

@Component
 public class MyBean implements CommandLineRunner {
    public void run(String... args) {
      // Do something...
    }
  }
或者
@Bean
public CommandLineRunner init() {
  return (String... strings) -> {
    System.setProperty("name", "javastack-system-properties");
  };
}
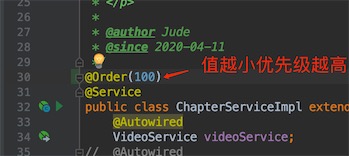
如果启动的时候有多个ApplicationRunner和CommandLineRunner,想控制它们的启动顺序,可以实现 org.springframework.core.Ordered接口或者使用 org.springframework.core.annotation.Order注解。
13、Spring Boot 有哪几种读取配置的方式?
Spring Boot 可以通过下面4种方式获取配置的变量
-
@PropertySource 指定配置文件
资源目录下建立config/db-config.properties:
db.username=root
db.password=123456
@Component @PropertySource(value = { "config/db-config.properties" }) public class DBConfig1 { @Value("${db.username}") private String username; @Value("${db.password}") private String password; public String getUsername() { return username; } public void setUsername(String username) { this.username = username; } public String getPassword() { return password; } public void setPassword(String password) { this.password = password; } } // 或者 @Component @ConfigurationProperties(prefix = "db") @PropertySource(value = { "config/db-config.properties" }) public class DBConfig2 { private String username; private String password; public String getUsername() { return username; } public void setUsername(String username) { this.username = username; } public String getPassword() { return password; } public void setPassword(String password) { this.password = password; } } -
@Value 从application.properties或application.yml文件中读取
@Component public class InfoConfig1 { // 冒号:后面表示默认值是北京, 冒号后面不指定值表示默认值是null @Value("${info.address:beijing}") private String address; @Value("${info.company}") private String company; @Value("${info.degree}") private String degree; public String getAddress() { return address; } public void setAddress(String address) { this.address = address; } public String getCompany() { return company; } public void setCompany(String company) { this.company = company; } public String getDegree() { return degree; } public void setDegree(String degree) { this.degree = degree; } } -
@Environment
-
@ConfigurationProperties(指定prefix从application.yml或者application.properties中读取)
@Component
@ConfigurationProperties(prefix = "info")
public class InfoConfig2 {
  private String address;
  private String company;
  private String degree;

  public String getAddress() {
    return address;
  }

  public void setAddress(String address) {
    this.address = address;
  }

  public String getCompany() {
    return company;
  }

  public void setCompany(String company) {
    this.company = company;
  }

  public String getDegree() {
    return degree;
  }

  public void setDegree(String degree) {
    this.degree = degree;
  }
14、Spring Boot 支持哪些日志框架?推荐和默认的日志框架是哪个?
Spring Boot 支持 Java Util Logging, Log4j2, Lockback 作为日志框架,如果你使用 Starters 启动器,Spring Boot 将使用 Logback 作为默认日志框架,pom.xml导入依赖spring-boot-starter-logging
application.properties配置日志参数:
既然默认自带了Logback框架,Logback也是最优秀的日志框架,往根资源目录下创建一个logback-spring.xml即可,下面是一个参考配置文件。
<?xml version="1.0" encoding="UTF-8"?>
<configuration debug="false">
    <springProperty scope="context" name="APP_NAME" source="spring.application.name"/>
    <springProperty scope="context" name="APP_PORT" source="server.port"/>
    <springProperty scope="context" name="DEFAULT_APP_PORT" source="spring.application.port"/>
    <property name="OS_NAME" value="${os.name}"/>

    <if condition='property("OS_NAME").contains("Windows")'>
        <then>
            <property name="LOG_PATH" value="${LOG_PATH:-E:/logs}" />
        </then>
        <else>
            <property name="LOG_PATH" value="${LOG_PATH:-/log}" />
        </else>
    </if>

    <property name="LOG_DIR" value="${APP_NAME:-system}" />
    <property name="APP_PORT" value="${APP_PORT:-${DEFAULT_APP_PORT:-0}}" />
    <if condition='!property("APP_PORT").equals("0")'>
        <then>
            <property name="LOG_DIR" value="${LOG_DIR}-${APP_PORT}" />
        </then>
    </if>

    <!-- 控制台输出 -->
    <appender name="STDOUT" class="ch.qos.logback.core.ConsoleAppender">
        <encoder class="ch.qos.logback.classic.encoder.PatternLayoutEncoder">
            <!--格式化输出:%d表示日期,%thread表示线程名,%-5level:级别从左显示5个字符宽度,%msg:日志消息,%n是换行符 -->
            <pattern>%d{yyyy-MM-dd HH:mm:ss.SSS} [%thread] %-5level %logger{50} - %msg%n</pattern>
        </encoder>
    </appender>

    <!-- 按照每天生成日志文件 -->
    <appender name="FILE" class="ch.qos.logback.core.rolling.RollingFileAppender">
        <filter class="ch.qos.logback.classic.filter.ThresholdFilter">
            <level>INFO</level>
        </filter>

        <rollingPolicy class="ch.qos.logback.core.rolling.TimeBasedRollingPolicy">
            <!--日志文件输出的文件名 -->
            <FileNamePattern>${LOG_PATH}/${LOG_DIR}/info.log.%d{yyyy-MM-dd}.log</FileNamePattern>
            <!--日志文件保留天数 -->
            <MaxHistory>30</MaxHistory>
        </rollingPolicy>

        <encoder class="ch.qos.logback.classic.encoder.PatternLayoutEncoder">
            <!--格式化输出:%d表示日期,%thread表示线程名,%-5level:级别从左显示5个字符宽度%msg:日志消息,%n是换行符 -->
            <pattern>%d{yyyy-MM-dd HH:mm:ss.SSS} [%thread] %-5level %logger{50} - %msg%n</pattern>
        </encoder>

        <!--日志文件最大的大小 -->
        <triggeringPolicy class="ch.qos.logback.core.rolling.SizeBasedTriggeringPolicy">
            <MaxFileSize>10MB</MaxFileSize>
        </triggeringPolicy>
    </appender>

    <!-- 按照每天生成日志文件 error级别 -->
    <appender name="FILE-ERROR" class="ch.qos.logback.core.rolling.RollingFileAppender">
        <filter class="ch.qos.logback.classic.filter.LevelFilter">
            <level>ERROR</level>
            <onMatch>ACCEPT</onMatch>
            <onMismatch>DENY</onMismatch>
        </filter>

        <rollingPolicy class="ch.qos.logback.core.rolling.TimeBasedRollingPolicy">
            <!--日志文件输出的文件名 -->
            <FileNamePattern>${LOG_PATH}/${LOG_DIR}/error.log.%d{yyyy-MM-dd}.log</FileNamePattern>

            <!--日志文件保留天数 -->
            <MaxHistory>30</MaxHistory>
        </rollingPolicy>

        <encoder class="ch.qos.logback.classic.encoder.PatternLayoutEncoder">
            <!--格式化输出:%d表示日期,%thread表示线程名,%-5level:级别从左显示5个字符宽度%msg:日志消息,%n是换行符 -->
            <pattern>%d{yyyy-MM-dd HH:mm:ss.SSS} [%thread] %-5level %logger{50} - %msg%n</pattern>
        </encoder>

        <!--日志文件最大的大小 -->
        <triggeringPolicy class="ch.qos.logback.core.rolling.SizeBasedTriggeringPolicy">
            <MaxFileSize>10MB</MaxFileSize>
        </triggeringPolicy>
    </appender>

    <!--myibatis log configure -->
    <logger name="com.apache.ibatis" level="TRACE" />
    <logger name="java.sql.Connection" level="DEBUG" />
    <logger name="java.sql.Statement" level="DEBUG" />
    <logger name="java.sql.PreparedStatement" level="DEBUG" />

    <!-- 日志输出级别 -->
    <root level="INFO">
        <appender-ref ref="STDOUT" />
        <appender-ref ref="FILE" />
        <appender-ref ref="FILE-ERROR" />
    </root>
</configuration>
强烈推荐使用logback-spring.xml作为文件名,因为logback.xml加载太早。日志初始化在ApplicationContext创建之前,所以@PropertySources加载的配置是读取不到的,系统环境变量、Spring Environment及application,bootstrap配置文件中的信息可以读取到。
Spring Boot也支持通过springProfile来加载不同profiles下的配置
    <springProfile name="staging">
        <!-- configuration to be enabled when the "staging" profile is active -->
    </springProfile>

    <springProfile name="dev, staging">
        <!-- configuration to be enabled when the "dev" or "staging" profiles are active -->
    </springProfile>

    <springProfile name="!production">
        <!-- configuration to be enabled when the "production" profile is not active -->
    </springProfile>
@Slf4j 注解是lombok.extern.slf4j.Slf4j 的扩展注解,在任意类上添加注解@Slf4j,就可以在本类中任意方法内打印日志了
@Slf4j
@RestController(value = "/test")
public class TestController {
    @RequestMapping(value = "/testPrint",method = RequestMethod.GET)
    public String testPrint(){
        log.debug("可以直接调用log打印日志了");
        return "testPrint";
    }
}
15、SpringBoot 实现热部署有哪几种方式?
devtools依赖方式: 第一步 pom.xml 导入spring-boot-devtools依赖
<dependency>
  <groupId>org.springframework.boot</groupId>
  <artifactId>spring-boot-devtools</artifactId>
</dependency>
<plugin>
  <!--热部署配置-->
  <groupId>org.springframework.boot</groupId>
  <artifactId>spring-boot-maven-plugin</artifactId>
  <configuration>
    <!--fork:如果没有该项配置,整个devtools不会起作用-->
    <fork>true</fork>
  </configuration>
</plugin>
记得刷新依赖
第二步idea 修改:File > Settings > Compiler-Build Project automaticallyFile

接着要注册,快捷键 ctrl + shift + alt + /,选择Registry,勾上 Compiler autoMake allow when app running


这样我们的热部署就完成了,可以再我们的项目中修改返回值,或者修改Mapping的value值后,在我们的页面中刷新试试。
1、生产环境devtools将被禁用,如java -jar方式或者自定义的类加载器等都会识别为生产环境。
2、打包应用默认不会包含devtools,除非你禁用SpringBoot Maven插件的 excludeDevtools属性。
3、devtools会在windows资源管理器占用java进程,在开发工具里面杀不掉,只能手动kill掉,不然重启会选成端口重复绑定报错。
16、如何理解 Spring Boot 配置加载顺序?
在 Spring Boot 里面,可以使用以下几种方式来加载配置。
1)properties文件;
2)YAML文件;
3)系统环境变量;
4)命令行参数;
配置属性加载的顺序如下:
1、开发者工具 `Devtools` 全局配置参数;
2、单元测试上的 `@TestPropertySource` 注解指定的参数;
3、单元测试上的 `@SpringBootTest` 注解指定的参数;
4、命令行指定的参数,如 `java -jar springboot.jar --name="Java技术栈"`;
5、命令行中的 `SPRING_APPLICATION_JSONJSON` 指定参数, 如 `java -Dspring.application.json='{"name":"Java技术栈"}' -jar springboot.jar`

6、`ServletConfig` 初始化参数;
7、`ServletContext` 初始化参数;
8、JNDI参数(如 `java:comp/env/spring.application.json`);
9、Java系统参数(来源:`System.getProperties()`);
10、操作系统环境变量参数;

11、`RandomValuePropertySource` 随机数,仅匹配:`ramdom.*`;
12、JAR包外面的配置文件参数(`application-{profile}.properties(YAML)`)
13、JAR包里面的配置文件参数(`application-{profile}.properties(YAML)`)
14、JAR包外面的配置文件参数(`application.properties(YAML)`)
15、JAR包里面的配置文件参数(`application.properties(YAML)`)

16、`@Configuration`配置文件上 `@PropertySource` 注解加载的参数;
17、默认参数(通过 `SpringApplication.setDefaultProperties` 指定);
数字小的优先级越高,即数字小的会覆盖数字大的参数值。我们来实践下,验证以上配置参数的加载顺序。
在主应用程序中添加Java系统参数
@Bean
public CommandLineRunner commandLineRunner() {
    return (args) -> {
        System.setProperty("name", "javastack-system-properties");
    };
}
在 application.properties 文件中添加属性。
name = javastack-application
在 application-dev.properties 文件中添加属性。
name = javastack-application-dev
添加测试类
@RunWith(SpringRunner.class)
@SpringBootTest(value = { "name=javastack-test", "sex=1" })
@ActiveProfiles("dev")
public class SpringBootBestPracticeApplicationTests {
    @Value("${name}")
    private String name;

    @Test
    public void test() {
        System.out.println("name is " + name);
    }
}
运行 test 单元测试,程序输出:
name is javastack-test
现参数会被正确被覆盖。了解了 Spring Boot 各种配置的加载顺序,如果配置被覆盖了我们就知道是什么问题了。
17、Spring Boot 如何定义多套不同环境配置?
提供多套配置文件,如:
applcation.properties
application-dev.properties
application-test.properties
application-prod.properties
运行时指定具体的配置文件
spring:
  profiles:
    active: dev
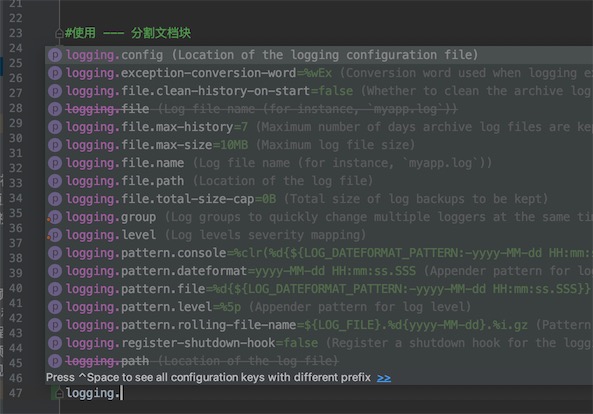
如果使用application.yml配置的话,用 — 分割文档块的方式实现多环境配置也是可以的
    spring:
      profiles:
        active: prod

    ---
    spring:
      profiles: dev
    server:
      port: 8080

    ---
    spring:
      profiles: test
    server:
      port: 8081

    ---
    spring.profiles: prod
    spring.profiles.include:
      - proddb
      - prodmq
    server:
      port: 8082

    ---
    spring:
      profiles: proddb
    db:
      name: mysql

    ---
    spring:
      profiles: prodmq
    mq:
      address: localhost
此时读取的就是prod的配置,prod包含proddb,prodmq
基于Java代码
在JAVA配置代码中也可以加不同Profile下定义不同的配置文件,@Profile注解只能组合使用@Configuration和@Component注解。
@Configuration
@Profile("prod")
public class ProductionConfiguration {
  // ...
}
指定Profile
main方法启动方式:
// 在Eclipse Arguments里面添加
--spring.profiles.active=prod
插件启动方式:
spring-boot:run -Drun.profiles=prod
jar运行方式:
java -jar xx.jar --spring.profiles.active=prod
除了在配置文件和命令行中指定Profile,还可以在启动类中写死指定,通过SpringApplication.setAdditionalProfiles方法。
SpringApplication.class
public void setAdditionalProfiles(String... profiles) { this.additionalProfiles = new LinkedHashSet<String>(Arrays.asList(profiles));}
18、Spring Boot 可以兼容老 Spring 项目吗,如何做?
可以兼容,使用 @ImportResource 注解导入老 Spring 项目配置文件。在Allen老师的源码分析课上也有讲到,Spring团队在做SpringBoot的时候也考虑到兼容性,真好
19、保护 Spring Boot 应用有哪些方法?
-
在生产中使用HTTPS
要在Spring Boot应用程序中强制使用HTTPS,您可以扩展WebSecurityConfigurerAdapter并要求安全连接。
@Configuration public class WebSecurityConfigurerAdapter extends WebSecurityConfigurerAdapter { @Override protected void configure(HttpSecurity http) throws Exception { http.requiresChannel().requiresSecure(); } } -
使用Snyk检查你的依赖关系
-
升级到最新版本
定期升级应用程序中的依赖项有多种原因。安全性是让您有升级动力的最重要原因之一
-
启用CSRF保护
跨站点请求伪造(Cross-Site Request Forgery )是一种攻击,强制用户在他们当前登录的应用程序中执行不需要的操作
-
使用内容安全策略防止XSS攻击
内容安全策略(CSP)是一个增加的安全层,可帮助缓解XSS(跨站点脚本)和数据注入攻击。要启用它,你需要配置应用程序以返回Content-Security-Policy标题。你还可以在HTML页面中
<meta http-equiv="Content-Security-Policy">使用标记。Spring Security * 默认情况下不添加 CSP。你可以使用以下配置在Spring Boot应用程序中启用CSP标头
@EnableWebSecurity public class WebSecurityConfig extends WebSecurityConfigurerAdapter { @Override protected void configure(HttpSecurity http) throws Exception { http.headers() .contentSecurityPolicy("script-src 'self' https://trustedscripts.example.com; object-src https://trustedplugins.example.com; report-uri /csp-report-endpoint/"); } } -
使用OpenID Connect进行身份验证
OpenID Connect(OIDC)是一个OAuth 2.0扩展,提供用户信息,除了访问令牌之外,它还添加了ID令牌,以及/userinfo可以从中获取其他信息的端点,它还添加了发现功能和动态客户端注册的端点。
要了解如何在Spring Boot应用程序中使用OIDC,请参阅Spring Security 5.0和OIDC入门。要总结如何使用它,你需要向项目添加一些依赖项,然后在application.yml文件中配置一些属性。
spring: security: oauth2: client: registration: okta: client-id: {clientId} client-secret: {clientSecret} scope: openid email profile provider: okta: issuer-uri: https://{yourOktaDomain}/oauth2/default -
使用OWASP的ZAP测试您的应用程序
OWASP ZAP安全工具是针对在运行活动的应用程序进行渗透测试的代理。它是一个受欢迎的(超过4k星)免费的开源项目,托管在GitHub上。 OWASP ZAP用于查找漏洞的两种方法是Spider和Active Scan。 Spider工具以URL种子开头,它将访问并解析每个响应,识别超链接并将它们添加到列表中。然后,它将访问这些新找到的URL并以递归方式继续,为您的Web应用程序创建URL映射。 Active Scan工具将根据潜在漏洞列表自动测试你选择的目标。它提供了一个报告,显示Web应用程序可被利用的位置以及有关漏洞的详细信息。
20、Spring Boot 2.X 有什么新特性?与 1.X 有什么区别?
- 配置变更
- JDK 版本升级,至少1.8
- 第三方类库升级
- 响应式 Spring 编程支持
- HTTP/2 支持
- 配置属性绑定
8、Spring三大框架
要点
Spring Framework核心技术底层原理详解
1、SpringIOC之Bean生命周期重点步骤详解
2、SpringIOC之依赖自动注入六层筛选源码剖析
3、SpringAOP之核心底层原理深入剖析
4、SpringAOP之事务核心底层原理深度剖析
5、Spring容器之BeanFactory架构设计剖析
6、Spring容器之ApplicationContex架构设计剖析
7、Spring扩展之与第三方框架整合的底层工作原理
Spring Boot技术难点源码深入剖析
1、@Configuration注解的底层核心原理深度解析
2、@Bean注解的底层核心原理深度解析
3、三级缓存解决循环依赖底层源码深度剖析
4、Spring Boot之BeanPostProcessor设计思想分析
5、Spring Boot之推断构造方法核心原理深度分析
6、Spring Boot之启动原理核心源码深度剖析
7、Spring Boot之自动配置核心源码深度剖析
8、Spring Boot之设计模式应用源码级别分析
Spring Cloud Alibaba三高架构
1、亿级流量电商网站微服务架构详解
2、Nacos注册中心实现电商微服务拆分实战
3、Nacos如何支撑双十一上百万服务实例的访问
4、Sentinel如何抗住阿里近十年双十一流量洪峰
5、Sentinel底层如何计算双十一线上系统实时QPS
6、阿里微服务分布式事务控制Seata实战
7、统一路由&大促限流&安全认证网关Gateway实战
8、双十一线上服务调用链路追踪Pinpoint详解
9、微服务自动化监控Prometheus&Grafana详解
10、阿里京东双十一后端微服务中台架构剖析
Spring Cloud Alibaba三高架构组件源码深度剖析
1、Nacos服务注册与发现源码深度剖析
2、Nacos心跳机制与服务健康检查源码剖析
3、Nacos注册表如何防止多节点读写并发冲突
4、Nacos高并发支撑异步任务与内存队列剖析
5、Nacos集群CP架构底层Raft协议实现源码剖析
6、从脑裂问题剖析Nacos&Eureka&Zookeeper架构异同
7、阿里云超大规模注册中心SaaS架构剖析
8、Sentinel底层滑动时间窗限流算法深度剖析
9、利用Sentinel的Metric机制计算线上系统实时QPS
10、Seata分布式事务回滚机制剖析
学习路线


