 弹吉他的兔子
开发网站 = 数据库操作 + web操作 + 模版引擎展示页面(后端 thymleaf [taɪm lif]+ 前端 vue )
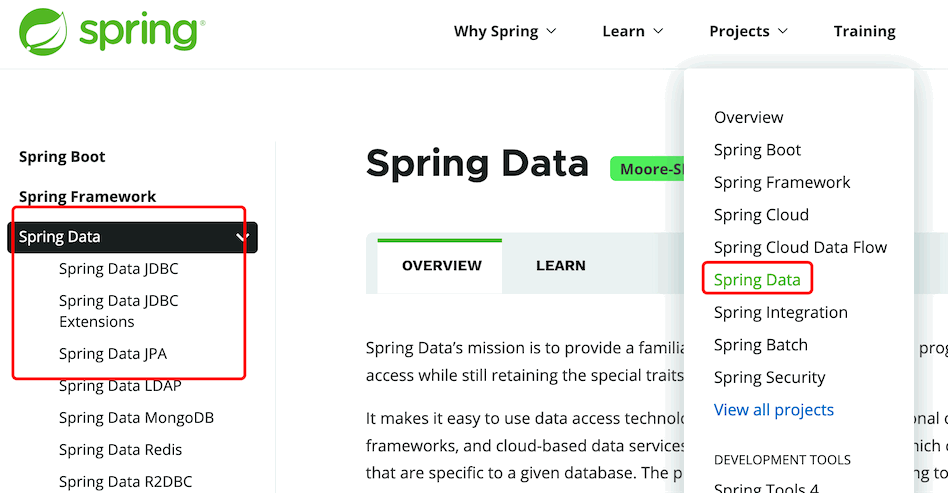
1、SpringData简介
数据库操作我们来学习SpringData,无论是使用SQL、NoSQL(NOT ONLY SQL),在数据库操作底层都是使用SpringData来封装的,它是与SpringBoot、SpringCloud齐名的项目。
官网地址:https://spring.io/projects/spring-data
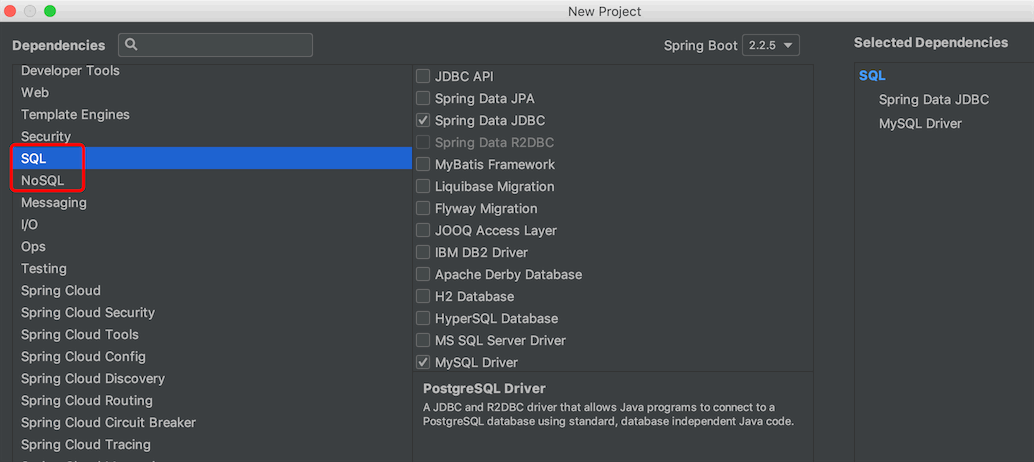
使用IDEA构建项目,选择SQL和NoSQL,可以看到SpringData支持的数据库封装模块
SpringData 封装大量的xxTemplate供我们直接操作数据库,十分方便,简化了企业开发。
2、集成JDBC
1.导入依赖
<!--点进去,依赖HikariCP 作为默认数据源 -->
<dependency>
  <groupId>org.springframework.boot</groupId>
  <artifactId>spring-boot-starter-jdbc</artifactId>
</dependency>
<!--默认版本8.0, 连接数据库url需要配置时区-->
<dependency>
  <groupId>mysql</groupId>
  <artifactId>mysql-connector-java</artifactId>
  <scope>runtime</scope>
</dependency>
2.配置application.yml
spring:
  datasource:
    username: root
    password: mysql8013
    # 注意8.0以上需要时区的配置
    url: jdbc:mysql://localhost:3306/spring_data_study?serverTimezone=GMT%2B8&useUnicode=true&characterEncoding=utf-8
    driver-class-name: com.mysql.cj.jdbc.Driver
使用idea支持多种数据库的客户端连接,
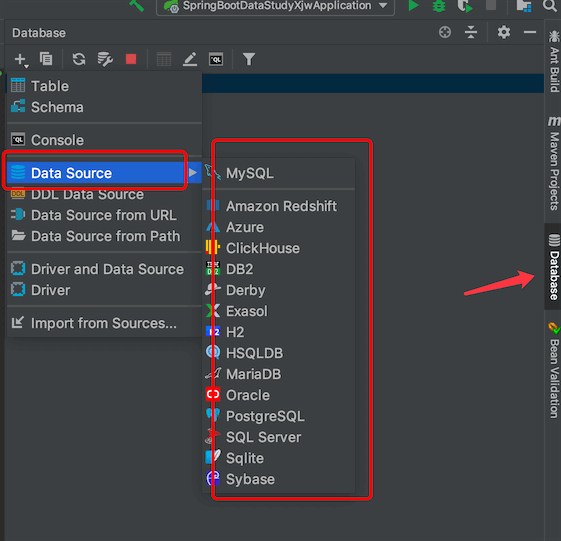
连接数据库时如果idea没对应数据库的驱动,它会提示下载的

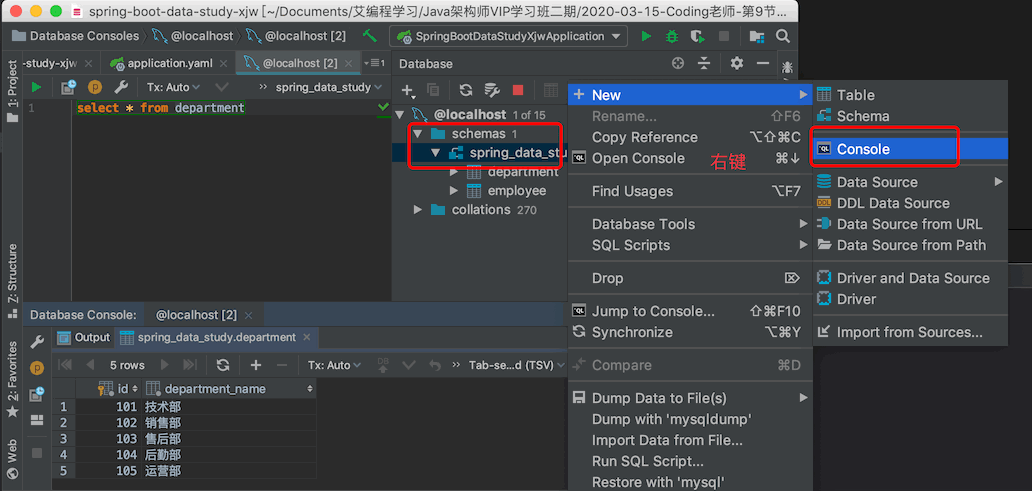
连接mysql,查询表数据
3.测试链接
在测试类里,我们Autowired(自动装配)引入datasource bean
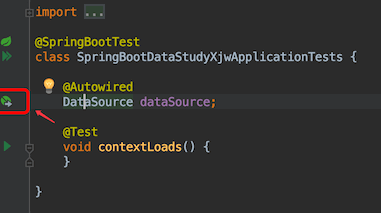
点击上图中的图标,它能帮我们导向自动装配的依赖包,发现是DataSourceConfiguration.class注入bean的,下载它的源码,
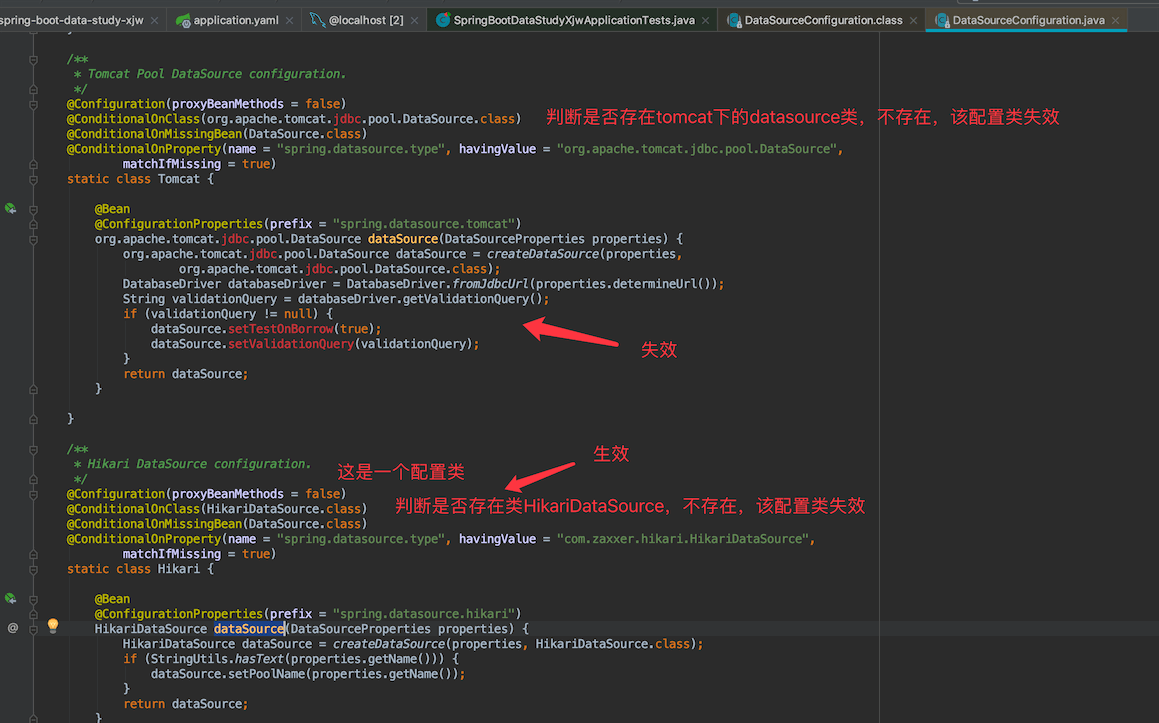
你会发现除了Hikari DataSource configuration 外,其它都是红色的因为缺失依赖类没生效,我们导入的依赖包spring-boot-starter-jdbc里面有hikari的依赖包,所以Hikari DataSource configuration生效,成为默认的数据源,

再深入一点,DataSourceConfiguration.class其实一个抽象类,它是在哪里被继承或者调用的?在idea 选择DataSourceConfiguration.class,mac系统按option+F7,window系统按alt+F7,控制台会显示它哪里被引用了
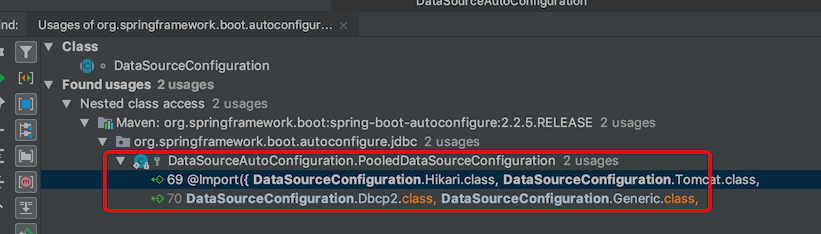
发现是DataSourceAutoConfiguration的内部类PooledDataSourceConfiguration,点进去,
是我们熟悉的自动配置类,PooledDataSourceConfiguration 在springboot启动时引入Hikari,Tomcat,Dbcp2等数据源
测试类:
@Autowired
DataSource dataSource;
@Test
void contextLoads() throws SQLException {
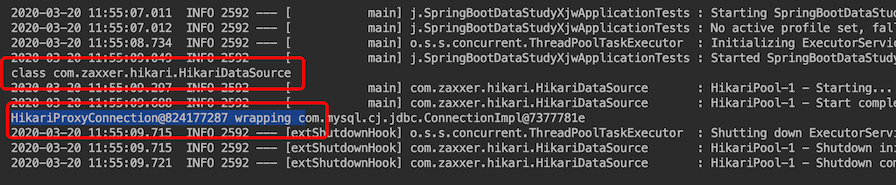
// 查看数据源 class com.zaxxer.hikari.HikariDataSource
System.out.println(dataSource.getClass());
// 连接数据库
Connection connection = dataSource.getConnection();
System.out.println(connection);
// 断开连接
connection.close();
}
结果:
小结
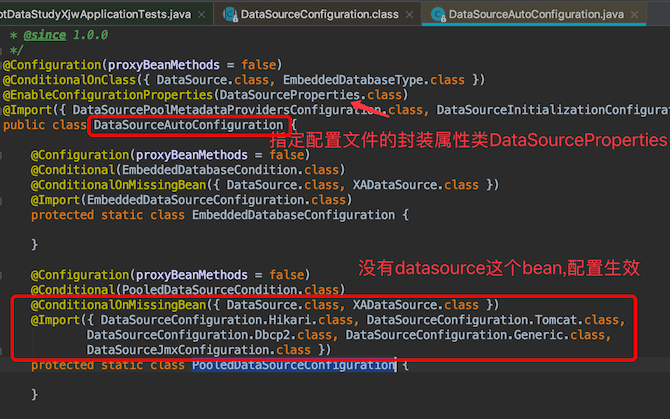
spring在连接数据库,我们发现三个自动配置的核心类
DataSourceConfiguration 自动配置的数据源
DataSourceAutoConfiguration 自动配置类
DataSourceProperties 配置文件绑定
4.测试CRUD
使用JdbcTemplate
@RestController
public class JdbcController {
  // jdbcTemplate 会自动帮我们配置完需要的环境,拿来即用
	@Autowired
	JdbcTemplate jdbcTemplate;

	@GetMapping("/list")
	public List<Map<String,Object>> listEmployees(){
		// 耦合性太强,不支持实体类字段名驼峰规则
		String sql ="select * from employee";
		return jdbcTemplate.queryForList(sql);
	}

	// jdbcTemplate 自动帮我们处理了事物
	@GetMapping("/save")
	public String save(){
		String sql = "insert into employee(last_name, email, gender, department, department_name, birth)\n" +
				"value ('jude','74678309@qq.com',1,101,'技术部','"+new Date().toLocaleString()+"')";
		jdbcTemplate.update(sql);
		return "ok";
	}

	// jdbcTemplate 自动帮我们处理了事物
	@GetMapping("/update/{id}")
	public String update(@PathVariable("id") String id){
		String sql = "update employee set last_name =?,email=? where id="+id;
		Object[] params = new Object[2];
		params[0] = "大伟";
		params[1] = "1234567@qq.com";
		jdbcTemplate.update(sql,params);

		return "ok";
	}

	@GetMapping("/delete/{id}")
	public String delete(@PathVariable("id") String id){
		String sql = "delete from employee where id = ?";
		jdbcTemplate.update(sql,id);
		return "ok";
	}
}
3、集成Druid(德鲁伊)
简介
Java程序很大的一部分工作都是要操作数据库的,为了提高操作性能,一般都会使用连接池。Druid就是一个不错的选择,它是阿里巴巴的开源组件之一,集合了C3P0,DBCP的优点,并且自带日志监控,它可以天然的监控SQL和数据库连接池的状况
Druid 是一个用 Java 编写的面向列的开源分布式数据存储。 Druid 被设计来快速摄取大量事实数据,并在数据之上提供低延迟查询。Druid 这个名字来自于许多角色扮演游戏中的变形德鲁伊类角色,以反映系统架构可以迁移到解决不同类型的数据问题的特性。 Druid 通常用于商业智能 / OLAP 应用程序,以分析大量的实时和历史数据。
任何池化技术,道理都是相通的,配置参数达到更高的性能,可以对比之前学习的线程池
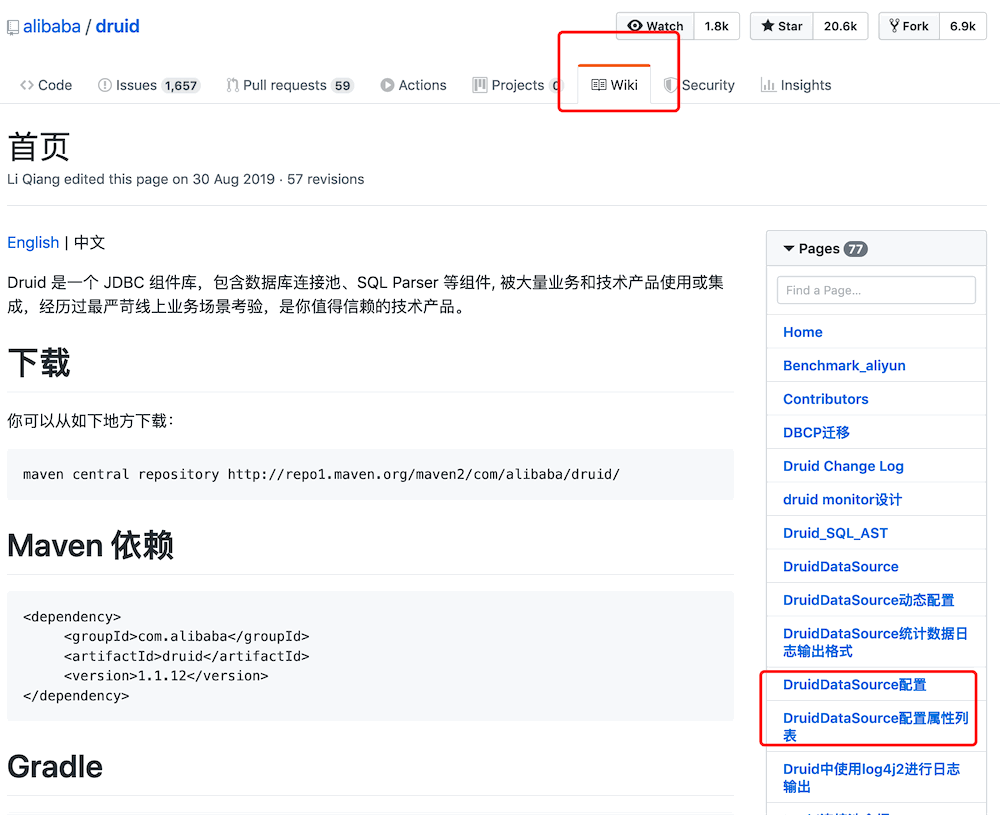
在Github查看druid的常用配置参数,地址:https://github.com/alibaba/druid/wiki
通用配置
 <bean id="dataSource" class="com.alibaba.druid.pool.DruidDataSource" init-method="init" destroy-method="close">
    <!-- 基本属性 url、user、password -->
   <property name="url" value="${jdbc_url}" />
     <property name="username" value="${jdbc_user}" />
     <property name="password" value="${jdbc_password}" />

   <!-- 配置监控统计拦截的filters -->
     <property name="filters" value="stat" />

   <!-- 配置初始化大小、最小、最大 ,获取连接等待超时的时间-->
     <property name="initialSize" value="1" />
    	<property name="minIdle" value="1" />
   	 <property name="maxActive" value="20" />
     <property name="maxWait" value="60000" />

 <!-- 配置间隔多久才进行一次检测,检测需要关闭的空闲连接,单位是毫秒 -->
     <property name="timeBetweenEvictionRunsMillis" value="60000" />
  <!-- 连接保持空闲而不被驱逐的最小时间 -->
     <property name="minEvictableIdleTimeMillis" value="300000" />

  <!-- 用来检测连接是否有效的sql-->
   	<property name="validationQuery" value="select 1" />
     <property name="testWhileIdle" value="true" />
     <property name="testOnBorrow" value="false" />
     <property name="testOnReturn" value="false" />

  <!--  是否缓存preparedStatement mysql建议关闭-->
     <property name="poolPreparedStatements" value="true" />
     <property name="maxOpenPreparedStatements" value="20" />
     <property name="asyncInit" value="true" />
 </bean>
1) 导入log4j,druid依赖
<dependency>
  <groupId>com.alibaba</groupId>
  <artifactId>druid</artifactId>
  <version>1.1.20</version>
</dependency>
<dependency>
  <groupId>log4j</groupId>
  <artifactId>log4j</artifactId>
  <version>1.2.17</version>
</dependency>
2) application.yaml配置数据源
spring:
 datasource:
  username: root
  password: mysql8013
  # 注意8.0以上需要时区的配置
  url: jdbc:mysql://localhost:3306/spring_data_study?	serverTimezone=GMT%2B8&useUnicode=true&characterEncoding=utf-8
  driver-class-name: com.mysql.cj.jdbc.Driver
 	type: com.alibaba.druid.pool.DruidDataSource
 	initialSize: 5
 	minIdle: 1
 	# 最大连接池数量
 	maxActive: 20
 	# 获取连接最大等待时间,单位毫秒
 	maxWait: 60000
 	timeBetweenEvictionRunsMillis: 60000
 	# 连接保持空闲而不被驱逐的最长时间,缺省30分钟
 	minEvictableIdleTimeMillis: 300000
 	validationQuery: select 1
 	# 申请连接时执行validationQuery检测连接是否有效,做了这个配置会降低性能,缺省false
	testOnBorrow: false
 	# 归还连接是执行validationQuery检测连接是否有效,做了这个配置会降低性能,缺省false
 	testOnReturn: false
 	# 申请连接的时候检测,如果空闲时间大于timeBetweenEvictionRunsMillis,执行validationQuery检测连接是否有效,缺省false,建议配置true,保证安全性
 	testWhileIdle: true
 	# 就是PSCache,PSCache对支持游标的数据库性能提升巨大,如oracle。mysql5.5以上版本才开始支持PSCache,建议开启。默认false
 	poolPreparedStatements: true
  # 当大于0时,poolPrepareStatements自动触发修改为true,
	maxOpenPreparedStatements: 100
 	maxPoolPreparedStatementPerConnectionSize: 20

 # 属性类型是字符串,通过别名的方式配置扩展插件,常用的插件有:
 # 监控统计用的filter:stat
 # 日志用的filter:log4j
 # 防御sql注入的filter:wal
 filters: stat,wall,log4j
 # 合并多个DruidDataSource的监控数据,多数据源做主从时使用
 useGlobalDataSourceStat: true
 connectionProperties: druid.stat.mergeSql=true;druid.stat.slowSqlMillis=500
解释:
-
timeBetweenEvictionRunsMillis:缺省1分钟,Destroy 线程会检测连接的间隔时间,如果连接空闲时间大于等于minEvictableIdleTimeMills则关闭物理连接;testWhileIdle的判断依据
-
maxPoolPreparedStatementPerConnectionSize:要启用PSCache,必须配置大于0,当大于0时,poolPrepareStatements自动触发修改为true,单个connection独享一个statement cache,所以maxOpenPreparedStatements是针对单个connection连接的。
连接池运行原理
-
初始化时创建 initialSize 个连接
-
有DB操作访问的时候,从里面取一个
-
如果当前使用的连接数=maxActive,就会进入等待,等待超过maxWait则会报错;没有到maxActive获取一个空闲连接,没有空闲就创建一个新连接
-
使用完毕还回连接池
-
每一个connection在连接池都是有空闲时长的
-
maxActive如何配置,理论上取最大并发数,如何评估?一分钟活跃用户1000*5=5000/10=300~500
3) 创建druidConfig,绑定配置,配置监控
@Configuration
public class DruidConfig {
  // 绑定配置
  @ConfigurationProperties(prefix = "spring.datasource")
  @Bean
  public DataSource druidDataSource(){
    return new DruidDataSource();
  }

  // 注册后台监控页面
  @Bean
  public ServletRegistrationBean statViewServlet(){
    ServletRegistrationBean bean = new ServletRegistrationBean(new StatViewServlet(),"/druid/*");
    Map<String,String> param = new HashMap<>();
    // 后台的登录用户和密码,可以把用户名,密码放到数据库中查询,方便随时修改密码
    param.put(StatViewServlet.PARAM_NAME_USERNAME,"admin");
    param.put(StatViewServlet.PARAM_NAME_PASSWORD,"123456");

    // 访问权限
    // param.put(StatViewServlet.PARAM_NAME_ALLOW,"localhost");    // 多个访问ip用逗号隔开
    param.put(StatViewServlet.PARAM_NAME_ALLOW,""); //为空,所有人都可以访问
    // 拒绝访问
    //param.put(StatViewServlet.PARAM_NAME_DENY,"192.168.12,2");
    bean.setInitParameters(param);

    return bean;
  }
}
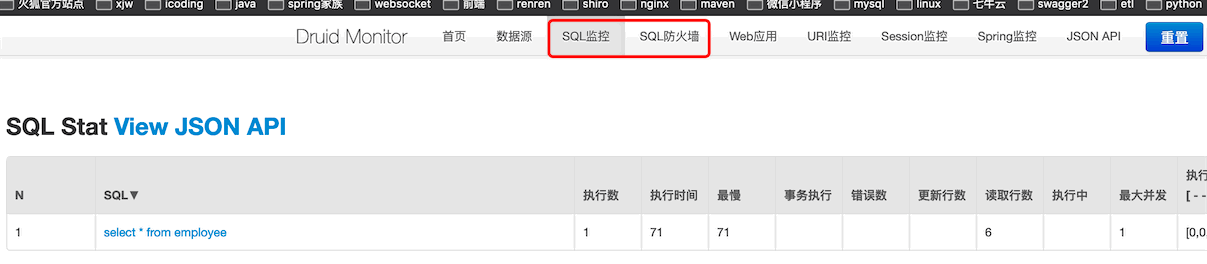
启动项目,浏览器访问localhost:8080/druid,在登录页面输入配置的账号和密码

你执行的sql,表被查询、更新、delete了多少次都可以监控到
4) 增加过滤配置
在druidconfig增加过滤器的配置,排除某些请求不被druid监控拦截
// 过滤器配置
@Bean
public FilterRegistrationBean webStatFilter(){
  FilterRegistrationBean bean = new FilterRegistrationBean();
  bean.setFilter(new WebStatFilter());
  Map<String,String> param = new HashMap<>();

  // 配置哪些请求可以被过滤
  param.put("exclusions","*.js,*.css,/druid/*"); // 排除

  bean.setInitParameters(param);
  bean.setUrlPatterns(Arrays.asList("/*"));
  return bean;
}
5) 关闭druid监控
spring.datasource.druid.filter.config.enabled=false
spring.datasource.druid.web-stat-filter.enabled=false
spring.datasource.druid.stat-view-servlet.enabled=false
小结
在SpringBoot未来的集成中,都是以下套路,这是一种思想:
1、导入pom依赖
2、application.yaml编写一些配置
3、编写Config类
同理SpringCloud套路:
1、导入pom依赖
2、编写一些配置
3、开启一个注解,如@Enablexxx
数据库密码加密访问
mcsp-rcc的druid连接impala超时断开问题
impala服务端设置了数据库的连接会话有效时间是300秒,如果空闲连接超过300秒则被impala认为是无效连接,从而导致java程序拿着一个自己认为是有效的session去连接impala结果被invalid session id 无效会话的异常

使用druid做连接池,点进DruidDataSource类看有配置属性 ,增加一些连接配置来避免这个问题
    @Bean("impalaDataSource")
    public DataSource impalaDataSource() {
        // minEvictableIdleTimeMillis 会话连接保持空闲而不被关闭的最小时间,默认30分钟
        // maxEvictableIdleTimeMillis 会话连接保持空闲而不被关闭的最大时间,默认7小时
        DruidDataSource dataSource = new DruidDataSource();
        dataSource.setName("impala-datasource");
        dataSource.setInitialSize(5);
        dataSource.setMinIdle(3);   // 连接池中容许保持空闲状态的最小连接数量,低于这个数量将创建新的连接,
        dataSource.setMaxActive(20);
        dataSource.setMaxWait(40000); // 连接等待时间,40秒还没有连接到数据库则连接失败
        dataSource.setUrl(url);
        dataSource.setDriverClassName(driverClass);
        dataSource.setPassword(password);
        dataSource.setUsername(username);
        dataSource.setTimeBetweenEvictionRunsMillis(60000); // 每隔60秒检查空闲连接
        dataSource.setMinEvictableIdleTimeMillis(60000);   // 会话最小空闲时间
        dataSource.setMaxEvictableIdleTimeMillis(290000); // 会话最大空闲时间
        dataSource.setValidationQuery("select 1"); // SQL查询,用来验证从连接池取出的连接,在将连接返回给调用者之前,验证连接是否可用
        dataSource.setTestWhileIdle(true); // 校验连接池中的空闲连接是否可用,默认true
        dataSource.setTestOnBorrow(true);  // 从连接池中取出连接前进行校验,如果校验失败,则从池中去除连接并尝试取出另一个,开启这个会消耗内存CPU资源,默认false
        dataSource.setTestOnReturn(false);  // 连接归还到连接池前不进行校验,默认false
        dataSource.setRemoveAbandoned(true); // 删除泄漏的连接,为避免误删正在使用的连接,官网建议生产环境上不开启
        dataSource.setRemoveAbandonedTimeout(290); // 如果从连接池获取的连接超过这个时间还不归还连接池,则被认为是泄漏连接,可以被删除回收
        dataSource.setLogAbandoned(true);// 标记当Statement或连接被泄露时是否打印程序的stack traces日志。

        return dataSource;
    }
主要开启了testOnBorrow 和 设置了连接的最大空闲时间maxEvictableIdleTimeMillis小于300秒,从连接池获取的连接是有效的,
参考:https://www.cnblogs.com/zhoading/p/8072882.html
https://my.oschina.net/haogrgr/blog/224010
4、集成MyBatis
整合使用
1.导入依赖
<!--mybatis是自己写的启动器,不是官方的-->
<dependency>
  <groupId>org.mybatis.spring.boot</groupId>
  <artifactId>mybatis-spring-boot-starter</artifactId>
  <version>2.1.2</version>
</dependency>
2.编写实体类,dao类和mapper.xml文件
// 部门类
@Data
@AllArgsConstructor
@NoArgsConstructor
public class Department {
    private Integer id;
    private String departmentName;
}

// dao类
@Mapper // 表示这是一个MyBatis的Mapper
@Repository  // dao层使用的
public interface DepartmentMapper {
    // 获取所有的部门信息
    List<Department> listDepartment();

    // 通过id获取部门信息
    Department getDepartment(Integer id);
}
<?xml version="1.0" encoding="UTF-8" ?>
<!DOCTYPE mapper
        PUBLIC "-//mybatis.org//DTD Mapper 3.0//EN"
        "http://mybatis.org/dtd/mybatis-3-mapper.dtd">

<!--绑定接口-->
<mapper namespace="com.jude.demo.mapper.DepartmentMapper">
    <!--绑定接口中的方法-->
    <select id="listDepartment" resultType="Department">
        select * from department
    </select>

    <select id="getDepartment" resultType="Department">
        select * from department where id = #{id}
    </select>
</mapper>
3.配置mybatis
mybatis:
  configuration:
    map-underscore-to-camel-case: true
  type-aliases-package: com.jude.*.entity
  mapper-locations: classpath:/mapper/**/*.xml
如果mapper.xml文件是放在java目录下的需要maven过滤资源,builder配置如下
<!--Maven默认不支持从 src java目录下获取除了代码之外的配置文件,我们需要过滤一下配置!-->
    <build>
        <resources>
            <!-- 配置文件导出 -->
            <resource>
                <directory>src/main/java</directory>
                <includes>
                    <include>**/*.xml</include>
                </includes>
                <filtering>true</filtering>
            </resource>
        </resources>
        <plugins>
            <plugin>
                <groupId>org.springframework.boot</groupId>
                <artifactId>spring-boot-maven-plugin</artifactId>
            </plugin>
        </plugins>
    </build>
我的mapper.xml文件是放在resource目录下的,所以不需要maven配置过滤。
4.编写congroller测试
@RestController
public class DepartmentController {
    @Autowired
    DepartmentMapper departmentMapper;

    // 查询全部部门
    @GetMapping("/listDepartment")
    public List<Department> listDepartment(){
        return departmentMapper.listDepartment();
    }

    // 通过id获取部门信息
    @GetMapping("/getDepartment/{id}")
    public Department getDepartment(@PathVariable("id") Integer id){
        return departmentMapper.getDepartment(id);
    }
}
数据库连接按上面druid数据源配置不用修改
MapperScannerConfigurer源码分析
配置了MapperScannerConfigurer,mybatis执行mapper接口方法就会被jdk动态代理拦截,创建动态代理类MapperProxy,下面举例分析
mapper接口
package org.format.dynamicproxy.mybatis.dao;
public interface UserDao {
    public User getById(int id);
    public int add(User user);
    public int update(User user);
    public int delete(User user);
    public List<User> getAll();
}
spring.xml方式配置MapperScannerConfigurer bean实例
<bean class="org.mybatis.spring.mapper.MapperScannerConfigurer">
    <property name="basePackage" value="org.format.dynamicproxy.mybatis.dao"/>
    <property name="sqlSessionFactoryBeanName" value="sqlSessionFactory"/>
</bean>
执行一个UserDao接口方法,看到实现的动态代理类是MapperProxy类

点击MapperProxy的源码

实现了InvocationHandler,说明使用了jdk自带的动态代理。
继续分析MapperScannerConfigurer的源码,

实现了接口BeanDefinitionRegistryPostProcessor bean定义注册后置处理器,重写方法postProcessBeanDefinitionRegistry 后置处理
  @Override
  public void postProcessBeanDefinitionRegistry(BeanDefinitionRegistry registry) {
    if (this.processPropertyPlaceHolders) {
      processPropertyPlaceHolders();
    }

    ClassPathMapperScanner scanner = new ClassPathMapperScanner(registry);
    scanner.setAddToConfig(this.addToConfig);
    scanner.setAnnotationClass(this.annotationClass);
    scanner.setMarkerInterface(this.markerInterface);
    scanner.setSqlSessionFactory(this.sqlSessionFactory);
    scanner.setSqlSessionTemplate(this.sqlSessionTemplate);
    scanner.setSqlSessionFactoryBeanName(this.sqlSessionFactoryBeanName);
    scanner.setSqlSessionTemplateBeanName(this.sqlSessionTemplateBeanName);
    scanner.setResourceLoader(this.applicationContext);
    scanner.setBeanNameGenerator(this.nameGenerator);
    scanner.setMapperFactoryBeanClass(this.mapperFactoryBeanClass);
    if (StringUtils.hasText(lazyInitialization)) {
      scanner.setLazyInitialization(Boolean.valueOf(lazyInitialization));
    }
    scanner.registerFilters();
    scanner.scan(
        StringUtils.tokenizeToStringArray(this.basePackage, ConfigurableApplicationContext.CONFIG_LOCATION_DELIMITERS));
  }
通过ClassPathMapperScanner 类路径mapper扫描器执行scan方法
public int scan(String... basePackages) {
  int beanCountAtScanStart = this.registry.getBeanDefinitionCount();
  this.doScan(basePackages);
  if (this.includeAnnotationConfig) {
    AnnotationConfigUtils.registerAnnotationConfigProcessors(this.registry);
  }

  return this.registry.getBeanDefinitionCount() - beanCountAtScanStart;
}
跳到doScan方法
 /**
   * Calls the parent search that will search and register all the candidates. Then the registered objects are post
   * processed to set them as MapperFactoryBeans
   */
  @Override
  public Set<BeanDefinitionHolder> doScan(String... basePackages) {
    Set<BeanDefinitionHolder> beanDefinitions = super.doScan(basePackages);

    if (beanDefinitions.isEmpty()) {
      LOGGER.warn(() -> "No MyBatis mapper was found in '" + Arrays.toString(basePackages)
          + "' package. Please check your configuration.");
    } else {
      processBeanDefinitions(beanDefinitions);
    }

    return beanDefinitions;
  }
其中super.doScan先调用父类ClassPathBeanDefinitionScanner.doScan方法获取basePackage下所有接口描述持有类BeanDefinitionHolder集合,方法源码如下
    protected Set<BeanDefinitionHolder> doScan(String... basePackages) {
        Assert.notEmpty(basePackages, "At least one base package must be specified");
        Set<BeanDefinitionHolder> beanDefinitions = new LinkedHashSet();
        String[] var3 = basePackages;
        int var4 = basePackages.length;

        for(int var5 = 0; var5 < var4; ++var5) {
            String basePackage = var3[var5];
            Set<BeanDefinition> candidates = this.findCandidateComponents(basePackage);
            Iterator var8 = candidates.iterator();

            while(var8.hasNext()) {
                BeanDefinition candidate = (BeanDefinition)var8.next();
                ScopeMetadata scopeMetadata = this.scopeMetadataResolver.resolveScopeMetadata(candidate);
                candidate.setScope(scopeMetadata.getScopeName());
                String beanName = this.beanNameGenerator.generateBeanName(candidate, this.registry);
                if (candidate instanceof AbstractBeanDefinition) {
                    this.postProcessBeanDefinition((AbstractBeanDefinition)candidate, beanName);
                }

                if (candidate instanceof AnnotatedBeanDefinition) {
                    AnnotationConfigUtils.processCommonDefinitionAnnotations((AnnotatedBeanDefinition)candidate);
                }

                if (this.checkCandidate(beanName, candidate)) {
                    BeanDefinitionHolder definitionHolder = new BeanDefinitionHolder(candidate, beanName);
                    definitionHolder = AnnotationConfigUtils.applyScopedProxyMode(scopeMetadata, definitionHolder, this.registry);
                    beanDefinitions.add(definitionHolder);
                    this.registerBeanDefinition(definitionHolder, this.registry);
                }
            }
        }

        return beanDefinitions;
    }
然后执行processBeanDefinitions(beanDefinitions)方法
 private void processBeanDefinitions(Set<BeanDefinitionHolder> beanDefinitions) {
    GenericBeanDefinition definition;
    for (BeanDefinitionHolder holder : beanDefinitions) {
      definition = (GenericBeanDefinition) holder.getBeanDefinition();
      String beanClassName = definition.getBeanClassName();
      LOGGER.debug(() -> "Creating MapperFactoryBean with name '" + holder.getBeanName() + "' and '" + beanClassName
          + "' mapperInterface");

      // the mapper interface is the original class of the bean  mapper接口是原bean类型
      // but, the actual class of the bean is MapperFactoryBean  改为MapperFactoryBean类型
      definition.getConstructorArgumentValues().addGenericArgumentValue(beanClassName); // issue #59
      definition.setBeanClass(this.mapperFactoryBeanClass); // bean类型修改

      definition.getPropertyValues().add("addToConfig", this.addToConfig);

      boolean explicitFactoryUsed = false;
      if (StringUtils.hasText(this.sqlSessionFactoryBeanName)) {
        definition.getPropertyValues().add("sqlSessionFactory",
            new RuntimeBeanReference(this.sqlSessionFactoryBeanName));
        explicitFactoryUsed = true;
      } else if (this.sqlSessionFactory != null) {
        definition.getPropertyValues().add("sqlSessionFactory", this.sqlSessionFactory);
        explicitFactoryUsed = true;
      }

      if (StringUtils.hasText(this.sqlSessionTemplateBeanName)) {
        if (explicitFactoryUsed) {
          LOGGER.warn(
              () -> "Cannot use both: sqlSessionTemplate and sqlSessionFactory together. sqlSessionFactory is ignored.");
        }
        definition.getPropertyValues().add("sqlSessionTemplate",
            new RuntimeBeanReference(this.sqlSessionTemplateBeanName));
        explicitFactoryUsed = true;
      } else if (this.sqlSessionTemplate != null) {
        if (explicitFactoryUsed) {
          LOGGER.warn(
              () -> "Cannot use both: sqlSessionTemplate and sqlSessionFactory together. sqlSessionFactory is ignored.");
        }
        definition.getPropertyValues().add("sqlSessionTemplate", this.sqlSessionTemplate);
        explicitFactoryUsed = true;
      }

      if (!explicitFactoryUsed) {
        LOGGER.debug(() -> "Enabling autowire by type for MapperFactoryBean with name '" + holder.getBeanName() + "'.");
        definition.setAutowireMode(AbstractBeanDefinition.AUTOWIRE_BY_TYPE);
      }
      definition.setLazyInit(lazyInitialization); //
    }
  }
MapperScannerConfigurer的作用也就是将对应的接口的类型改造为MapperFactoryBean,而这个MapperFactoryBean的属性mapperInterface是原bean类型。MapperFactoryBean实例注入了mapper接口和sqlSessionFactory属性。
分析MapperFactoryBean的源码
MapperFactoryBean继承了SqlSessionDaoSupport类,SqlSessionDaoSupport类继承DaoSupport抽象类,DaoSupport抽象类实现了InitializingBean接口,因此实例化MapperFactoryBean对象后,都会调用InitializingBean接口的afterPropertiesSet方法。


SqlSessionDaoSupport设置sqlSessionFactory同时也会创建自己的sqlSessionTemplate

checkDaoConfig是个抽象方法,MapperFactoryBean重写了该方法
@Override
protected void checkDaoConfig() {
  super.checkDaoConfig();
  notNull(this.mapperInterface, "Property 'mapperInterface' is required");

  Configuration configuration = getSqlSession().getConfiguration();
  // mapperInterface属性加入Configuration 配置类
  if (this.addToConfig && !configuration.hasMapper(this.mapperInterface)) {
    try {
      configuration.addMapper(this.mapperInterface);
    } catch (Exception e) {
      logger.error("Error while adding the mapper '" + this.mapperInterface + "' to configuration.", e);
      throw new IllegalArgumentException(e);
    } finally {
      ErrorContext.instance().reset();
    }
  }
}
从Spring IOC容器取bean实例时调用getObject方法
  @Override
  public T getObject() throws Exception {
    return getSqlSession().getMapper(this.mapperInterface);
  }
这里的getSqlSession().getMapper方法是sqlSessionFactory下的sqlSessionTemplate的getMapper方法,前面SqlSessionDaoSupport赋值sqlSessionFactory时创建的sqlSessionTemplate

调用Configuration的getMapper()方法,使用了MybatisPlus那就是MybatisConfiguration配置类,否则原Mybatis的Configuration


如果是mybatis-plus的MybatisMapperRegistry则继承了MapperRegistry重写了getMapper方法

MapperProxyFactory构造MapperProxy:
public class MapperProxyFactory<T> {

  private final Class<T> mapperInterface;
  private final Map<Method, MapperMethodInvoker> methodCache = new ConcurrentHashMap<>();

  public MapperProxyFactory(Class<T> mapperInterface) {
    this.mapperInterface = mapperInterface;
  }

  public Class<T> getMapperInterface() {
    return mapperInterface;
  }

  public Map<Method, MapperMethodInvoker> getMethodCache() {
    return methodCache;
  }

  @SuppressWarnings("unchecked")
  protected T newInstance(MapperProxy<T> mapperProxy) {
    return (T) Proxy.newProxyInstance(mapperInterface.getClassLoader(), new Class[] { mapperInterface }, mapperProxy);
  }

  public T newInstance(SqlSession sqlSession) {
    final MapperProxy<T> mapperProxy = new MapperProxy<>(sqlSession, mapperInterface, methodCache);
    return newInstance(mapperProxy);
  }
}
MapperProxyFactory就是使用了jdk组带的Proxy完成动态代理。
参考:https://www.cnblogs.com/fangjian0423/p/spring-mybatis-MapperScannerConfigurer-analysis.html
5、Mybatis的流式查询
流式查询指的是查询成功后不是返回一个集合而是返回一个迭代器,应用每次从迭代器取一条查询结果。流式查询的好处是能够降低内存使用。
如果没有流式查询,我们想要从数据库取 1000 万条记录而又没有足够的内存时,就不得不分页查询,而分页查询效率取决于表设计,如果设计的不好,就无法执行高效的分页查询。因此流式查询是一个数据库访问框架必须具备的功能。
流式查询的过程当中,数据库连接是保持打开状态的,因此要注意的是:执行一个流式查询后,数据库访问框架就不负责关闭数据库连接了,需要应用在取完数据后自己关闭。
MyBatis 流式查询接口
MyBatis 提供了一个叫 org.apache.ibatis.cursor.Cursor 的接口类用于流式查询,这个接口继承了 java.io.Closeable 和 java.lang.Iterable 接口,由此可知:
- Cursor 是可关闭的;
- Cursor 是可遍历的。
Cursor 听名字跟sql server的游标类似,Cursor 提供了三个方法:
isOpen():用于在取数据之前判断 Cursor 对象是否是打开状态。只有当打开时 Cursor 才能取数据;isConsumed():用于判断查询结果是否全部取完。getCurrentIndex():返回已经获取了多少条数据
因为 Cursor 实现了迭代器接口,因此在实际使用当中,从 Cursor 取数据非常简单:
cursor.forEach(rowObject -> {...});
举例
下面是一个Mapper类
@Mapper
public interface FooMapper {
    @Select("select * from foo limit #{limit}")
    Cursor<Foo> scan(@Param("limit") int limit);
}
方法 scan() 是一个非常简单的查询。通过指定 Mapper 方法的返回值为 Cursor 类型,MyBatis 就知道这个查询方法一个流式查询。
然后在Controller层直接调用这个Dao层的scan方法(省略无关的代码)
@GetMapping("foo/scan/0/{limit}")
public void scanFoo(@PathVariable("limit") int limit) throws Exception {
    try (Cursor<Foo> cursor = fooMapper.scan(limit)) { // 1
        cursor.forEach(foo -> {}); // 2
    }
}
上面的代码中,fooMapper 是 @Autowired 进来的。注释 1 处调用 scan 方法,得到 Cursor 对象并保证它能最后关闭,jdk8的try with resource写法;2 处则是从 cursor 中取数据。
我们来执行scanFoo()方法,这时候会报错
java.lang.IllegalStateException: A Cursor is already closed.
这是因为我们前面说了在取数据的过程中需要保持数据库连接,而 Mapper 方法通常在执行完后连接就关闭了(具体可以查看注解@Mapper的源码),因此 Cusor 也一并关闭了。所以我们要保持数据库连接打开的,有三种方案
-
方案一:SqlSessionFactory
我们可以用 SqlSessionFactory 来手工打开数据库连接,将 Controller 方法修改如下:
@GetMapping("foo/scan/1/{limit}")
public void scanFoo1(@PathVariable("limit") int limit) throws Exception {
    try (
        SqlSession sqlSession = sqlSessionFactory.openSession(); // 1
        Cursor<Foo> cursor =
              sqlSession.getMapper(FooMapper.class).scan(limit) // 2
    ) {
        cursor.forEach(foo -> { });
    }
}
上面的代码中,1 处我们开启了一个 SqlSession (实际上也代表了一个数据库连接),并保证它最后能关闭;2 处我们使用 SqlSession 来获得 Mapper 对象。这样才能保证得到的 Cursor 对象是打开状态的。
注意这里的try使用了JDK7开始支持的try-with-resource语法,sqlSession和cursor会在使用完后自动关闭连接的,这是编译器在将java源码文件编译为class字节码文件时加上了关闭连接的操作,有兴趣的小伙伴可以反编译class文件认证一下。
-
方案二:TransactionTemplate
在 Spring 中,我们可以用 TransactionTemplate 来执行一个数据库事务,这个过程中数据库连接同样是打开的,执行完后,数据库连接才关闭,这就是Spring的 xxxTemplate模版技术,简化开发的思想。代码如下:
@GetMapping("foo/scan/2/{limit}")
public void scanFoo2(@PathVariable("limit") int limit) throws Exception {
    TransactionTemplate transactionTemplate =
            new TransactionTemplate(transactionManager); // 1

    transactionTemplate.execute(status -> { // 2
        try (Cursor<Foo> cursor = fooMapper.scan(limit)) {
            cursor.forEach(foo -> { });
        } catch (IOException e) {
            e.printStackTrace();
        }
        return null;
    });
}
上面的代码中,1 处我们创建了一个 TransactionTemplate 对象(此处 transactionManager 是怎么来的不用多解释,本文假设读者对 Spring 数据库事务的使用比较熟悉了),2 处执行数据库事务,而数据库事务的内容则是调用 Mapper 对象的流式查询。注意这里的 Mapper 对象无需通过 SqlSession 创建,@Autowired由spring容器自动注入。
-
方案三:@Transactional 注解
这个大家都比较熟悉了,本质上和方案二一样,代码如下:
@GetMapping("foo/scan/3/{limit}")
@Transactional
public void scanFoo3(@PathVariable("limit") int limit) throws Exception {
    try (Cursor<Foo> cursor = fooMapper.scan(limit)) {
        cursor.forEach(foo -> { });
    }
}
它仅仅是在原来方法上面加了个
@Transactional注解。这个方案看上去最简洁,但请注意 Spring 框架当中注解使用的坑:只在外部调用时生效。在当前类中调用这个方法,依旧会报错。以上是三种实现 MyBatis 流式查询的方法。
6、Mybatis传递参数的7种方法
匿名参数 顺序传递参数
controller
@ApiOperation(value = "多个参数查询_匿名顺序传参")
@GetMapping("findByParams")
public ResultMsg findByParams(Short gender,String age)
{
    List result= employeeMapper.selectByGenderAndAge(gender,age);
    return ResultMsg.getMsg(result);
}
mapper
List<Employee> selectByGenderAndAge(Short gender,String age );
xml
<select id="selectByGenderAndAge" resultMap="BaseResultMap" >
  select * from employee where gender = #{gender} and age = #{age}
</select>
上面方式按参数名去引用的话会报如下错误,mybatis错误提示很细致,这里明确给我们提示
匿名参数只能使用arg1, arg0, param1, param2 类似的形式
这种传参方式的缺点是不够灵活,必须严格按照参数顺序来引用,不推荐
BindingException: Parameter 'gender' not found. Available parameters are [arg1, arg0, param1, param2]
正确方式
<select id="selectByGenderAndAge" resultMap="BaseResultMap" >
  select *  from employee where gender = #{param1} and age = #{param2}
</select>
使用@Param注解
controller
@ApiOperation(value = "多个参数查询_注解方式传参")
@GetMapping("findByParams2")
public ResultMsg findByParams2(Short gender,String age)
{
    List result= employeeMapper.selectByGenderAndAge2(gender,age);
    return ResultMsg.getMsg(result);
}
mapper
List<Employee> selectByGenderAndAge( @Param("gender") Short gender,@Param("age") String age );
xml
<select id="selectByGenderAndAge" resultMap="BaseResultMap" >
  select * from employee where gender = #{gender} and age = #{age}
</select>
使用Map
实际开发中使用map来传递多个参数是一种推荐的方式
controller
@ApiOperation(value = "多个参数查询")
@GetMapping("findByMapParams")
public ResultMsg findByMapParams(Short gender,String age)
{
    Map params = new HashMap<>();
    params.put("gender",gender);
    params.put("age",age);
    List result= employeeMapper.selectByMapParams(params);
    return ResultMsg.getMsg(result);
}
mapper
List<Employee> selectByMapParams(Map params);
xml
<select id="selectByMapParams" resultMap="BaseResultMap" parameterType="map">
  select * from employee where gender = #{gender} and age = #{age}
</select>
可以看到使用map来传递多个参数,可以直接使用参数名称进行引用
使用java bean
也可以使用bean的方式来传递多个参数,使用时parameterType指定为对应的bean类型即可。
这就传参方式的优点是比较方便,controller层使用@RequestBody接收到实体类参数后,直接传递给mapper层调用即可,不需要在进行参数的转换
controller
@ApiOperation(value = "多个参数查询_通过Java Bean传递多个参数")
@PostMapping("findByBeans")
public ResultMsg findByBeans(@RequestBody Employee employee)
{
    List result= employeeMapper.selectByBeans(employee);
    return ResultMsg.getMsg(result);
}
mapper
List <Employee> selectByBeans(Employee employee);
xml
<select id="selectByBeans" resultMap="BaseResultMap" parameterType="com.wg.demo.po.Employee">
  select * from employee where gender = #{gender} and age = #{age}
</select>
使用JsonObject
这也是推荐的一种传参方式,controller层收到JSON型数据后,直接传递给mapper层进行查询操作,简单方便,不用定义Java bean(pojo)
controller
@ApiOperation(value = "多个参数查询_通过JSON传递多个参数")
@PostMapping("findByJSONObject")
public ResultMsg findByJSONObject(@RequestBody JSONObject params)
{
    List result= employeeMapper.findByJSONObject(params);
    return ResultMsg.getMsg(result);
}
mapper
List <Employee> findByJSONObject(JSONObject params);
xml
<select id="findByJSONObject" resultMap="BaseResultMap" parameterType="com.alibaba.fastjson.JSONObject">
  select * from employee where gender = #{gender} and age = #{age}
</select>
传递集合类型参数List、Set、Array
在一些复杂的查询中(如 sql中的 in操作),传统的参数传递已无法满足需求,这时候就要用到List、Set、Array类型的参数传递,具体使用如下:
controller
@ApiOperation(value = "多个参数查询_通过List、Set、Array传递多个参数")
@PostMapping("findByList")
public ResultMsg findByList(@RequestBody List<String> list)
{
    List result= employeeMapper.findByList (list);
    return ResultMsg.getMsg(result);
}
mapper
List <Employee> findByList(List list);
xml
<select id="findByList" resultMap="BaseResultMap" >
  SELECT * from employee where age in
  <foreach collection="list" open="(" separator="," close=")" item="age">
    #{age}
  </foreach>
</select>
这里foreach表示循环操作,具体的参数含义如下:
-
foreach元素的属性主要有 item,index,collection,open,separator,close。
-
item表示集合中每一个元素进行迭代时的别名
-
index指定一个名字,用于表示在迭代过程中,每次迭代到的位置
-
open表示该语句以什么开始
-
separator表示在每次进行迭代之间以什么符号作为分隔符
-
close表示以什么结束
-
collection
在使用foreach的时候最关键的也是最容易出错的就是collection属性,该属性是必须指定的,但是在不同情况下,该属性的值是不一样的,主要有一下3种情况:
- 1.如果传入的是单参数且参数类型是一个List的时候,collection属性值为list
- 2.如果传入的是单参数且参数类型是一个array数组的时候,collection的属性值为array
- 3.如果传入的参数是多个的时候,我们就需要把它们封装成一个Map或者Object
测试一下

参数类型为对象+集合
该类参数与java Bean参数形式类似,只不过更复杂一些,如下面的Department类,除了基本字段还包括一个Employee的列表,bean如下
@Data
public class Department {
    private Long id;
    private String deptName;
    private String descr;
    private Date createTime;
    List<Employee> employees;
}
controller
@ApiOperation(value = "多个参数查询_对象+集合参数")
@PostMapping("findByDepartment")
public ResultMsg findByDepartment(@RequestBody Department department){
    List result= employeeMapper.findByDepartment(department);
    return ResultMsg.getMsg(result);
}
mapper
List <Employee> findByDepartment(@Param("department")Department department);
xml
<select id="findByDepartment" resultMap="BaseResultMap" parameterType="com.wg.demo.po.Department">
    SELECT * from employee where dept_id =#{department.id} and age in
    <foreach collection="department.employees" open="(" separator="," close=")" item="employee">
        #{employee.age}
    </foreach>
</select>
这里foreach 对应Departmen部门中的List employees
测试一下
// 请求参数: 查询部门Id=1,并且年龄 等于24和25的员工
{
  "createTime": "2019-07-02T10:17:16.756Z",
  "deptName": "string",
  "descr": "string",
  "employees": [
    {
      "age": "24",
    },
    {
      "age": "25",
    }
  ],
  "id": 1
}
结果
{
  "data": [
    {
      "address": "北新街ndcpc",
      "age": "24",
      "createTime": 1562062434000,
      "deptId": "1",
      "gender": 1,
      "id": "318397755696631808",
      "name": "kls0bx19cy"
    },
    {
      "address": "北新街lavi0",
      "age": "25",
      "createTime": 1562062436000,
      "deptId": "1",
      "gender": 1,
      "id": "318397755801489408",
      "name": "gj9q3ygikh"
    }
  ],
  "result": "SUCCESS",
  "resultCode": 200,
  "resultMsg": ""
}
7、Mybatis其他
转义字符
"<" 使用 <替换
">" 使用 >替换
抽取公共SQL语句
定义可重用的查询列
<sql id="all_column">id,username,pazzword,state,reg_date</sql>
<select id="getUser" resultType="cn.jq.mybatis.model.User">
  select
  <include refid="all_column"></include>
  from t_user where id = #{id}
</select>

-- 结果
select id,username,pazzword,state,reg_date from t_user where id = ?
通过 property子标签给sql标签里传值,通过 ${} 获取值,比如给查询表起个别名
<sql id="all_column">${alias}.id,${alias}.username,${alias}.pazzword,${alias}.state,${alias}.reg_date</sql>
<select id="getUser" resultType="cn.jq.mybatis.model.User">
  select
  <include refid="all_column">
    <property name="alias" value="t1"/>
  </include>
  from t_user t1 where t1.id = #{id}
</select>

-- 结果
select t1.id,t1.username,t1.pazzword,t1.state,t1.reg_date from t_user t1 where t1.id = ?
定义可重用的查询条件
<sql id="condition_sql">
  <if test="username != null and username != ''">
    and username like concat('%',concat(#{username},'%'))
  </if>
  <if test="state != null and state >= 0">
    and state like #{state}
  </if>
</sql>

<select id="getUserBylike" resultType="cn.jq.mybatis.model.User">
  select * from t_user
  <where>
    <include refid="condition_sql"></include>
  </where>
</select>
- sql标签和include标签配合使用,sql标签里和其他增删改查标签一样支持动态slq标签;
- include标签可以通过property子标签给sql标签里传值,sql标签里用 ${} 获取
bind模糊查询
bind标签可以从 OGNL表达式中创建一个变量并将其绑定到上下文,比如:模糊查询 传参,使用bind元素拼接 %号,不能传null值
<select id="getUserBylike" resultType="cn.jq.mybatis.model.User">
  <bind name="new_username" value="'%'+username+'%'"/>
  select * from t_user where
  <choose>
    <when test="username != null and username != ''">
      username like #{new_username}
    </when>
    <when test="state != null and state >= 0">
      state like #{state}
    </when>
    <otherwise>
      1=1
    </otherwise>
  </choose>
</select>
结果:

查询是否存在
根据某一条件从数据库表中查询 『有』与『没有』,只有两种状态,那为什么在写SQL的时候,还要SELECT count(*) 呢,
多次REVIEW代码时,发现如下现象:业务代码中,需要根据一个或多个条件,查询是否存在记录,不关心有多少条记录。普遍的SQL及代码写法如下
##### SQL写法:
SELECT count(*) FROM table WHERE a = 1 AND b = 2

##### Java写法:
int nums = xxDao.countXxxxByXxx(params);
if ( nums > 0 ) {
  //当存在时,执行这里的代码
} else {
  //当不存在时,执行这里的代码
}
优化写法
SELECT 1 FROM table WHERE a = 1 AND b = 2 LIMIT 1

##### Java写法:
Integer exist = xxDao.existXxxxByXxx(params);
if ( exist != NULL ) {
  //当存在时,执行这里的代码
} else {
  //当不存在时,执行这里的代码
}
SQL不再使用count,而是改用LIMIT 1,让数据库查询时遇到一条就返回,不要再继续查找还有多少条了业务代码中直接判断是否非空即可。
根据查询条件查出来的条数越多,性能提升的越明显,在某些情况下,还可以减少联合索引的创建。