 弹吉他的兔子
1、静态资源处理
SpringMVC中,我们把静态资源放到webapp目录下。
SpringBoot项目中,所有的配置文件都是xxx.properties,核心的配置文件是application.yaml,我们把静态资源css,js文件放在resource/static目录下,就可以访问了,为什么?我们需要明白它的规则。怎么做?
- 从源码分析,得出结论
- 测试是否可用
关于MVC的自动配置
1、所有MVC相关的配置都在WebMvcAutoConfiguration(视图解析器、静态资源过滤),idea全局搜索它

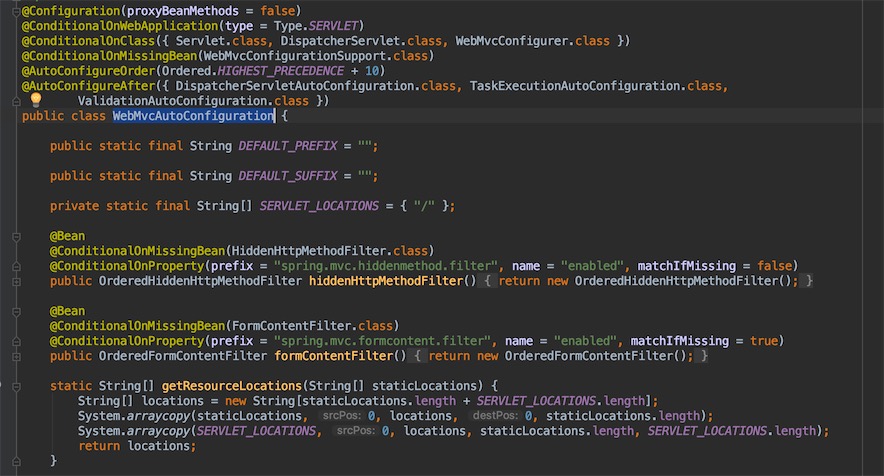
在WebMvcAutoConfiguration,我们找到addResourceHandlers()方法,它就是添加静态资源的方法
@Override
public void addResourceHandlers(ResourceHandlerRegistry registry) {
  // 默认规则的配置被禁用,如果你手动添加了资源映射路径的配置,那么这些自动配置就会直接失效
  if (!this.resourceProperties.isAddMappings()) {
    logger.debug("Default resource handling disabled");
    return;
  }
  // 下面是自动配置
  // 缓存控制
  Duration cachePeriod = this.resourceProperties.getCache().getPeriod();
  CacheControl cacheControl = this.resourceProperties.getCache().getCachecontrol().toHttpCacheControl();
  // 分析源代码,需要掌握看对象的方法调用,上面两行代码只是获取对象,我们要看对象怎么用

  // 第一种策略 /webjars/**
  // 判断注册器是否存在一个映射路径 /webjars/**,有的话就绑定资源路径,并配置到缓存中
  // addResourceHandler 处理逻辑,如 /webjars/a.js
  // addResourceLocations 处理资源的地址,如 /classpath:/META-INF/resources/webjars/a.js
  if (!registry.hasMappingForPattern("/webjars/**")) {
    customizeResourceHandlerRegistration(registry.addResourceHandler("/webjars/**")
                                         .addResourceLocations("classpath:/META-INF/resources/webjars/")
                                         .setCachePeriod(getSeconds(cachePeriod)).setCacheControl(cacheControl));
  }
  // 第二种策略 /**
  // 获取静态资源路径,进行映射并放入缓存中
  String staticPathPattern = this.mvcProperties.getStaticPathPattern();
  if (!registry.hasMappingForPattern(staticPathPattern)) {
    customizeResourceHandlerRegistration(registry.addResourceHandler(staticPathPattern)
                                         .addResourceLocations(getResourceLocations(this.resourceProperties.getStaticLocations()))
                                         .setCachePeriod(getSeconds(cachePeriod)).setCacheControl(cacheControl));
  }
}
点进this.mvcProperties.getStaticPathPattern()的方法,
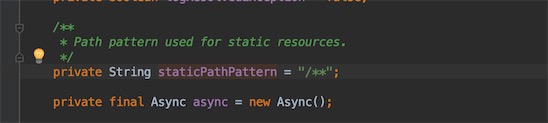
继续看上面的源码,如果访问的路径是/** ,就会映射到this.resourceProperties.getStaticLocations(),点它的方法源码,最终跳转到多个静态资源目录,如下

/**会映射到上面的4个目录,而不是单纯的一个目录。classpath是项目内路径
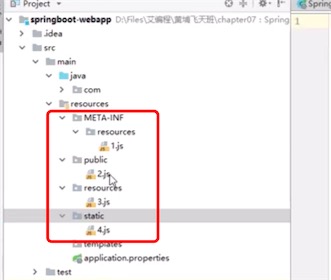
启动项目,分别访问各个目录下的js文件:
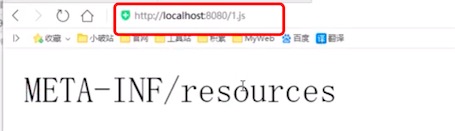
优先级比较
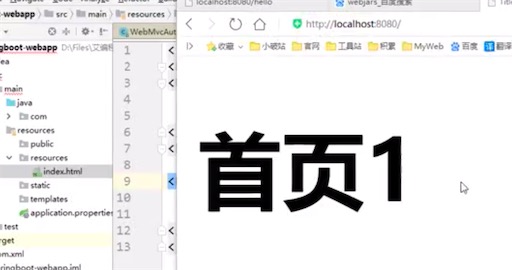
4个目录下都是1.js文件,访问/localhost:8080/1.js,看浏览器映射到那个目录下的1.js
private static final String[] CLASSPATH_RESOURCE_LOCATIONS =
{
  "classpath:/META-INF/resources/", // 优先级最高,在starter 中使用,如swagger-ui,spirng.factories文件
   "classpath:/resources/",   // 文件资源
  "classpath:/static/",  // 静态资源
  "classpath:/public/"  // 公共的,如图标等
};

/META-INF/resources 优先级最高,依次是 resources,static,public
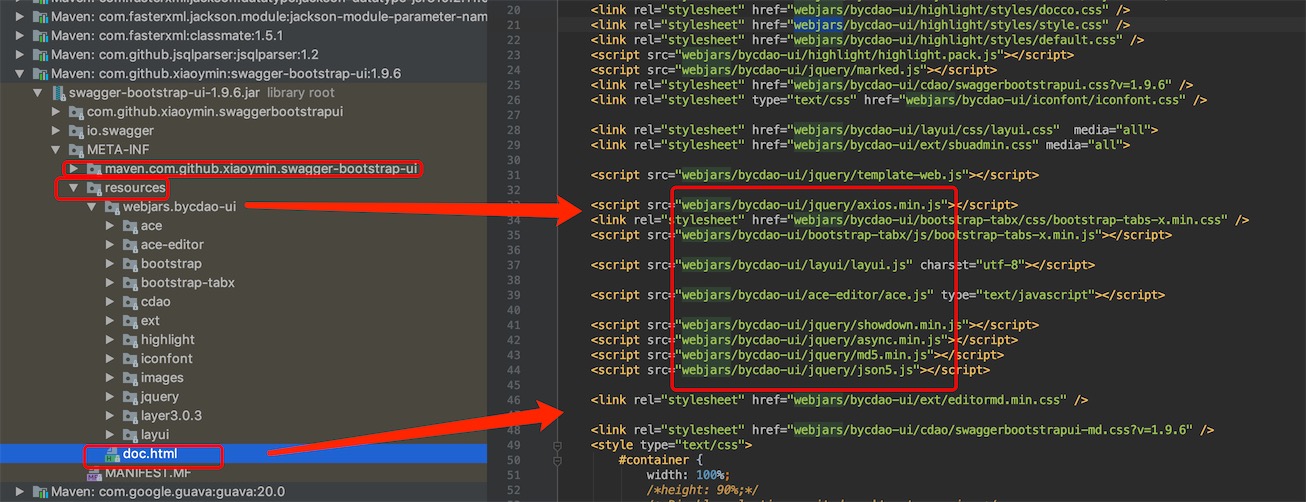
这回明白了引入swagger-bootstrap-ui,浏览器直接访问/doc了会映射到/META-INF/resources目录下的doc.html,看下面分析。
第三种策略:自定义配置映射路径,但是这样配置之后,默认的就会失效
在WebMvcAutoConfiguration,我们找到addResourceHandlers()方法,有这么一个判断,当你配置了资源映射路径,那么上面的自动配置都会失效
// 默认规则的配置被禁用,如果你手动添加了资源映射路径的配置,那么这些自动配置就会直接失效
  if (!this.resourceProperties.isAddMappings()) {
    logger.debug("Default resource handling disabled");
    return;
  }
application.properties配置文件
# 自定义映射路径
spring.resources.static-locaions=classpath:/coding,classpath:/jacob

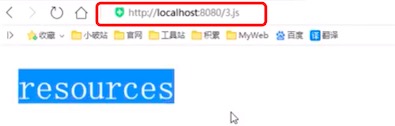
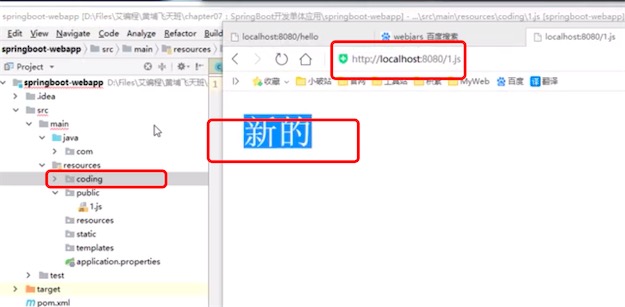
当我们再次访问1.js,发现已无法访问了。但在自定义的目录/coding下新建一个1.js,启动项目,重新访问1.js
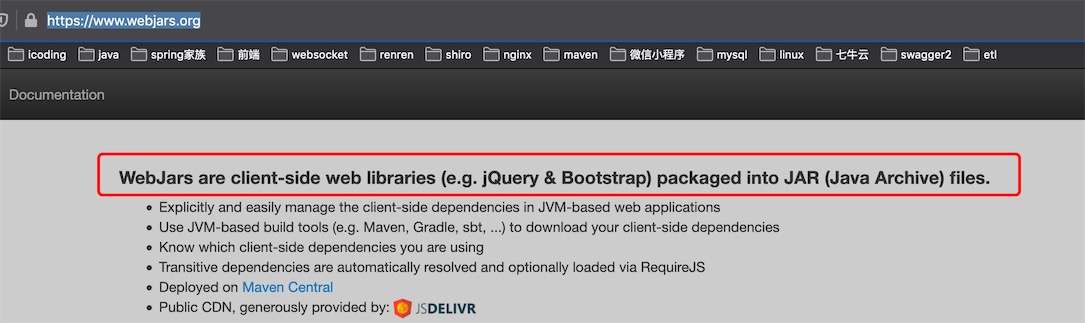
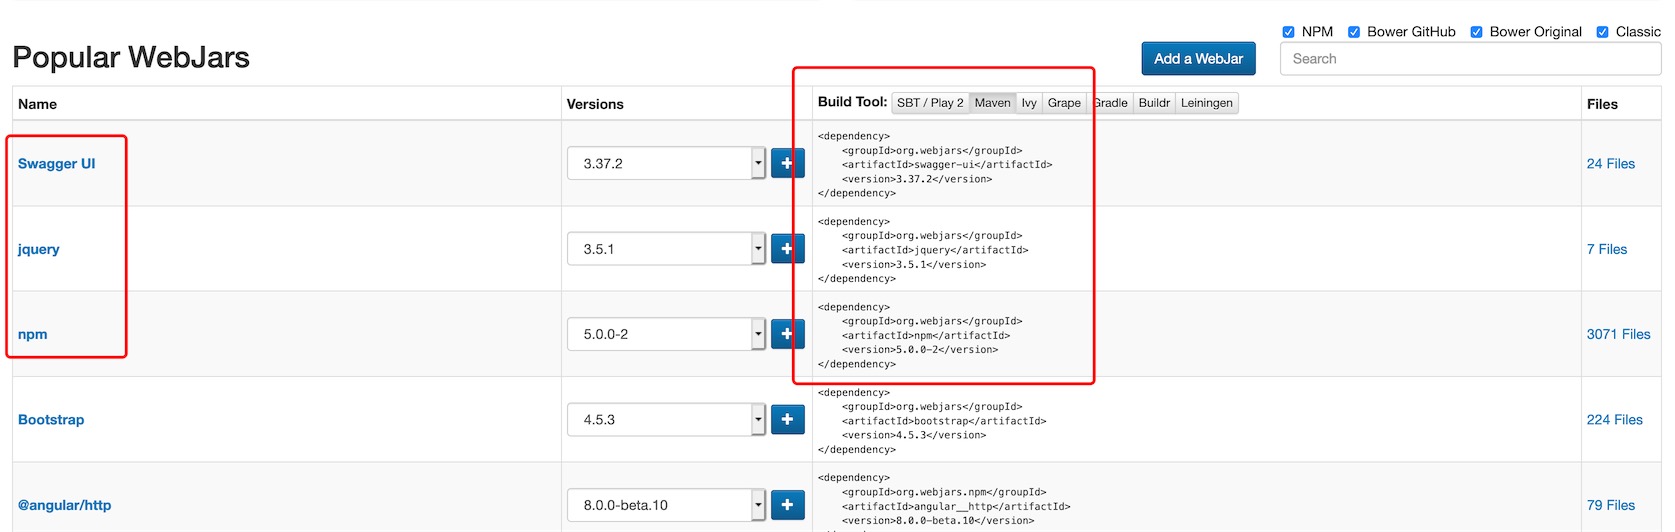
什么是webjars
这个时候我们可以百度啦,其实它就是一些前端静态资源如jQuery、Bootstrap、Vue.js等,以jar包的方式引入项目中,是一个很神奇的东西。
-
我们在进行web开发时,一般上都是将静态资源文件放置在webapp目录下,
-
在SpringBoot里面,一般是将资源文件放置在src/main/resources/static目录下。
-
在Servlet3中,允许我们直接访问WEB-INF/lib下的jar包中的/META-INF/resources目录资源,即WEB-INF/lib/{*.jar}/META-INF/resources下的资源可以直接访问,WebJars也正是利用此功能,将所有前端的静态文件打包成一个jar包,里面包含了/META-INF/resources目录资源。
为什么要用webjars
为了对资源进行统一依赖管理,就像我们开发web项目时,使用Maven\Gradle等构建工具对jar包版本进行依赖管理,同理前端资源文件我们使用webjars的方式引入项目,就可以统一的版本依赖管理,无论是前端还是后端资源包。
webjars的官网:https://www.webjars.org/
在官网上找到自己需要的前端资源的maven依赖,添加到项目中使用
我们常用的swagger2的前端UI的静态资源文件,就是使用webjars的方式引入的,来看一下源码发现doc.html是直接放在/META-INF/resources 目录下的
如何使用webjars
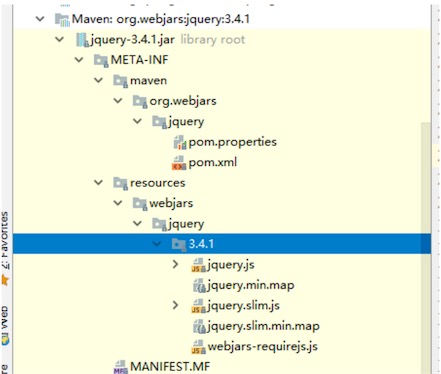
1、pom.xml 导入maven依赖,如jquery.js
<dependency>
  <groupId>org.webjars</groupId>
  <artifactId>jquery</artifactId>
  <version>3.4.1</version>
</dependency>
发现导入了一个jar包
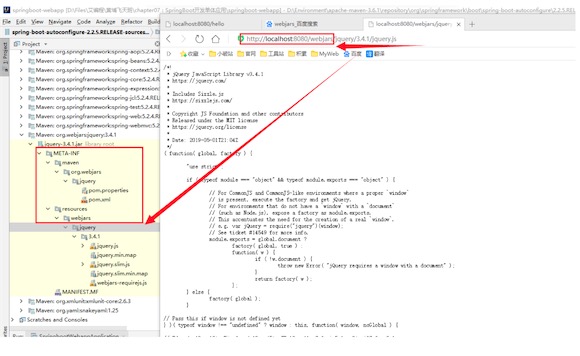
2、页面直接引入就可以了,下面使用了thymeleaf模版,参考上面swagger-bootstrap-ui的webjars使用
<script th:src="@{/webjars/jquery/3.4.1/jquery.js}" rel="stylesheet"></script>
测试访问一下
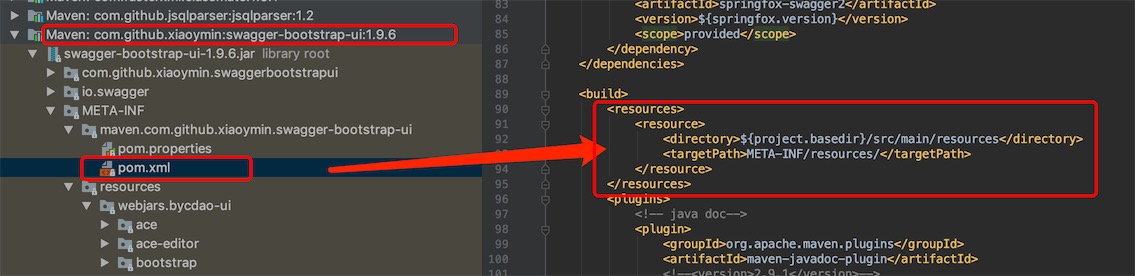
注意,maven在打包时要引入
<!-- 构建工具,打包时引入 -->
<build>
  <resources>
    <resource>
      <directory>${project.basedir}/src/main/resources</directory>
      <targetPath>META-INF/resources/</targetPath>
    </resource>
  </resources>
</build>
swagger-bootstrap-ui 的pom.xml在构建时就引入了META-INF/resources 资源路径
2、首页和图标处理
首页
继续分析源码,在WebMvcAutoConfiguration.java,搜索index,就会找到首页的相关映射方法welcomePageHandlerMapping
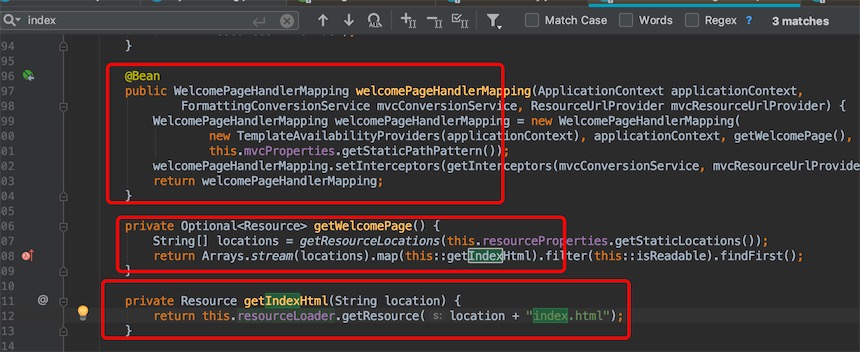
// 首页会被映射到这个处理器下
@Bean
public WelcomePageHandlerMapping welcomePageHandlerMapping(ApplicationContext applicationContext,
                                                           FormattingConversionService mvcConversionService, ResourceUrlProvider mvcResourceUrlProvider) {
  WelcomePageHandlerMapping welcomePageHandlerMapping = new WelcomePageHandlerMapping(
    new TemplateAvailabilityProviders(applicationContext), applicationContext, getWelcomePage(),
    this.mvcProperties.getStaticPathPattern());
  welcomePageHandlerMapping.setInterceptors(getInterceptors(mvcConversionService, mvcResourceUrlProvider));
  return welcomePageHandlerMapping;
}

// 获得欢迎页
private Optional<Resource> getWelcomePage() {
  // 4个静态路径目录
  String[] locations = getResourceLocations(this.resourceProperties.getStaticLocations());
  // stream流
  // map 映射
  // filter 过滤
  // findFirst 找到第一个符号条件的
  // 调用对象方法的语法糖, this 对象:: getIndexHtml 方法名字
  return Arrays.stream(locations).map(this::getIndexHtml).filter(this::isReadable).findFirst();
}

private Resource getIndexHtml(String location) {
  return this.resourceLoader.getResource(location + "index.html");
}
点击WelcomePageHandleMapping 的构造方法,
WelcomePageHandlerMapping(TemplateAvailabilityProviders templateAvailabilityProviders,
                          ApplicationContext applicationContext, Optional<Resource> welcomePage, String staticPathPattern) {
  if (welcomePage.isPresent() && "/**".equals(staticPathPattern)) {
    logger.info("Adding welcome page: " + welcomePage.get());
    setRootViewName("forward:index.html");
  }
  else if (welcomeTemplateExists(templateAvailabilityProviders, applicationContext)) {
    logger.info("Adding welcome page template: index");
    setRootViewName("index");
  }
}
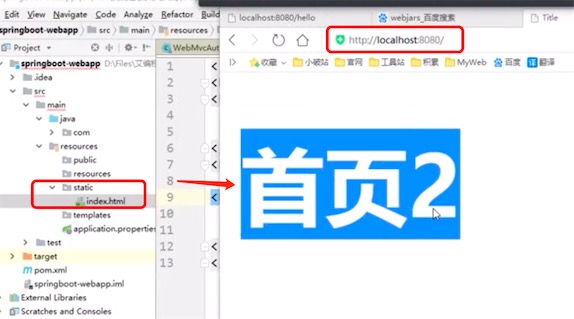
从源码可以看出,当静态映射路径是/**,就会在当前静态资源目录下找index.html,如果没有自定义映射路径,/**会映射到上面说到的4个静态目录
private static final String[] CLASSPATH_RESOURCE_LOCATIONS = { "classpath:/META-INF/resources/","classpath:/resources/", "classpath:/static/", "classpath:/public/" };
测试
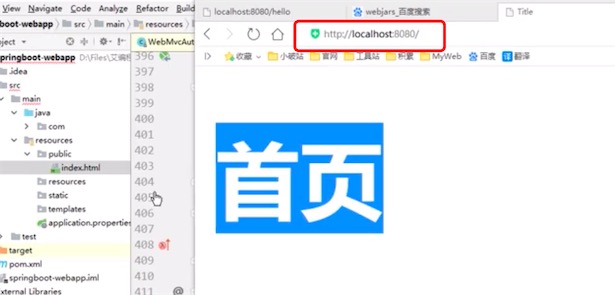
1、在public目录下添加一个首页index.html
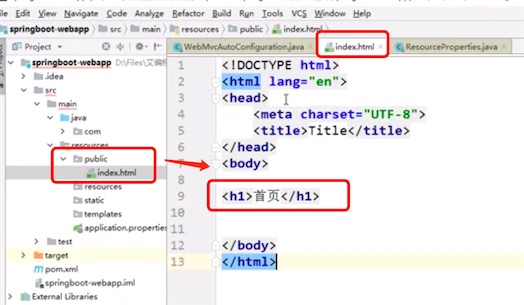
启动项目,访问localhost:8080/
2、首页index.html放到resources目录下
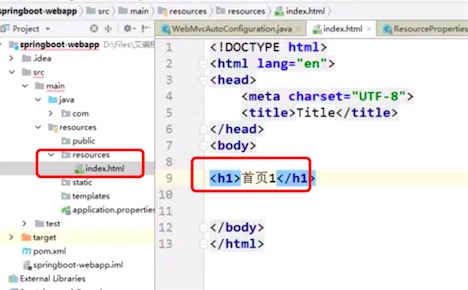
启动项目,访问localhost:8080/
3、首页index.html放到static目录下
网站图标
全局搜索favicon发现

点击StaticResourceLocation,是一个枚举类
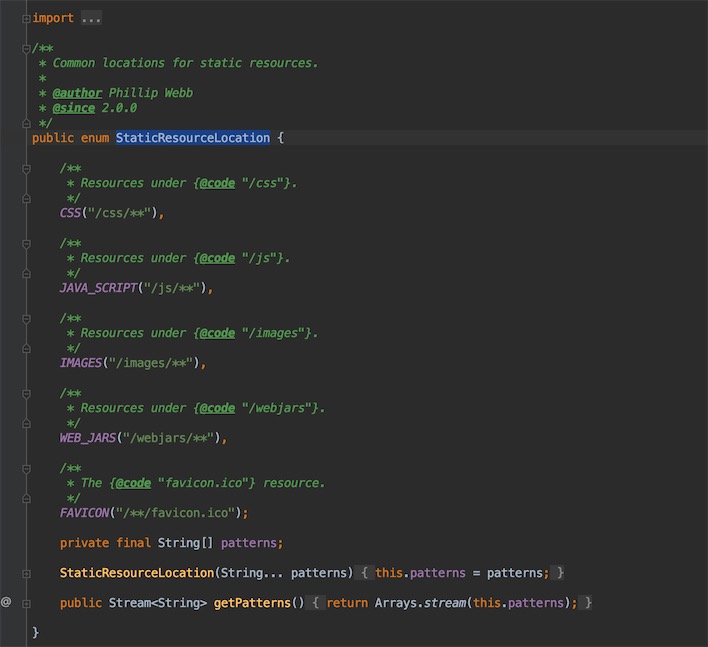
这是一个静态资源的映射,要设置网站的图标,我们只需要将一个favicon.ico放入静态资源目录即可(/** 会映射到静态资源目录)
我们把favicon.ico放到public目录下,
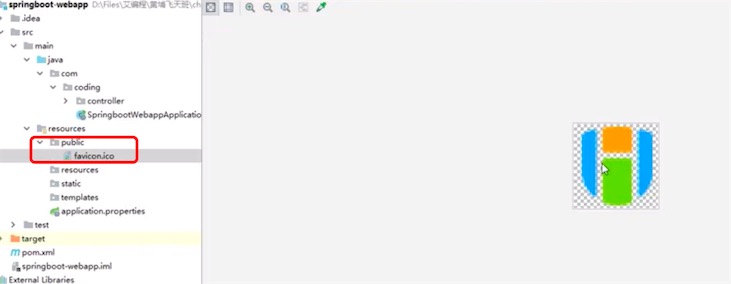
浏览器我们清理一下缓存,在springboot 2.1.x的版本,application.properties配置文件还需要关闭默认图标
# 关闭默认图标
spring.mvc.favicon.enabled=false

Springboot 2.2.x版本已经不需要配置了
启动项目访问localhost:8080/,发现有网站图标了

我们学习的时候,尽量使用最新版,然后找到问题,分析源码
有道无术,术尚可求!(道:方法,思想)
有术无道,止于术!
如果配置了上下文路径
server.servlet.context-path=/kuangstudy
网站图标访问路径没有加上context-path导致404

也就是说springboot 访问网站图标的路径不会因为加了context-path而改变,解决办法是在每个html页面添加
<link rel="shortcut icon" href="/favicon.ico" type="image/x-icon">
3、Thymeleaf模板引擎
thymleaf[ taɪm lif]
什么是模板引擎?就是前端给你的页面一般是一些静态资源,如html页面等
传统的话,我们需要将它们转换为jsp页面,嵌入java变量或者代码,来实现一些功能
jsp无疑很强大!servlet的底层,跟php类似,可以在页面上写业务逻辑
但是使用SpringBoot后,是没有办法写jsp页面的,jsp是通过war包的方式发布到tomcat中的。
SpringBoot项目都是以jar包方法运行,如下:
java -jar xxxx.jar
那么我们的页面如何处理,和后端交互?这里不说前后端分离式的项目
我们画图说明一下页面是如何处理的,如下图:
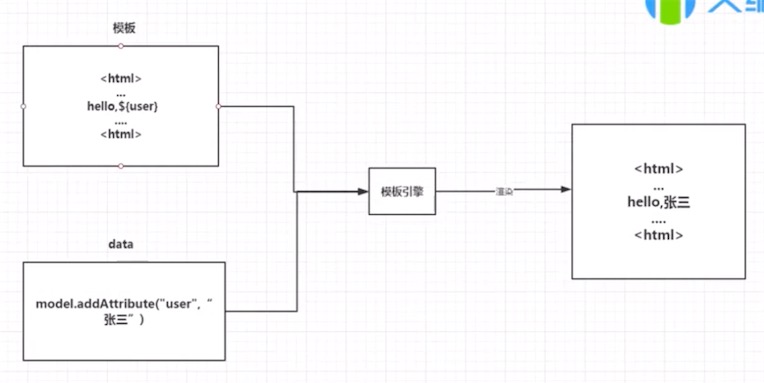
知名的模板引擎: jap、freemarker、Thymeleaf
SpringBoot推荐我们使用Thymeleaf模版引擎,他使用的就是html页面!十分简单
小结
所有的模板引擎都是一个原理,如上图,每个模板语法有点不同而已!
Thymeleaf 是我们现在必须要会的!
使用Thymeleaf
官网:https://www.thymeleaf.org/documentation.html
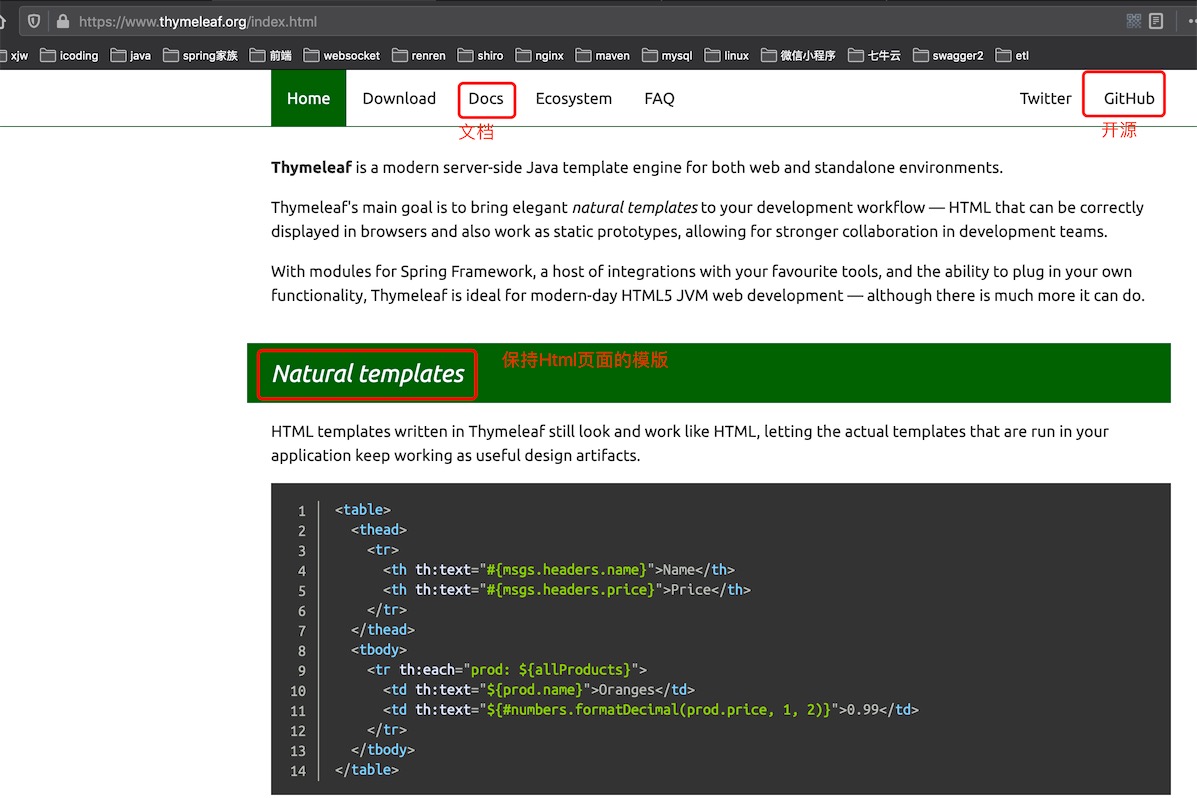
它是开源的,GitHub:https://github.com/thymeleaf
新建一个Springboot工程,整合Thymeleaf
1、导入依赖,可以到maven仓库中查询依赖
<dependency>
    <groupId>org.springframework.boot</groupId>
    <artifactId>spring-boot-starter-thymeleaf</artifactId>
</dependency>
不指定版本,跟随spring-boot-starter-parent的版本管控
2、配置xxxProperties
Spring-boot-starter-xxx都是官方命名的,在项目中全局搜索ThymeleafProperties,
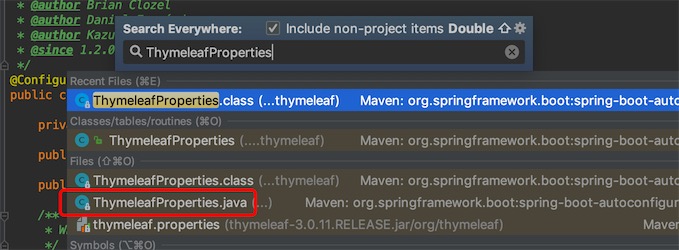
@ConfigurationProperties(prefix = "spring.thymeleaf")
public class ThymeleafProperties {

	private static final Charset DEFAULT_ENCODING = StandardCharsets.UTF_8;

  // 默认前缀
	public static final String DEFAULT_PREFIX = "classpath:/templates/";
// 默认后缀
	public static final String DEFAULT_SUFFIX = ".html";

	/**
	 * Whether to check that the template exists before rendering it.
	 */
	private boolean checkTemplate = true;

	/**
	 * Whether to check that the templates location exists.
	 */
	private boolean checkTemplateLocation = true;
  ...
3、怎么使用,我们打开官方文档usingthymeleaf.pdf,里面说明了th的一些语法和使用例子

在resources/templates目录下,新建home.html
<!DOCTYPE html>
<!--xmlns xml namespace 命名空间,加上了才可以支持 thymeleaf -->
<html lang="en" xmlns:th="http://www.thymeleaf.org">
<head>
<meta charset="utf-8">
<title>Title</title>
</head>
<body>
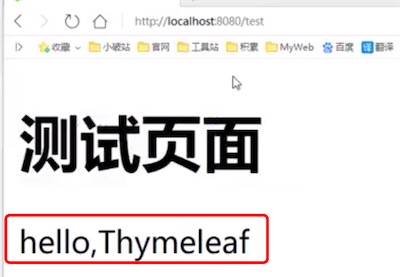
<h1>测试页面</h1>
<!-- 十分像vue, v-xx= -->
<p th:text="${msg}"></p>
</body>
</html>
什么是模板引擎,后端可以进行跳转,并给出相应的数据,前端可以接受一些数据
在controller层,写一个跳转接口
@Controller
public class IndexController {
  @GetMapping("test")
  public static test(Model model){
    model.addAttribute("msg","hello,Thymeleaf");
    return "home"; // 看上面的ThymeleafProperties,不修改前缀后缀的话,跳转到
    // classpath:/templates/test.html页面
  }

}
访问测试,页面跳转成功
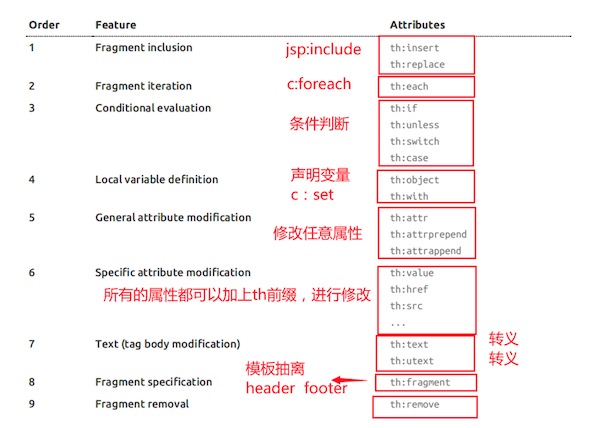
官方文档一定要熟悉,不会的时候拿出来看一看,常用的9种语法th标签如下:
转义html字符串
controller
@Controller
public class IndexController {
  @GetMapping("test")
  public static test(Model model){
    model.addAttribute("msg","hello,Thymeleaf");
    model.addAttribute("msg2","<h1>hello,Thymeleaf</h1>");
    model.addAttribute("users",Arrays.asList("coding,qinjiang"));
    return "home"; // 看上面的ThymeleafProperties,不修改前缀后缀的话,跳转到
    // classpath:/templates/test.html页面
  }
}
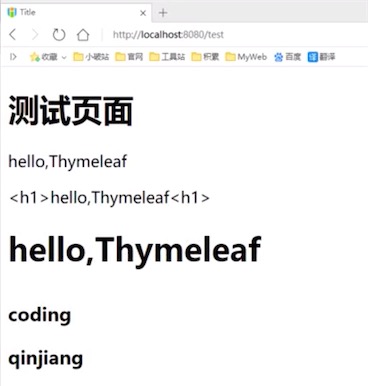
html
<!DOCTYPE html>
<!--xmlns xml namespace 命名空间,加上了才可以支持 thymeleaf -->
<html lang="en" xmlns:th="http://www.thymeleaf.org">
  <head>
    <meta charset="utf-8">
    <title>Title</title>
  </head>
  <body>
    <h1>测试页面</h1>
    <!-- 十分像vue, v-xx= -->
    <p th:text="${msg}"></p>
    <!-- 不转义 -->
    <p th:text="${msg2}"></p>
    <!-- 转义 -->
    <p th:utext="${msg2}"></p>
    <h3 th:each="user:${users}" th:text="${user}"></h3>
  </body>
</html>
访问测试
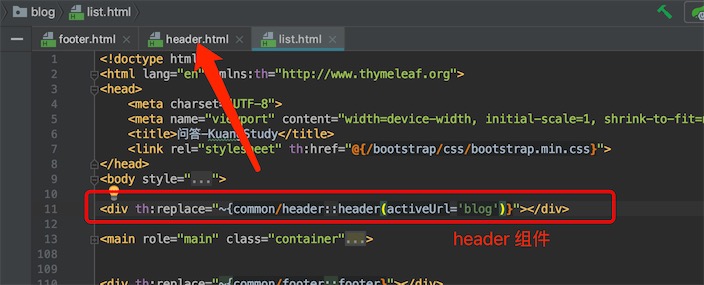
模板抽离
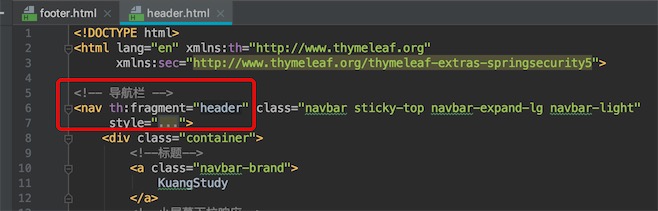
引入header页面组件
编写表达式
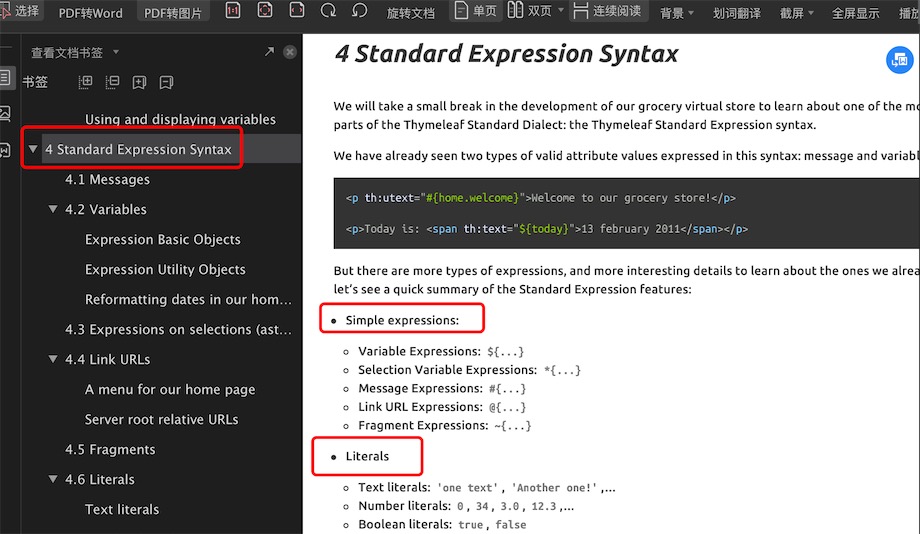
1、Simple expressions 简单表达式
-
Variable Expressions: ${…} 获取一些变量的值,有下面三种:
1、对象的属性,调用方法
2、内置的基本对象,看官方文档的 Expression Basic Objects
3、工具对象
-
Selection Variable Expressions: *{…} 选择表达式,和 ${} 是一样的;
- Message Expressions: #{…} 国际化内容获取!
-
Link URL Expressions: @{…} URL表达式/ 链接 th:href=“@{/login}”
- Fragment Expressions: ~{…} 组件化表达式;th:replace=”~{common/header::header}”
2、Literals (字面量)
-
Text literals: ‘one text’ , ‘Another one!’ ,… (字符串)
-
Number literals: 0 , 34 , 3.0 , 12.3 ,…
-
Boolean literals: true , false
<div th:if="${user.isAdmin} == false"></div> 或者 <div th:if="${user.isAdmin == false}"></div> -
Null literal: null
<div th:if="${variable.something} == null"></div> -
Literal tokens: one , sometext , main ,…
3、Text operations: (文本操作)
-
String concatenation: + 字符串连接
-
Literal substitutions: The name is ${name} 字面量取值
4、Arithmetic operations: (数学运算)
-
Binary operators: + , - , * , / , %
-
Minus sign (unary operator): -
5、Boolean operations: (布尔运算)
-
Binary operators: and , or
-
Boolean negation (unary operator): ! , not
6、Comparisons and equality: (比较运算)
-
Comparators: > , < , >= , <= ( gt , lt , ge , le )
-
Equality operators: == , != ( eq , ne )
7、Conditional operators: (条件运算符,三元表达式)
-
If-then: (if) ? (then)
-
If-then-else: (if) ? (then) : (else)
-
Default: (value) ?: (defaultvalue)
内置基本对象

1、Base objects
${#ctx.locale}
${#ctx.response}
${#ctx.session}
${#ctx.servletContext}
2、Web context namespace for request/session attribute
${param.foo} <!-- Retrieves a String[] with the values of request parameter 'foo' -->
${param.size()}
${param.isEmpty()}
${param.containsKey('foo')}
...
${session.foo} <!-- Retrieves the session atttribute 'foo' -->
${session.size()}
${session.isEmpty()}
${session.containsKey('foo')}
...
${application.foo} <!-- Retrieves the ServletContext atttribute 'foo' -->
${application.size()}
${application.isEmpty()}
${application.containsKey('foo')}
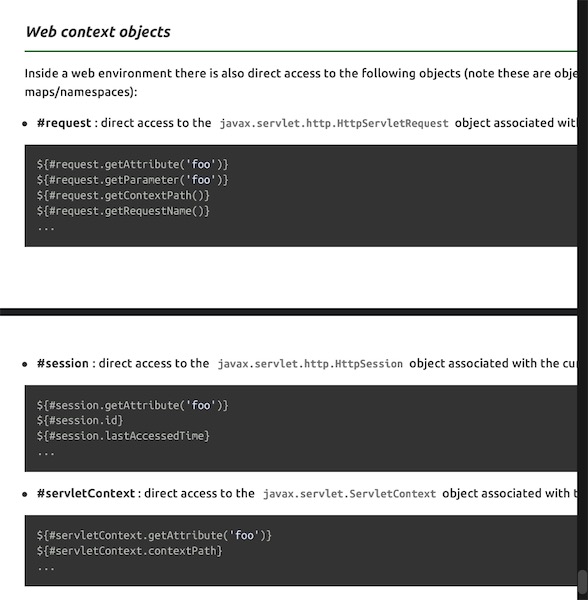
3、Web context objects 上下文
${#request.getAttribute('foo')}
${#request.getParameter('foo')}
${#request.getContextPath()}
${#request.getRequestName()}
...
${#session.getAttribute('foo')}
${#session.id}
${#session.lastAccessedTime}
...
${#servletContext.getAttribute('foo')}
${#servletContext.contextPath}
工具对象
如#messages,#dates,具体使用看官方文档,为java 量身定做的模板引擎
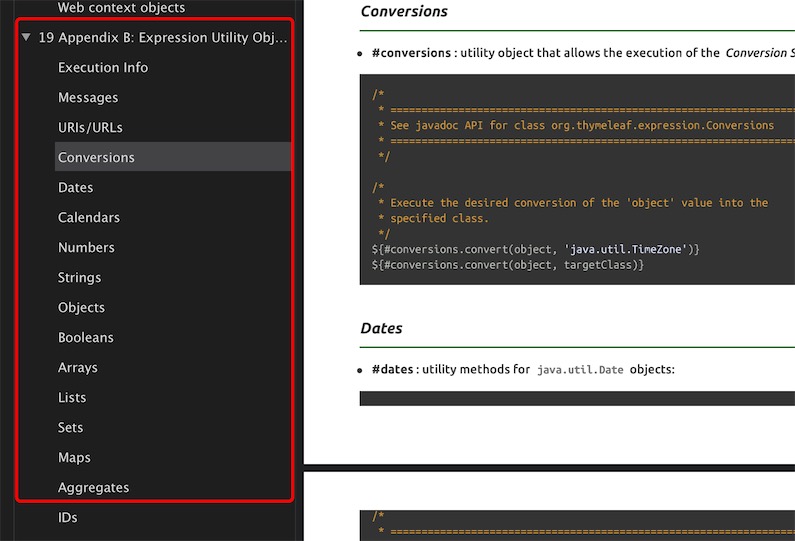
${#messages.msg('msgKey')}
${#uris.escapePath(uri)}
${#conversions.convert(object, 'java.util.TimeZone')} 转换
// See javadoc API for class org.thymeleaf.expression.Dates
${#dates.format(date, 'dd/MMM/yyyy HH:mm')} 日期格式化
${#calendars.format(cal)} calendars对象
${#numbers.formatInteger(num,3)}
${#strings.toString(obj)}
${#arrays.toArray(object)}
记住一句话:将官方文档翻熟即可,使用一个看一个
把官方文档usingthymeleaf.pdf下载到手机上看,偶尔看看,不要天天刷抖音浪费时间,还能学学英语
4、MVC 自动配置原理
官方文档阅读
学习方式:源码 + 官方文档
我们把这段官方文档拷贝下来,并翻译它
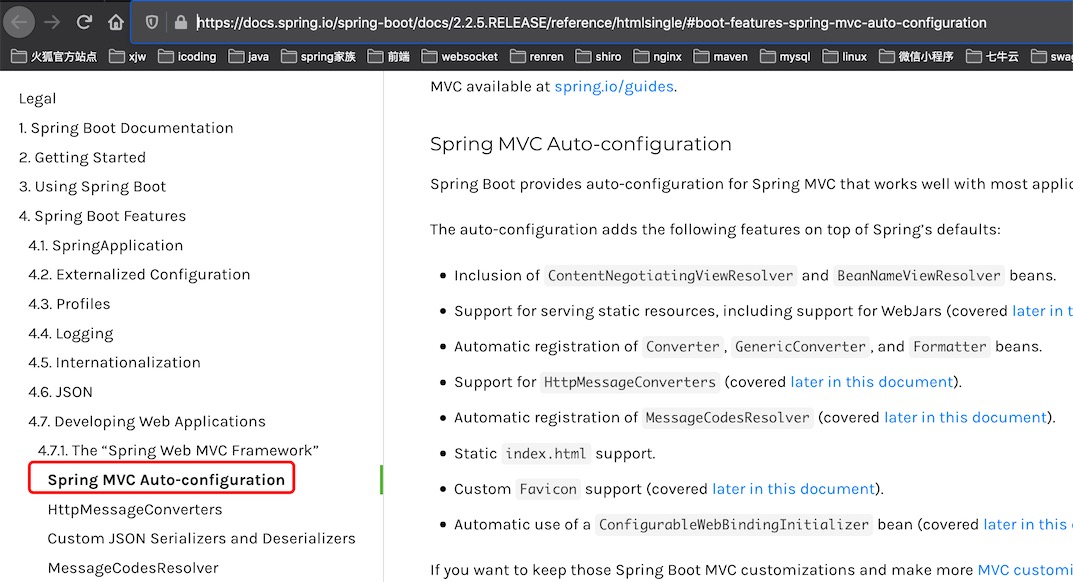
Spring MVC Auto-configuration
// Springboot 为 spring mvc 提供了自动配置,很好的工作与大多数应用
Spring Boot provides auto-configuration for Spring MVC that works well with most applications.
// 自动配置在Spring默认配置的基础上添加了以下功能
The auto-configuration adds the following features on top of Spring’s defaults:
// 包含了内容导航视图解析器和bean名称视图解析器
Inclusion of ContentNegotiatingViewResolver and BeanNameViewResolver beans.
// 支持静态资源文件路径映射,包含webjars的支持
Support for serving static resources, including support for WebJars (covered later in this document)).
// 自动注册转换器,通用转换器和格式化器
  // 例如网页提交的前端对象,到后台自动封装为具体的对象;字符串 “1” 转换为数字1,都是转换器在工作;时间字符串2020-03-18 到后台能转换为Date类型,则是Formatter bean在工作,Springbooot默认引入jackjson 配置时间格式
Automatic registration of Converter, GenericConverter, and Formatter beans.
// 支持Http消息转换,如request\response 对象自动转换为json对象
Support for HttpMessageConverters (covered later in this document).
// 自动注册消息代码解析
Automatic registration of MessageCodesResolver (covered later in this document).
// 支持静态首页定制
Static index.html support.
// 自定义网站图标
Custom Favicon support (covered later in this document).
// 自动配置web数据绑定
Automatic use of a ConfigurableWebBindingInitializer bean (covered later in this document).

// 如果你想保持Springboot 对MVC的自动配置基础上,做更多的自定义配置,如拦截器、格式化器,视图控制,你可以在自定义配置类(类型为WebMvcConfigurer),并加上注解 @Configuration ,但是不要加@EnableWebMvc注解
If you want to keep those Spring Boot MVC customizations and make more MVC customizations (interceptors, formatters, view controllers, and other features), you can add your own @Configuration class of type WebMvcConfigurer but without @EnableWebMvc.

// 如果您想自定义request请求映射路由,或者自定义异常解析,你可以声明一个WebMvcRegistrations的bean,
If you want to provide custom instances of RequestMappingHandlerMapping, RequestMappingHandlerAdapter, or ExceptionHandlerExceptionResolver, and still keep the Spring Boot MVC customizations, you can declare a bean of type WebMvcRegistrations and use it to provide custom instances of those components.

// 如果你想完全控制Spring MVC,你可以在自定义配置类上加上@EnableWebMvc注解
If you want to take complete control of Spring MVC, you can add your own @Configuration annotated with @EnableWebMvc, or alternatively add your own @Configuration-annotated DelegatingWebMvcConfiguration as described in the Javadoc of @EnableWebMvc.
内容协商视图解析器
ContentNegotiatingViewResolver ,内容协商视图解析器,
就是所有的视图解析器都会经过它来协商判断是否使用,
看源码,在springboot web项目中,按两下shift建 全局搜索WebMvcAutoConfiguration
找到ContentNegotiatingViewResolver
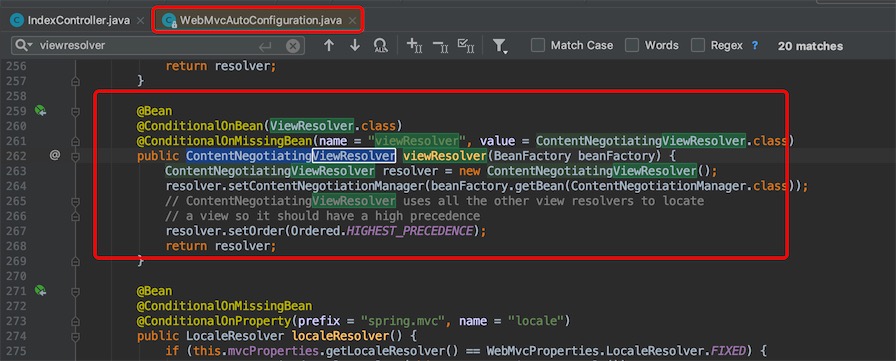
这个视图使用所有其他的视图解析器去精确定位视图,它拥有最高优先级,说明项目启动的时候会优先加载它,再去加载其他的视图解析器,由它来操作其他视图的定位
点进ContentNegotiatingViewResolver的源码,找到解析视图名字的方法resolveViewName
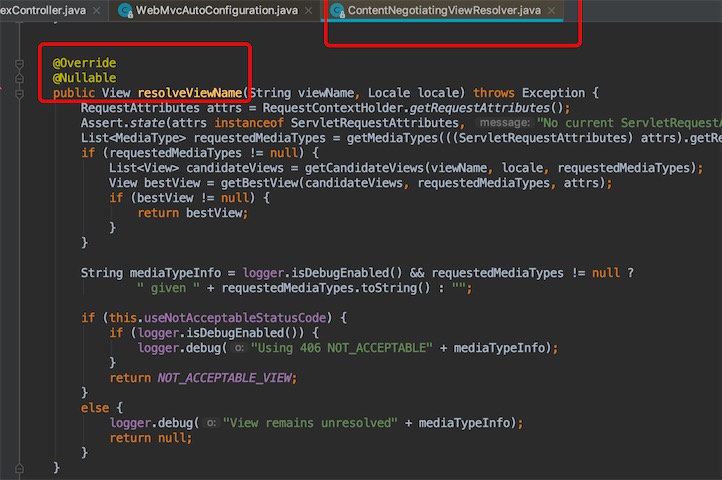
@Override
@Nullable // 参数可以为空
public View resolveViewName(String viewName, Locale locale) throws Exception {
  RequestAttributes attrs = RequestContextHolder.getRequestAttributes();
  Assert.state(attrs instanceof ServletRequestAttributes, "No current ServletRequestAttributes");
  List<MediaType> requestedMediaTypes = getMediaTypes(((ServletRequestAttributes) attrs).getRequest());
  if (requestedMediaTypes != null) {
    // 获取所有候选的视图,在分析springboot自动配置的源码时看到过getCandidate这个
    List<View> candidateViews = getCandidateViews(viewName, locale, requestedMediaTypes);
    // 获取最好的视图
    View bestView = getBestView(candidateViews, requestedMediaTypes, attrs);
    if (bestView != null) {
      return bestView; // 返回最好的视图,从所有的视图解析器中获取最好的返回
    }
  }

  String mediaTypeInfo = logger.isDebugEnabled() && requestedMediaTypes != null ?
    " given " + requestedMediaTypes.toString() : "";

  if (this.useNotAcceptableStatusCode) {
    if (logger.isDebugEnabled()) {
      logger.debug("Using 406 NOT_ACCEPTABLE" + mediaTypeInfo);
    }
    return NOT_ACCEPTABLE_VIEW; // 如果没有找到的话,就返回406错误
  }
  else {
    logger.debug("View remains unresolved" + mediaTypeInfo);
    return null;
  }
}
定义一个视图解析器
@Bean
@ConditionalOnBean(ViewResolver.class)
@ConditionalOnMissingBean(name = "viewResolver", value = ContentNegotiatingViewResolver.class)
public ContentNegotiatingViewResolver viewResolver(BeanFactory beanFactory) {
  ContentNegotiatingViewResolver resolver = new ContentNegotiatingViewResolver();
  resolver.setContentNegotiationManager(beanFactory.getBean(ContentNegotiationManager.class));
  // ContentNegotiatingViewResolver uses all the other view resolvers to locate
  // a view so it should have a high precedence
  resolver.setOrder(Ordered.HIGHEST_PRECEDENCE);
  return resolver;
}
从源码可以看出所有的视图解析器都是从beanFactory中加载的,所以我们自己写一个视图解析器,也是可以被扫描加载的!来实操一下,定义一个视图解析器配置类MyViewResolverConfig
@Configuration
public class MyViewResolverConfig {
	@Bean // 生成一个组件实例放入beanFactory
	public MyViewResolver myViewResolver(){
		return new MyViewResolver();
	}

	private static class MyViewResolver implements ViewResolver{
		@Override
		public View resolveViewName(String viewName, Locale locale) throws Exception {
			return null;
		}
	}
}
我们看一下ViewResolver接口有哪些子接口
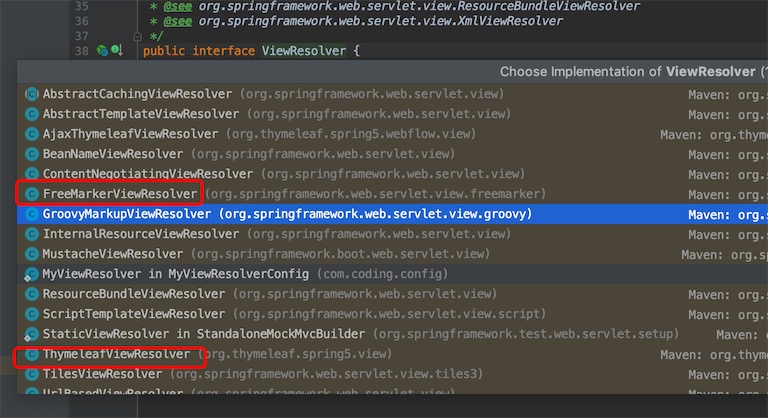
有我们熟悉的FreeMark视图解析器和Thymeleaf视图解析器,看源码,ThymeleafViewResolver 继承AbstractCachingViewResolver,后者重写了resolveViewName方法
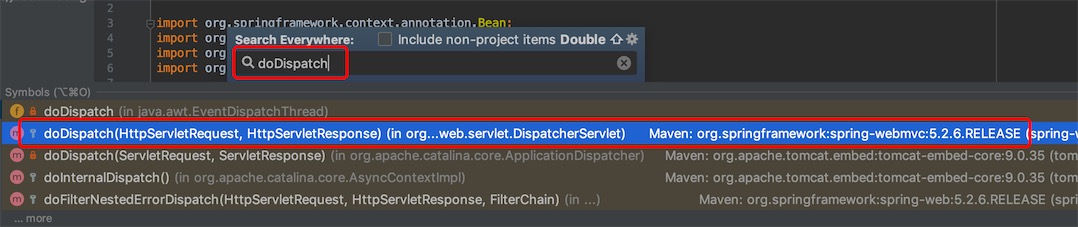
所有的request请求,没有被拦截器拦截的话,都会走到doDispatch(spring mvc下的方法) 分配到controller层对应的路由方法 ,我们debug方式启动项目
在doDispatch方法上打一个断点

浏览器访问一个请求,进入该断点,我们就可以看当前扫描的所有视图解析器
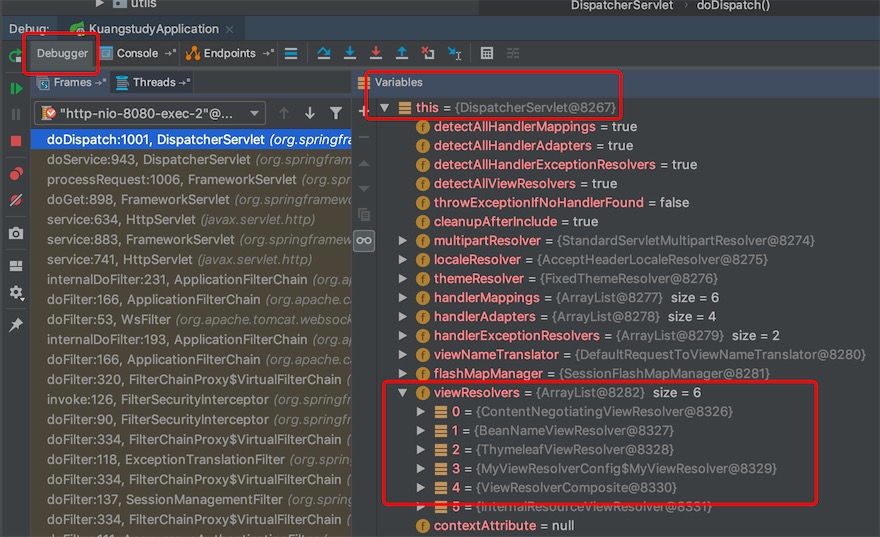
其中就有我们自定义的视图解析器MyViewResolver,也可以看到ContentNegotiatingViewResolver是第一个优先加载,有最优先级,它会协调所有的视图解析器,并返回最合适的视图解析器。
所以,记住一句话:在SpringBoot中,如果我们想要使用自己定制化的东西,只需要给Spring容器beanFactory中添加这个组件就好了。剩下的事情SpringBoot就会帮我们自动去做了。
格式转化器Formatter
全局搜索WebMvcAutoConfiguration,找到重写方法addFormatters
@Override
public void addFormatters(FormatterRegistry registry) {
  ApplicationConversionService.addBeans(registry, this.beanFactory);
}
搜索WebMvcProperties,找到dateFormat属性,发现它最终在WebMvcAutoConfiguration的方法mvcConversionService 被调用了
@Bean
@Override // 这是一个服务
public FormattingConversionService mvcConversionService() {
  WebConversionService conversionService = new WebConversionService(this.mvcProperties.getDateFormat());
  addFormatters(conversionService);
  return conversionService;
}

/** 默认的时间格式 / 开头
	 * Date format to use. For instance, `dd/MM/yyyy`.
	 */
private String dateFormat;
注意,只要在WebMvcProperties中的都可以手动配置
# 前端提交的日期格式问题,和前端提交的格式对应即可
spring.mvc.date-format=yyyy-MM-dd
实现WebMvcConfigurer
官方文档
// 如果你想保持Springboot 对MVC的自动配置基础上,做更多的自定义配置,如拦截器、格式化器,视图控制,你可以在自定义配置类(类型为WebMvcConfigurer),并加上注解 @Configuration ,但是不要加@EnableWebMvc注解
If you want to keep those Spring Boot MVC customizations and make more MVC customizations (interceptors, formatters, view controllers, and other features), you can add your own @Configuration class of type WebMvcConfigurer but without @EnableWebMvc.

// 如果你想完全控制Spring MVC,你可以在自定义配置类上加上@EnableWebMvc注解
If you want to take complete control of Spring MVC, you can add your own @Configuration annotated with @EnableWebMvc, or alternatively add your own @Configuration-annotated DelegatingWebMvcConfiguration as described in the Javadoc of @EnableWebMvc.
扩展mvc 方法,3步
-
编写自己的config配置类
-
实现接口WebMvcConfigurer
-
重写接口的默认方法
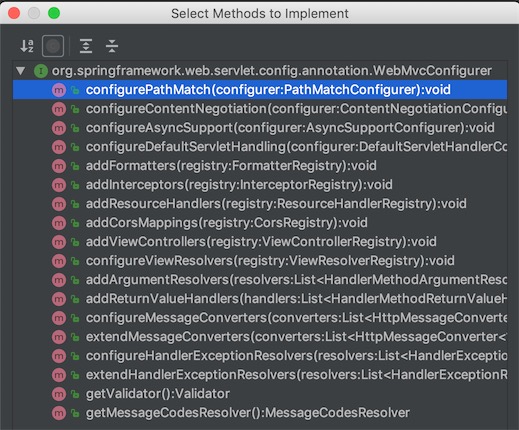
包括我们常用的配置
1) 异步支持
configureAsyncSupport2) 添加格式化器
addFormatter3) 添加拦截器
addInterceptor4) 添加资源处理
addResourceHandler5) 添加跨域配置
addCorsMappings6) 添加视图控制
addViewController7) 配置视图解析器
configureViewResolver、8) 配置返回数据处理
addReturnValueHandler、9) 配置消息转换
configureMessageConvert
// 自己编写一个视图解析、路由,spring mvc底层就是这么做的
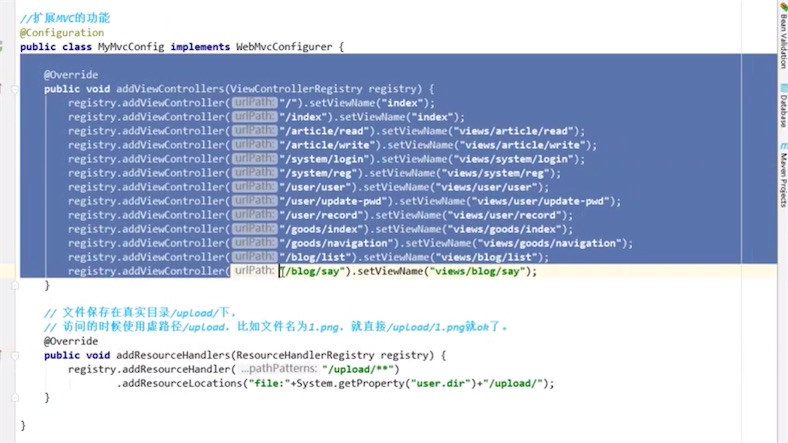
@Configuration
//@EnableWebMvc
public class MyMvcConfig implements WebMvcConfigurer {
@Override
public void addViewControllers(ViewControllerRegistry registry) {
// 视图跳转的控制!
registry.addViewController("/index").setViewName("login");
registry.addViewController("/").setViewName("login");
registry.addViewController("/index.html").setViewName("login");
registry.addViewController("/test").setViewName("login");
}
}
我们加上@EnableWebMvc注解后,方法addViewControllers添加的路由跳转依然生效,但是在@Controller注解的控制类的自动配置的路由跳转请求方法就不生效了
@Controller
public class IndexController {
  @RequestMapping({"/test"})
  public String test(){
    return "test";
  }
}
启动项目,访问/test,
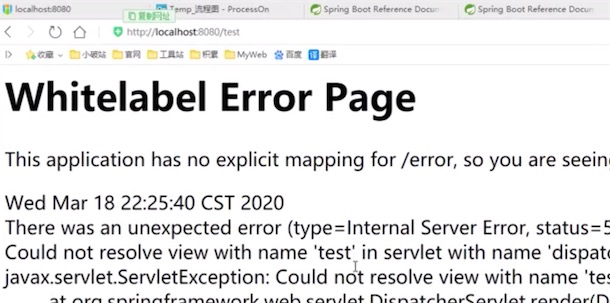
即使我们放在默认静态目录resources、static、public下静态资源js、css文件的访问都会失效,报error page错误
分析问题为什么@EnableWebMvc不要加他,点击WebMvcAutoConfiguration,springboot 自动配置的核心xxxAutoConfiguration、xxxProperties
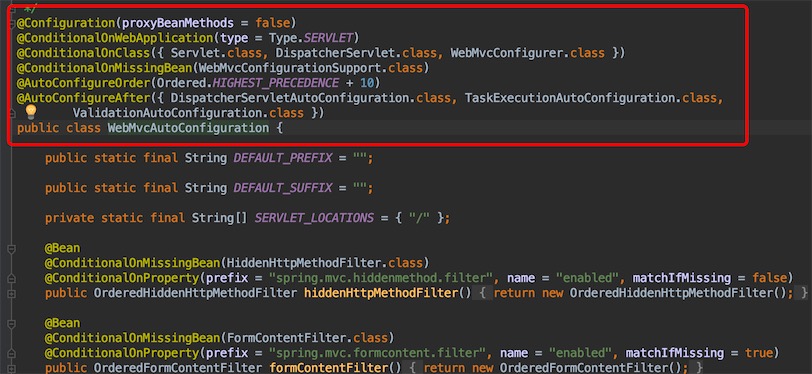
// 如果这个bean不存在,才生效
@ConditionalOnMissingBean(WebMvcConfigurationSupport.class)
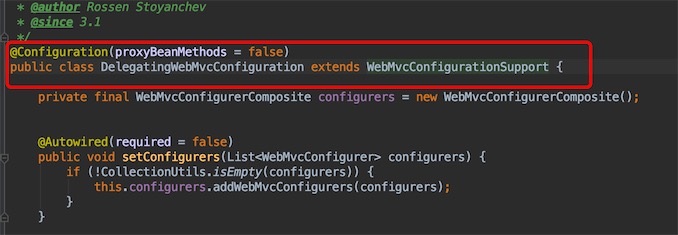
为什么会路由失效的?因为开启@EnableWebMvc注解后,会导入一个类DelegatingWebMvcConfiguration生成对应的bean,他是继承WebMvcConfigurationSupport的,所以就会导致WebMvcAutoConfiguration自动配置不生效,Springboot 对MVC的自动配置全部失效,除了我们自己实现WebMvcConfigurer的视图解析器
@Retention(RetentionPolicy.RUNTIME)
@Target(ElementType.TYPE)
@Documented
@Import(DelegatingWebMvcConfiguration.class)
public @interface EnableWebMvc {
}
小结
如果你要扩展MVC配置,但是又需要保留原来的配置,可以使用
@Configuration
public class MyMvcConfig implements WebMvcConfigurer {

}
全面接管SpringMVC
读官方文档,我们知道,只需要加一个@EnableWebMvc注解,spring只提供基本的MVC功能,其他需要自己实现。
springboot源码是很精妙的,它有非常多的这种扩展配置,应该多留心注意。
5、配置项目环境及首页
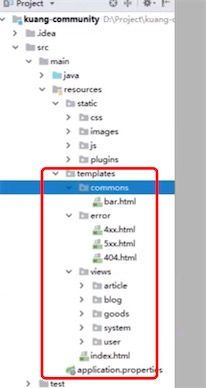
正式开发项目之前,需要将所有页面的中链接的路径改为 thymeleaf 的路径配置!
html导入thymeleaf约束文件
<html lang="zh" xmlns:th="http://www.thymeleaf.org">
配置页面支持thymeleaf
Js、css静态资源使用@{}进行适配
不使用controller,自己配置视图控制,静态路由跳转
静态页面都支持thymeleaf,写在template目录下