 弹吉他的兔子
1、8大数据类型-下
列表List
对比String的单值单value,list就是单值多Value
# =========================
# lpush (左) 将一个或者多个值插入到列表头部
# rpush (右) 将一个或者多个值插入到列表头部
# lrange 查看区间范围的值
# ==========================
# 1、往左插入值
127.0.0.1:6379> lpush list "one"
127.0.0.1:6379> lpush list "two"
# 2、往右插入值
127.0.0.1:6379> rpush list "right"
# 3、查看区间范围的值
127.0.0.1:6379> lrange list 0 -1 # -1 查看全部
"two"
"one"
"right"
127.0.0.1:6379> lrange list 0 1
"two"
"one"

# 4、lpop(左)弹出
127.0.0.1:6379> lpop list
"two"
# 5、rpop(右)弹出
127.0.0.1:6379> rpop list
"right"
127.0.0.1:6379> lrange list 0 -1
"one"

# =========================
# 6、通过下标获取列表中的元素 lindex (0 代表第一个,-1最后一个)
# ==========================
127.0.0.1:6379> lindex list 0
"one"
127.0.0.1:6379> lindex list -1
"one"
# 7、llen 返回列表的长度
127.0.0.1:6379> lpush list "two"
127.0.0.1:6379> rpush list "three"
127.0.0.1:6379> llen list
(integer) 3
# 8、lrem list count el 移除列表中指定元素,count表示移除的数量,返回被移除的数量
# 例子:hello hello foo hello
# count = 0 : 移除表中所有与 VALUE 相等的值
# count < 0 : 从表尾开始向表头搜索,移除与 VALUE 相等的元素,数量为 COUNT 的绝对值
# count > 0 : 从表头开始向表尾搜索,移除与 VALUE 相等的元素,数量为 COUNT
127.0.0.1:6379> rpush list "hello"
127.0.0.1:6379> rpush list "hello"
127.0.0.1:6379> rpush list "foo"
127.0.0.1:6379> rpush list "hello"
127.0.0.1:6379> lrem list -2 "hello" # 从表尾开始向表头搜索,移除2个元素
(integer) 2
127.0.0.1:6379> lrange list 0 -1
"hello"
"foo"
# =========================
# 9、ltrim 对列表进行修剪,返回最终指定的区间元素
# ==========================
127.0.0.1:6379> flushdb
127.0.0.1:6379> rpush list "hello"
127.0.0.1:6379> rpush list "hello"
127.0.0.1:6379> rpush list "hello2"
127.0.0.1:6379> ltrim list 1 2
ok
127.0.0.1:6379> lrange list 0 -1
"hello"
"hello2"
# =========================
# 10、rpoplpush 移除列表中最后一个元素,放入新列表中
# ==========================
127.0.0.1:6379> rpush mylist "hello"
127.0.0.1:6379> rpush mylist "aaaa"
127.0.0.1:6379> rpush mylist "bbbb"
127.0.0.1:6379> rpoplpush mylist newlist
"bbbb"
127.0.0.1:6379> lrange mylist 0 -1
"hello"
"aaaa"
# =========================
# 11、lset 修改列表中指定下标的值
# ==========================
127.0.0.1:6379> lset mylist 1 "eeee"
127.0.0.1:6379> lrange mylist 0 -1
"hello"
"eeee"
# 超出下标 ,报错!
127.0.0.1:6379> lset mylist 2 "cccc"
(error) ERR index out of range
# =========================
# 12、linsert 按照某个位置进行插入,前后
# ==========================
127.0.0.1:6379> linsert mylist after "hello" "world"
(integer) 3
127.0.0.1:6379> lrange mylist 0 -1
"hello"
"world"
"eeee"
总结:
- 字符串链表,left right 都可以插入元素
- 如果key不存在,创建一个新的链表,存在,在链表新增内容
- 如果值没有了,链表key也就消失了
- 链表的操作无论是头还是尾部,效率很高,如果你要操作中间元素,效率就很低了
List结构是否可以显示最新消息排行功能?
可以,使用lpush 把消息插入左边,那就是最新消息
List应用之一:消息队列,lpush 任务,rpop操作将任务取出
由于redis的特殊性,list在这里可以玩成栈,也可以作为队列
集合Set
单值多Value
# =========================
# sadd 将一个或者多个元素插入到集合中,但是元素不能重复
# smembers 查看set集合的元素
# sismember 判断某一个元素是否属于集合
# ==========================
# 1、sadd 插入元素到集合
127.0.0.1:6379> sadd myset "hello" "coding" "coding"
(integer) 2
# 2、smembers 查看集合中的元素
127.0.0.1:6379> smembers myset
1) "coding"
2) "hello"
# 3、sismember 判断元素
127.0.0.1:6379> sismember myset "world"
(integer) 0
# 4、scard 返回集合里元素个数
127.0.0.1:6379> scard myset
(integer) 2
# 5、srem 从集合移除元素
127.0.0.1:6379> srem myset "coding"
127.0.0.1:6379> smembers myset
1) "hello"

# =========================
# 6、srandmember 从集合随机返回一个或者多个指定个元素
# 应用场景:随机抽奖
# =========================
127.0.0.1:6379> sadd students wan guozhongyao wuqing cwweb jude
127.0.0.1:6379> srandmember students
"wuqing"
127.0.0.1:6379> srandmember students
"guozhongyao"
127.0.0.1:6379> srandmember students
"jude"
127.0.0.1:6379> srandmember students
127.0.0.1:6379> srandmember students 2
1) "cwweb"
2) "guozhongyao"

# 7、smove 将指定成员从一个集合移动到另外一个集合
127.0.0.1:6379> smove students good-students jude
# 如果集合key不存在,会自动创建
127.0.0.1:6379> smembers good-students
1) "jude"
127.0.0.1:6379> smembers students
1) "wan"
2) "wuqing"
3) "cwweb"
4) "guozhongyao"

# =========================
# 数据交集:
# =========================
127.0.0.1:6379> sadd students-beijing wan wuqing coding
# 8、sdiff 差集 一个集合相对于另外一个集合多出来的元素 (减)
127.0.0.1:6379> sdiff students students-beijing
1) "cwweb"
2) "guozhongyao"
# 9、sinter 交集 两个集合都有的元素
127.0.0.1:6379> sinter students students-beijing
1) "wuqing"
2) "wan"
# 10、sunion 并集
127.0.0.1:6379> sunion students students-beijing
1) "guozhongyao"
2) "coding"
3) "wan"
4) "wuqing"
5) "cwweb"
集合的应用场景:将一个用户所有关注人存在一个集合中,所有的粉丝放到另外一个集合中。
- 交集,共同关注的人
- 差集,二度好友(可能认识的人)
哈希Hash
特殊的键值对,(k, (k, v) ),两层key,其实像java的map
# 1、hset 给哈希key的field设置值
127.0.0.1:6379> hset myhash field1 "hello"
# 2、hmset 批量设置字段的值
127.0.0.1:6379> hmset myhash field2 "world" field3 "jude"
# 3、hget 获取单个字段的值
127.0.0.1:6379> hget myhash field1
"hello"
# 4、hmget 获取多个字段的值
127.0.0.1:6379> hmget myhash field2 field3
1) "world"
2) "jude"
# 5、hetall 获取所有字段和值
127.0.0.1:6379> hgetall myhash
# 6、hdel 删除一个或多个字段,没有字段 哈希键就消失了
127.0.0.1:6379> hdel myhash field2 field3
(integer) 2
127.0.0.1:6379> exists myhash
(integer) 0

# =================
# 7、hlen 获取字段的数量
# 8、hkeys 查看所有的字段
# 9、hvals 查看所有的值
# =================
127.0.0.1:6379> hmset myhash field1 "good" field2 "good" field3 "study"
127.0.0.1:6379> hlen myhash
(integer) 3

# =================
# 10、hincrby 给指定字段增加值
# 11、hsetnx 为哈希表中不存在的字段赋值
# =================
127.0.0.1:6379> hset myhash field4 5
127.0.0.1:6379> hincrby myhash field4 1
(integer) 6
127.0.0.1:6379> hincrby myhash field4 -10
(integer) -4
127.0.0.1:6379> hsetnx myhash name "jude"
(integer) 1
127.0.0.1:6379> hsetnx myhash name "jude"
(integer) 0
Redis Hash 是一个String 类型的field和vlaue的映射表,十分适合我们的对象!

有序集合Zset
基于set,增加了一个score值,结构如下
原来的:set k1 v1 v2
现在的:set k1 score v1 score v2. 权重,分数
# =========================
# 1、zadd 添加一个或多个成员
# 2、zrange 通过索引区间查看值,分数从低到高 ,递增
# 3、zrangebyscore 根据分数显示有序集合 ,分数从低到高
# =========================
127.0.0.1:6379> zadd salary 2000 wan 5000 wuqing 3000 jude
(integer) 3
127.0.0.1:6379> zrange salary 0 -1
1) "wan"
2) "jude"
3) "wuqing"
127.0.0.1:6379> zrangebyscore salary -inf +inf
1) "wan"
2) "jude"
3) "wuqing"
# 带上分数
127.0.0.1:6379> zrangebyscore salary -inf +inf withscores
1) "wan"
2) "2000"
3) "jude"
4) "3000"
5) "wuqing"
6) "5000"
# 工资<=2500的人
127.0.0.1:6379> zrangebyscore salary -inf 2500 withscores
1) "wan"
2) "2000"
# 工资>=2500的人
127.0.0.1:6379> zrangebyscore salary 2500 +inf withscores
1) "jude"
2) "3000"
3) "wuqing"
4) "5000"

# =========================
# 4、zrevrange 通过索引区间查看值,分数从高到低,递减
# 5、zrevrangebyscore 根据分数显示有序集合 ,分数从高到低
# =========================
127.0.0.1:6379> zrevrange salary 0 -1
1) "wuqing"
2) "jude"
3) "wan"
# 薪水介于 5000 和2500的人
127.0.0.1:6379> zrevrangebyscore salary 5000 2500 withscores
1) "wuqing"
2) "5000"
3) "jude"
4) "3000"

# =========================
# 6、zrem 移除有序集合中的一个和多个元素
# 7、zcard 计算集合中的成员个数
# 8、zcount 统计指定分数区之间的成员数量
# =========================
127.0.0.1:6379> zcard salary
(integer) 3
# 工资介于2000(包含) 到 5000(包含) 的员工数量
127.0.0.1:6379> zcount salary 2000 5000
(integer) 3
应用场景:
-
存储全班同学的成绩zset,天然自带排序 score
- 普通消息(1 msg), 紧急消息(2 msg) ,权重高的优先处理
- 排行榜应用,zset应用十分广泛
地理位置Geospatial
geo就是可以把用户的地理位置信息存储起来,
应用场景:附件的人,摇一摇,周围多少距离
将给定的位置(经度和纬度)定位一个元素,本质:有序集合 zset
# =========================
# 1、geoadd 添加一个或多个地理到key中
# =========================
# redis-cli 客户端中文乱码问题,加参数连接 --raw
[root@VM_0_3_centos ~]# redis-cli -p 6379 --raw
127.0.0.1:6379> geoadd china:city 116.23128 40.22077 北京 108.93425 34.23053 西安 113.27324 23.15792 广州 113.88308 22.55329 深圳
127.0.0.1:6379> geoadd china:city 106.54041 29.40268 重庆 113.6401 34.72468 郑州

# zrange 查看所有的值
127.0.0.1:6379> zrange china:city 0 -1
重庆
西安
深圳
广州
郑州
北京

# =========================
# 2、geopos 查看某个地方的地理位置,不存在返回nil
# =========================
127.0.0.1:6379> geopos china:city 上海 北京

116.23128265142440796
40.22076905438526495

# =========================
# 两点之间的距离,计算使用一个球形来计算的,但地球是一个椭圆型,会有误差
# 3、geodist key member1 member2 [unit]
# unit单位:m(米) km(千米) mi(英里) ft(英尺)
# =========================
127.0.0.1:6379> geodist china:city 北京 重庆
"1491536.4099"
127.0.0.1:6379> geodist china:city 北京 深圳 km
"1977.4843"

# =========================
# 附件的人
# 4、georadius 以给定的经纬度为中心, 找出某一半径内的元素
# key longitude latitude radius m|km|mi|ft [withcoord] [withdist] [withhash]
# =========================
127.0.0.1:6379> georadius china:city 110.99 35.01 500 km
西安
郑州
# 带上经纬度
127.0.0.1:6379> georadius china:city 110.99 35.01 500 km withscoord
西安
108.93425256013870239
34.23053097599082406
郑州
113.64010244607925415
34.72467993544626808
# 带上距离
127.0.0.1:6379> georadius china:city 110.99 35.01 500 km withdist
西安
207.1730
郑州
243.9106
# 指定数量
127.0.0.1:6379> georadius china:city 110.99 35.01 500 km withdist
count 1
西安
207.1730

# =========================
# 附件的人 通过 member
# 5、georadiusbymember
# =========================
127.0.0.1:6379> georadiusbymember china:city 北京 1000 km withdist
郑州
652.6135
北京
0.0000
西安
927.5371

# =========================
# 6、删除元素 zrem 因为它本质上还是zset
# =========================
127.0.0.1:6379> zrem china:city 广州
1
127.0.0.1:6379> zrange china:city 0 -1
重庆
西安
深圳
郑州
北京
地图信息表:java批量录入到我们的china:city,然后就可以对所有的地图进行相关的操作
动态录入:获取当前用户的地理位置(APP接口),根据这个范围找到附近的人
Bitmaps
应用场景:统计用户的信息,如活跃和不活跃,登录和没的登录,一年的打卡情况
-
传统方案:key/value 365个记录,如果用户量很大,空间很浪费
-
Redis的bitmaps功能: 365位(01010001….),节约内存,1byte(B 字节)=8bit(位),所以46个字节(byte)即可存下
1KB = 1024B, 1MB = 1024KB,1GB = 1024MB
# 打卡 sign:userid day记录天数 值就是0 和 1
# 1、setbit set操作,设置 一周的打卡情况
127.0.0.1:6379> setbit sign:1 0 0
127.0.0.1:6379> setbit sign:1 1 1
127.0.0.1:6379> setbit sign:1 2 1
127.0.0.1:6379> setbit sign:1 3 1
127.0.0.1:6379> setbit sign:1 4 1
127.0.0.1:6379> setbit sign:1 5 1
127.0.0.1:6379> setbit sign:1 6 0
# =============================
# 2、getbit get操作
# =============================
# 查看周三是否打卡
127.0.0.1:6379> getbit sign:1 3
1
# 查看周五是否打卡
127.0.0.1:6379> getbit sign:1 5
1

# =============================
# 3、bitcount 统计,返回1的个数
# =============================
127.0.0.1:6379> bitcount sign:1
5
小结:我们在生活中,编程中,只要只有两个标注位0 和1,我们都可以使用bitmap 进行操作,这样的话十分方便。
HyperLogLog
Hyperloglog 是用来做基数统计的,优点
- 输入的体积无论多么大,hyperloglog使用的空间总是固定的12KB,很小
利用12kb,它可以计算2^64个不同元素的基数
应用场景:网页统计UV(user view),用户浏览数量,一天同一个用户访问多次,只能算访问一次,目的是计数,不是保存用户。
-
传统的方案 : set 集合(用户的id ,保存到set中),获取set的大小,用户量大,10亿,大数据就会出问题。
-
Redis的hyperloglog,只需要12KB就可以统计超大的用户数量,可以计算2^64个不同元素的基数
什么是基数
原数据集{1,3,5,7,5,7,8}
基数集{1,3,5,7,8} 不重复的元素
# 1、pfadd 添加多个元素到 hyperloglog
127.0.0.1:6379> pfadd mykey a b c d a a b b i j
127.0.0.1:6379> pfadd mykey g h j
# 2、pfcount 返回hyperloglog的基数估算值
127.0.0.1:6379> pfcount mykey
8
# 3、pfmerge 合并多个基数集
127.0.0.1:6379> pfadd mykey2 i k j l m n m n o
127.0.0.1:6379> pfmerge mykey3 mykey mykey2
127.0.0.1:6379> pfcount mykey3
13
统计不重复的数,大数据量更好,有容错率,精确的统计就不要用hyperloglog,因为它存在~1%的错误率!
2、配置文件Redis.conf
# 查看redis实例的全部配置
127.0.0.1:6379> config get *
 1) "dbfilename"
  1) "dump.rdb"
  2) "requirepass"
  3) "juderedis"
....
209) "slaveof"
210) ""
211) "notify-keyspace-events"
212) "xKE"
213) "bind"
214) "0.0.0.0"

# 热设置redis的参数项,不用重启redis
# 更改rdb持久化配置
127.0.0.1:6379> config set "9000 10 3000 100 600 100000"
# 更改连接超时
127.0.0.1:6379> config set timeout 250
Unit单位
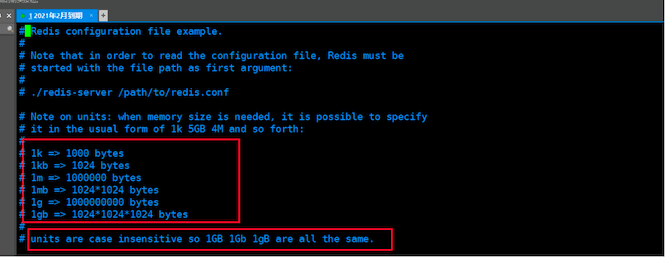
配置大小单位,大小写不敏感
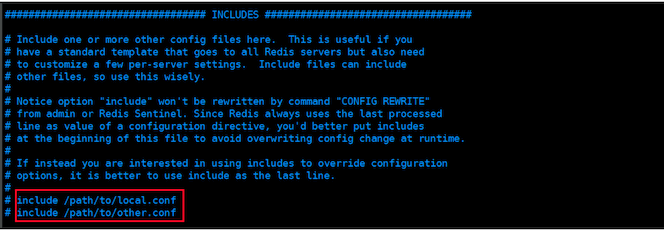
Include 包含配置文件
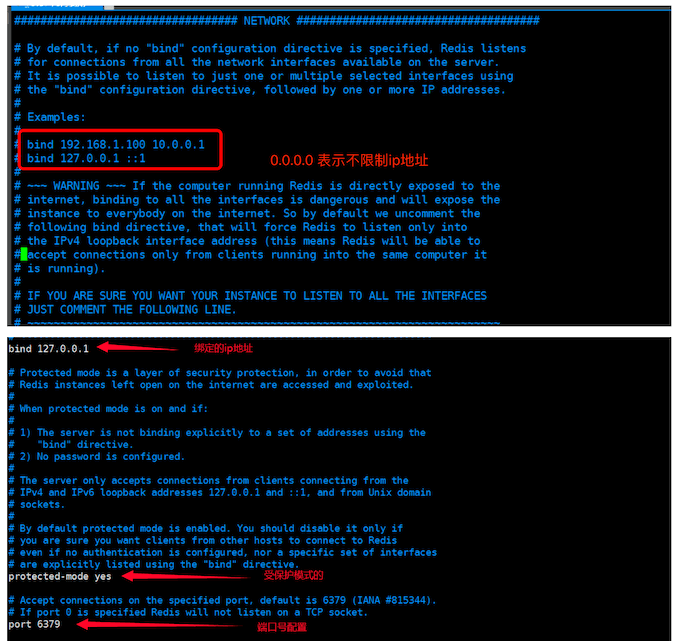
Network 网络相关配置
通用配置
daemonize no # 是否使用守护进程(后台)启动,默认no
supervised no # 是否可以通过 systemd来管里redis的守护进程,默认no
pidfile   # 以后台方式启动redis,就需要指定pid文件
loglevel notice # 日志级别
	# debug (a lot of information,useful for devlopment/testing)
	# verbose (many rarely useful info,but not a mess like the debug level)
	# notice (moderately verbose ,what you want in production probably) 生产环境
	# warning (only very imporant / critical message are logged)
logfile "" # 日志文件位置,如果为空,标准输出
databases 16 # 数据库的数量,默认16个,自己设置
always-show-logo yes # 显示logo
RDB持久化
# rdb 持就化配置
save 900 1		# 900秒内,只要发生一次变化,就会触发一次 rdb操作
save 300 10
save 60 10000
# 持久化出现错误之后,redis是否停止写入
stop-writes-on-bgsave-error yes
# 是否压缩rdb文件,需要消耗cpu,no: 不压缩,需要更多的磁盘空间
rdbcompression yes
# 是否检查rdb文件,利于文件的容错性,大概有10%的内存性能损耗
rdbchecksum yes
# 持久化文件名,配合下面的 dir配置
dbfilename dump.rdb
# The working directory.
# The DB will be written inside this directory, with the filename specified
# above using the 'dbfilename' configuration directive.
# The Append Only File will also be created inside this directory.
# Note that you must specify a directory here, not a file name.
dir ./  # 数据目录
集群 Replication
# 角色是从节点,设置主节点的IP 端口
# slave上配置
replicaof <masterip> <masterport>
# 主节点的访问密码,无密码不用配置
masterauth <master-password>
# redis6.0版本还多一个配置
masteruser <username>
# yes 主从复制中,从服务器可以响应客户端请求
# no 主从复制中,从服务器将阻塞所有请求,有客户端请求时返回“SYNC with master in progress”;
# 默认开启yes
# slave上配置
replica-serve-stale-data yes
# slave节点只允许read 默认就是 yes
replica-read-only yes

# Replication SYNC strategy: disk or socket.
# New replicas and reconnecting replicas that are not able to continue the replication
# process just receiving differences, need to do what is called a "full
# synchronization". An RDB file is transmitted from the master to the replicas.
# The transmission can happen in two different ways:
#
# 1) Disk-backed: The Redis master creates a new process that writes the RDB
#                 file on disk. Later the file is transferred by the parent
#                 process to the replicas incrementally.
# 2) Diskless: The Redis master creates a new process that directly writes the
#              RDB file to replica sockets, without touching the disk at all.
#
# With disk-backed replication, while the RDB file is generated, more replicas
# can be queued and served with the RDB file as soon as the current child producing
# the RDB file finishes its work. With diskless replication instead once
# the transfer starts, new replicas arriving will be queued and a new transfer
# will start when the current one terminates.
#
# When diskless replication is used, the master waits a configurable amount of
# time (in seconds) before starting the transfer in the hope that multiple replicas
# will arrive and the transfer can be parallelized.
#
# With slow disks and fast (large bandwidth) networks, diskless replication works better. 硬盘io低而带宽足,可以选择不落盘diskless的方式不同步rdb数据
# 从节点同步主节点的数据,是否采用不落盘的方式,默认no,就是落盘,详情看上面的注释,可以看得懂
# diskless:不落盘,主节点会开启一个进程直接从内存读取rdb数据到从节点的socket传送数据,不,不读取磁盘的rdb文件。
# master上配置
repl-diskless-sync no
# When diskless replication is enabled, it is possible to configure the delay
# the server waits in order to spawn the child that transfers the RDB via socket
# to the replicas.
#
# This is important since once the transfer starts, it is not possible to serve
# new replicas arriving, that will be queued for the next RDB transfer, so the server
# waits a delay in order to let more replicas arrive.
#
# The delay is specified in seconds, and by default is 5 seconds. To disable
# it entirely just set it to 0 seconds and the transfer will start ASAP.
# 不落盘同步主节点数据开启了,才有效
# master上配置
repl-diskless-sync-delay 5
# 是否禁止复制tcp链接的tcp nodelay参数,可传递yes或者no。
# 默认是no,即使用tcp nodelay,允许小包的发送。对于延时敏感型,同时数据传输量比较小的应用,开启TCP_NODELAY选项无疑是一个正确的选择
# 如果master设置了yes来禁止tcp nodelay设置,在把数据复制给slave的时候,会减少包的数量和更小的网络带宽。
# 但是这也可能带来数据的延迟。
# 默认我们推荐更小的延迟,但是在数据量传输很大的场景下,建议选择yes。
# 默认开启并配置为no,
# master上配置
repl-disable-tcp-nodelay no
# 当master不可用,Sentinel会根据slave的优先级选举一个master。
# 最低的优先级的slave,当选master。
# 而配置成0,永远不会被选举。
# 注意:要实现Sentinel自动选举,至少需要2台slave。
# 默认开启,
# 在slave上配置
replica-priority 100
限制客户端连接数
# 最大客户端连接数
maxclients 10000
Aof 持久化配置
# 是否开启aof ,默认不开启
appendonly no
# aof文件 ,在dir目录下
appendfilename "appendonly.aof"
限制最大内存与移除策略
# 最大使用内存
maxmemory <bytes>
# 当缓存消耗的内存超过这个数值时, 将触发数据淘汰。该数据配置为0时,表示缓存的数据量没有限制, 即LRU功能不生效。64位的系统默认值为0,32位的系统默认内存限制为3GB
# 移除策略,默认不移除数据,写入时报Error无法写入
maxmemory_policy noeviction
# 随机采样的精度,也就是随即取出key的数目。该数值配置越大, 越接近于真实的LRU算法,但是数值越大,相应消耗也变高,对性能有一定影响,样本值默认为5。
maxmemory_samples 5

- volatile-lru: 在所有带有过期时间的 key 中使用 LRU 算法淘汰数据;
- alkeys-lru: 在所有的 key 中使用最近最少被使用 LRU 算法淘汰数据,保证新加入的数据正常;
- volatile-random: 在所有带有过期时间的 key 中随机淘汰数据;
- allkeys-random: 在所有的 key 中随机淘汰数据;
- volatile-ttl: 在所有带有过期时间的 key 中,淘汰最早会过期的数据;
- noeviction: 不回收,当达到最大内存的时候,在增加新数据的时候会返回 error,不会清除旧数据,这是 Redis 的默认策略;
策略的执行过程如下:
-
客户端运行命令,添加数据申请内存;
-
Redis 会检查内存的使用情况,如果已经超过的最大限制,就是根据配置的内存淘汰策略去淘汰相应的 key,从而保证新数据正常添加;
-
继续执行命令
近似的 LRU 算法
Redis 使用的是经过采样的LRU,通过配置文件中设置 maxmemory-samples 5 来设置采样的大小,默认值是5,可以自行调整,从官方提供的采样图对比,发现采样值设置为10时,已经比较接近真实的LRU了,

Redis 之所以不采样实际的 LRU 算法,是因为会耗费很多的内存,原文是这样说的:The reason why Redis does not use a true LRU implementation is because it costs more memory.
总结: 行家一出手,就知有没有
1、学习需要,记录
2、调优需要,记录
**以后学习一些配置文件的时候,或者中间件,了解完基础知识,就去看看配置文件**3、Key的过期策略
上面讲的是redis达到最大使用内存,触发的数据移除策略,如果key本身带有过期时间,redis又是如何清除带有过期时间的key?Redis采用两种策略进行删除
-
定时删除
给每个 key 加一个定时器,这样当时间到达过期时间的时候就自动删除 key,但是会占用较多的CPU,是主动的方式。
-
惰性删除
在每次访问一个 key 的时候再去判断这个 key 是否到达过期时间了,过期了就删除掉,对CPU友好,如果这些过期的 key 我们再也不会访问,那么永远就不会删除了(除非达到最大内存触发移除策略)。
所以Redis在实际场景是两种方式都会用到,定时删除策略,官网是这样说的
Specifically this is what Redis does 10 times per second:
每秒,触发10次以下操作
1. Test 20 random keys from the set of keys with an associated expire.
有过期时间的 Key 集合中随机 20 个出来
2. Delete all the keys found expired.
删掉已经过期的 Key
3. If more than 25% of keys were expired, start again from step 1.
如果比例超过 25%,再重新从第1步开始