 弹吉他的兔子
1. 分布式全局id概述及引发的问题
- 在创建表的时候我们对主键id都是使用自增,通过这个来唯一区分数据
- 在分库分表的场景中自增id就出现无法解决重复的问题了
- 两条不同的业务数据由于id重复,就会导致查询出错或关联数据有问题
2. 通过UUID实现全局id
InnoDB引擎是一个索引组织表(数据和索引放在同一个文件), 数据会跟着主键ID来排序和相应的数据排列,一旦数据ID发生变化会导致索引重排,如果主键ID是有序的就不会发生重排,但是uuid是无序的会导致数据跟着索引进行重排浪费性能,所以一般不建议使用uuid作为主键。但是MyISAM引擎的数据和索引是分开文件存储的,使用UUID作为主键不影响数据的排序
优点:
- UUID通用唯一识别码
- 值差异大,使用uuid作为条件查询会较快
缺点:
- 只是一个单纯的id,没有实际意义,长度32位,太长没有顺序对MySQL innoDB引擎的索引组织表极不友好
MyCat不支持UUID的方式的,Sharding-Jdbc支持UUID的方式
2.1. 在sharding-jdbc中使用UUID进行分库
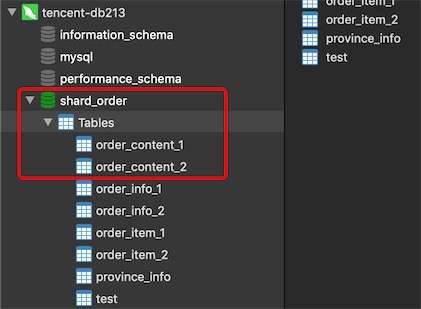
第一步:分别在两个数据库db213和db214的schema shard_order下创建表
CREATE TABLE `order_content_1` (
  `id` varchar(32) NOT NULL,
  `order_amount` decimal(10,2) DEFAULT NULL,
  `order_status` int(255) DEFAULT NULL,
  `user_id` int(11) DEFAULT NULL,
  PRIMARY KEY (`id`)
) ENGINE=InnoDB DEFAULT CHARSET=utf8;
CREATE TABLE `order_content_2` (
  `id` varchar(32) NOT NULL,
  `order_amount` decimal(10,2) DEFAULT NULL,
  `order_status` int(255) DEFAULT NULL,
  `user_id` int(11) DEFAULT NULL,
  PRIMARY KEY (`id`)
) ENGINE=InnoDB DEFAULT CHARSET=utf8;
第二步:配置application.properties将UUID的列作为数据库的划分方式,userid作为分表的规则
我们就需要将inline的规则改成standard的规则,并自己实现standard的分片规则类
# 分库的规则
spring.shardingsphere.sharding.tables.order_content.database-strategy.standard.sharding-column=id
spring.shardingsphere.sharding.tables.order_content.database-strategy.standard.precise-algorithm-class-name=com.icodingedu.config.MyShardingRule
# 分表的规则
# 分表的规则
spring.shardingsphere.sharding.tables.order_content.table-strategy.inline.sharding-column=user_id
spring.shardingsphere.sharding.tables.order_content.table-strategy.inline.algorithm-expression=order_content_$->{user_id % 2 + 1}
# 指定id的生成规则为UUID
# 指定id的生成规则为UUID,由sharding-jdbc提供
# 如果声明值的写入就会使用写入的而不是UUID(就是说id没有值才会使用uuid)
spring.shardingsphere.sharding.tables.order_content.key-generator.column=id
spring.shardingsphere.sharding.tables.order_content.key-generator.type=UUID
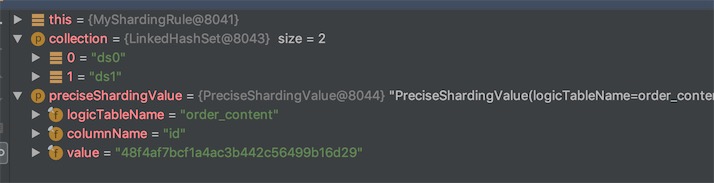
分库的自定义类
package com.icodingedu.config;

import org.apache.shardingsphere.api.sharding.standard.PreciseShardingAlgorithm;
import org.apache.shardingsphere.api.sharding.standard.PreciseShardingValue;
import org.springframework.context.annotation.Configuration;
import org.springframework.stereotype.Component;

import java.util.Collection;

public class MyShardingRule implements PreciseShardingAlgorithm<String> {

    @Override
    public String doSharding(Collection<String> collection, PreciseShardingValue<String> preciseShardingValue) {
      // 拿到用来分库的值
        String id = preciseShardingValue.getValue();
      // 通过hash才取模得到ds0还是ds1
        int mode = id.hashCode()%collection.size();
      // 绝对值
        mode = Math.abs(mode);
        Object [] nodes = collection.toArray();
        return nodes[mode].toString();
    }
}
测试
@Test
void insertOrderContent() {
  String sql = "insert into order_content(order_amount,order_status,user_id) values(333,1,10)";
  int i = jdbcTemplate.update(sql);
  System.out.println("******* 影响的结果:"+i);
}

3. 通过雪花算法实现全局id
全局分布式ID方案总结:https://www.cnblogs.com/haoxinyue/p/5208136.html
-
SnowFlack是由Twitter提出的分布式ID算法
-
是一个64bit的long型数字
-
引入了时间戳的概念,保持自增
-
SnowFlack数据结构
- 第一位是0固定不变的,表示一个正数,如果是1就是负数了
- 41位的时间戳:当前时间减去你设置的开始时间的毫秒数,开始时间在雪花算法生成里可以设置,最长的时间范围是69年
- 5位的机房id
- 5位的机器id:5位机房和5位机器唯一标识机器的序列,可以配置2的10次方,也就是1024个机器在并发的情况下可以不重复
- 12位的序号:同一时间同一机器并发可以生成2的12次方个序列,也就是说有4096个不同
- 说明雪花支持毫秒级的并发是4096个

-
时间回调会引起重复
你在一开始上线的时候和实际的时间不一致,比实际早,发现后将时间修改就有一定可能导致时间重叠出现重复,重复的几率比较低
-
MyCat和sharding-jdbc都支持雪花算法
-
Sharding-jdbc可以设置最大容忍回调时间,如果超过之后再通过snowflack生成id会抛出异常
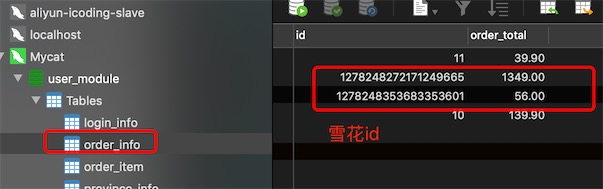
3.1. MyCat如何使用雪花生成id
# 0.首先要将id由int修改为bigint(19),unsigned(无符号)
# 1.修改server.xml的配置,修改为2将自动生成的id变更为雪花算法方式
# 你会发现Mycat默认就是2的
[root@helloworld conf]# vim server.xml
<property name="sequnceHandlerType">2</property>

# 2.设置机房id和机器id
# conf下的sequence_time_conf.properties
[root@helloworld conf]# vim sequence_time_conf.properties
WORKID=03 #机器id,不超过32
DATAACENTERID=03 #机房id,不超过32

# 3.配置表生成的id规则
# 修改schema.xml
[root@helloworld conf]# vim schema.xml
<table name="order_info" dataNode="dn213,dn214" rule="mod-long" autoIncrement="true" primaryKey="id">
		<childTable name="order_item" joinKey="order_id" parentKey="id"/>
</table>
# autoIncrement
# primaryKey

# 4、重启mycat
[root@helloworld conf]# ../bin/mycat restart

3.2. Sharding-Jdbc实现雪花
# 给两个数据源命名
spring.shardingsphere.datasource.names=ds0,ds1
# 数据源链接ds0要和命名一致
spring.shardingsphere.datasource.ds0.type=com.zaxxer.hikari.HikariDataSource
spring.shardingsphere.datasource.ds0.driver-class-name=com.mysql.jdbc.Driver
spring.shardingsphere.datasource.ds0.jdbcUrl=jdbc:mysql://39.103.163.215:3306/shard_order
spring.shardingsphere.datasource.ds0.username=gavin
spring.shardingsphere.datasource.ds0.password=123456
# 数据源链接ds1要和命名一致
spring.shardingsphere.datasource.ds1.type=com.zaxxer.hikari.HikariDataSource
spring.shardingsphere.datasource.ds1.driver-class-name=com.mysql.jdbc.Driver
spring.shardingsphere.datasource.ds1.jdbcUrl=jdbc:mysql://39.101.221.95:3306/shard_order
spring.shardingsphere.datasource.ds1.username=gavin
spring.shardingsphere.datasource.ds1.password=123456
# 具体的分片规则,基于数据节点
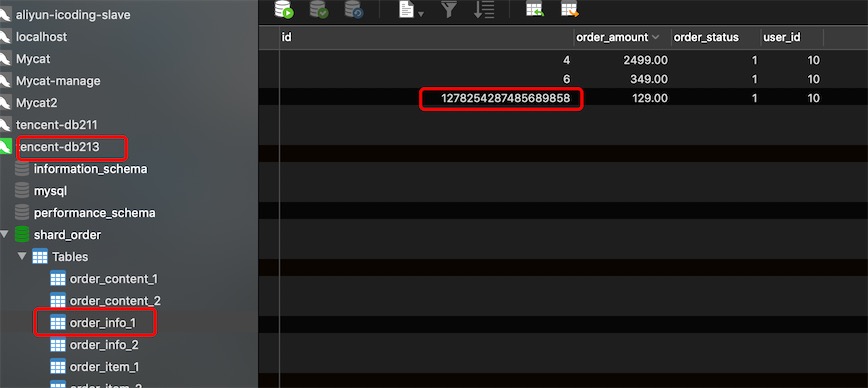
spring.shardingsphere.sharding.tables.order_info.actual-data-nodes=ds$->{0..1}.order_info_$->{1..2}
# 分库的规则
spring.shardingsphere.sharding.tables.order_info.database-strategy.inline.sharding-column=id
spring.shardingsphere.sharding.tables.order_info.database-strategy.inline.algorithm-expression=ds$->{id % 2}
# 分表的规则
spring.shardingsphere.sharding.tables.order_info.table-strategy.inline.sharding-column=user_id
spring.shardingsphere.sharding.tables.order_info.table-strategy.inline.algorithm-expression=order_info_$->{user_id % 2 + 1}
# 设定雪花id
spring.shardingsphere.sharding.tables.order_info.key-generator.column=id
spring.shardingsphere.sharding.tables.order_info.key-generator.type=snowflake
# 这里也需要设置机房id和机器id,两者合并了,是10位,所以不要超过1024
spring.shardingsphere.sharding.tables.order_info.key-generator.props.worker.id=1000
# 最大的时间容忍间隔,60000毫秒
spring.shardingsphere.sharding.tables.order_info.key-generator.props.max.tolerate.time.difference.milliseconds=60000
从官网可以看到

@Test
void insertOrder(){
  OrderInfo orderInfo = new OrderInfo();
  orderInfo.setUserId(10).setOrderStatus(1).setOrderAmount(BigDecimal.valueOf(129));
  orderInfoService.save(orderInfo);

  OrderItem orderItem = new OrderItem();
  orderItem.setId(5).setOrderId(orderInfo.getId()).setProductName("安佳牛奶").setUserId(10);
  orderItemService.save(orderItem);
}
4. Redis实现全局唯一ID
原理
因为 Redis 的所有命令是单线程的,所以可以利用 Redis 的原子操作 INCR 和 INCRBY,来生成全局唯一的ID。redis是单线程的,是因为它基于 Reactor 模型开发了网络事件处理器,这个处理器被称为文件事件处理器,它由4部分构成:
- 多个套接字
- IO多路复用程序
- 文件事件分派器
- 事件处理器
因为文件事件分派器队列的消费是单线程的,所以 Redis 才叫单线程模型。
所谓的redis多路复用机制,就是指多个网络IO线程复用一个redis线程,这也是redis高效的原因。
好了,说回Redis生成全局唯一ID的事。
方式一:StringRedisTemplate
我们的实体类如下:
public class Activity {
    private Long id;
    private String name;
    private BigDecimal price;
}
我们定义一个Service类来调用redis生成全局唯一id
public class IdGeneratorService {
  @Autowired
  private StringRedisTemplate stringRedisTemplate;

  private static final String ID_KEY = "id:generator:activity";

  public Long incrementId() {
    return stringRedisTemplate.opsForValue().increment(ID_KEY);
  }
调用
long id = idGeneratorService.incrementId(); // 调用生成
感觉好像有点 low ,但总算生成了全局唯一id
方式二:lua脚本
生产环境中,我们的redis都是集群部署的,生成id就要变化一下:集群中每个节点预生成生成ID;然后与redis的已经存在的ID做比较。如果大于,则取节点生成的ID;小于的话,取Redis中最大ID自增。这个时候我们还需要一段 lua 脚本来保证我们实现的ID是唯一的,这才是真正的本质,不然我们实现的ID再高端,不唯一,有个锤子用。
lua核心脚本如下:
local function get_max_seq()
    local key = tostring(KEYS[1])
    local incr_amoutt = tonumber(KEYS[2])
    local seq = tostring(KEYS[3])
    local month_in_seconds = 24 * 60 * 60 * 30
    if (1 == redis.call(\'setnx\', key, seq))
    then
        redis.call(\'expire\', key, month_in_seconds)
        return seq
    else
        local prev_seq = redis.call(\'get\', key)
        if (prev_seq < seq)
        then
            redis.call(\'set\', key, seq)
            return seq
        else
        --[[
            不能直接返回redis.call(\'incr\', key),因为返回的是number浮点数类型,会出现不精确情况。
            注意: 类似"16081817202494579"数字大小已经快超时lua和reids最大数值,请谨慎的增加seq的位数
        --]]
            redis.call(\'incrby\', key, incr_amoutt)
            return redis.call(\'get\', key)
        end
    end
end
return get_max_seq()
Reactor模式
前面我们说Redis 基于 Reactor 模型开发了网络事件处理器,这个网络事件处理器由4部分组成:多个套接字、IO多路复用程序、文件事件分派器、事件处理器。因为文件事件分派器队列的消费是单线程的,所以 Redis 才叫单线程模型。
这个Reactor模式,其实在Netty 中也是有使用的。
什么是Reactor模型
Reactor模型,就是一个多路复用I/O模型,主要用于在高并发、高吞吐量的环境中进行I/O处理。而这种多路复用的模型所依赖的永远都是那么几个内容,事件分发器,事件处理器,还有调用的客户端,如下图:

Reactor模型是一个同步的I/O多路复用模型,关于同步IO,可以看之前的文章回顾一下
这种单线程的模型是什么样子的呢,如下图:

这种模型的意思是说:Redis 单线程指的是网络请求模块使用了一个线程(所以不需考虑并发安全性),即一个线程处理所有网络请求,其他模块仍用了多个线程。多路复用,指的就是这个,也是为什么redis高效的原因。首先redis的数据是直接从内存读取的,但是我们这里说的快速是针对存储在磁盘上的数据来说的,因为断电后,内存中的数据丢失了,重启redis后,还是需要从磁盘读取的。
我们看一段redis官网说的话:
Redis is single threaded. How can I exploit multiple CPU / cores?
It's not very frequent that CPU becomes your bottleneck with Redis, as usually Redis is either memory or network bound. For instance, using pipelining Redis running on an average Linux system can deliver even 1 million requests per second, so if your application mainly uses O(N) or O(log(N)) commands, it is hardly going to use too much CPU.

However, to maximize CPU usage you can start multiple instances of Redis in the same box and treat them as different servers. At some point a single box may not be enough anyway, so if you want to use multiple CPUs you can start thinking of some way to shard earlier.

You can find more information about using multiple Redis instances in the Partitioning page.

However with Redis 4.0 we started to make Redis more threaded. For now this is limited to deleting objects in the background, and to blocking commands implemented via Redis modules. For future releases, the plan is to make Redis more and more threaded.
翻译过来大致就是说,当我们使用 Redis 的时候,CPU 成为瓶颈的情况并不常见,通常是内存或网络受限成为瓶颈。
其实说白了,官网就是说我们 Redis 就是这么的快,并且正是由于在单线程模式的情况下已经很快了,就没有必要在使用多线程了。其实redis 6.0开始,已经支持多线程,只不过是默认关闭的。
使用多线程不见得一定快,原因在于CPU切换的时间损耗:其实 Redis 使用单个 CPU 绑定一个内存,针对内存的处理就是单线程的,而我们使用多个 CPU 模拟出多个线程来,光在多个 CPU 之间的切换,然后再操作 Redis ,实际上就不如直接从内存中拿出来,毕竟耗时在这里摆着。
你认为的 Redis 为什么是单线程的?