 弹吉他的兔子
1. 分布式事务Seata-AT模式解析
AT模式分析
AT 模式下,每个数据库被当做是一个 Resource,Seata 里称为 DataSource Resource。业务通过 JDBC 标准接口访问数据库资源时,Seata 框架会对所有请求进行拦截,做一些操作。每个本地事务提交时,Seata RM(Resource Manager,资源管理器) 都会向 TC(Transaction Coordinator,事务协调器) 注册一个分支事务。当请求链路调用完成后,发起方通知 TC 提交或回滚分布式事务,进入二阶段调用流程。此时,TC 会根据之前注册的分支事务回调到对应参与者去执行对应资源的第二阶段。TC 是怎么找到分支事务与资源的对应关系呢?每个资源都有一个全局唯一的资源 ID,并且在初始化时用该 ID 向 TC 注册资源。在运行时,每个分支事务的注册都会带上其资源 ID。这样 TC 就能在二阶段调用时正确找到对应的资源。
Seata 中有三大模块:TM、RM 和 TC。
- TM 和 RM 是作为 Seata 的客户端与业务系统集成在一起,@GlobalTransactional注解标记的方法就是一个TM,全局事务
- TC 作为 Seata 的服务端独立部署 seata server。
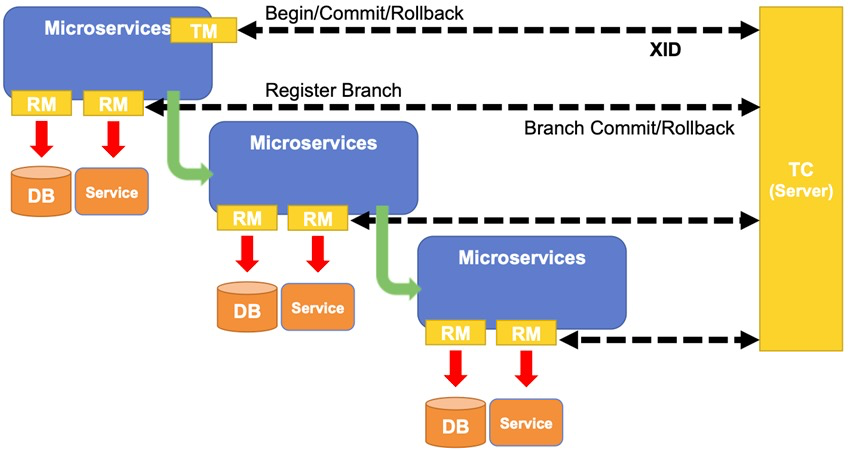
在 Seata 中,分布式事务的执行流程如下:
- TM 开启分布式事务(TM 向 TC 注册全局事务记录),生成全局事务xid,为每个RM生成一个分支事务bid,全局事务写入global_table表;
- 按业务场景,编排数据库、服务等事务内资源(RM 向 TC 汇报资源准备状态 );
- TM 结束分布式事务,事务一阶段结束(TM 通知 TC 提交/回滚分布式事务);
- TC 汇总各个分支事务信息,决定分布式事务是提交还是回滚;
- TC 通知所有 RM 提交/回滚 资源,事务二阶段结束。
注意:Seata和2PC不同的是Seata的RM是在业务系统端,而2PC的RM则是在数据库服务器端(RM就是数据库),所以2PC在多个RM的情况下对数据库资源链接的占用和锁定是比较耗时的
Seata 会有 4 种分布式事务解决方案,分别是 AT 模式、TCC 模式、Saga 模式和 XA 模式,我们主要学习Seata的AT模式
AT 模式是一种无侵入的分布式事务解决方案。在 AT 模式下,用户只需关注自己的“业务 SQL”,用户的 “业务 SQL” 作为一阶段,Seata 框架会自动生成事务的二阶段提交和回滚操作
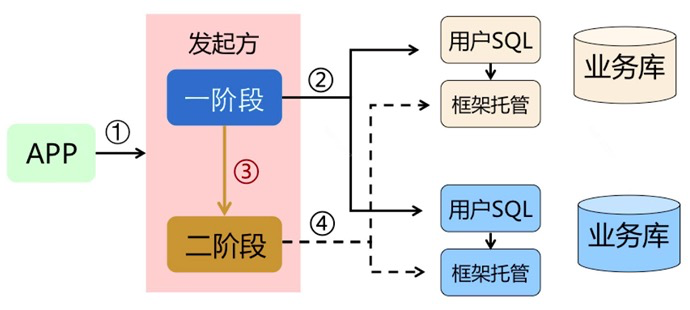
AT模式一阶段操作
在一阶段,Seata 会拦截“业务 SQL”,首先解析 SQL 语义,找到“业务 SQL”要更新的业务数据,在业务数据被更新前,将其保存成“before image”,然后执行“业务 SQL”更新业务数据,在业务数据更新之后,再将其保存成“after image”,最后生成行锁 (不能被第三方再修改)。以上操作全部在一个数据库事务内完成,这样保证了一阶段操作的原子性。
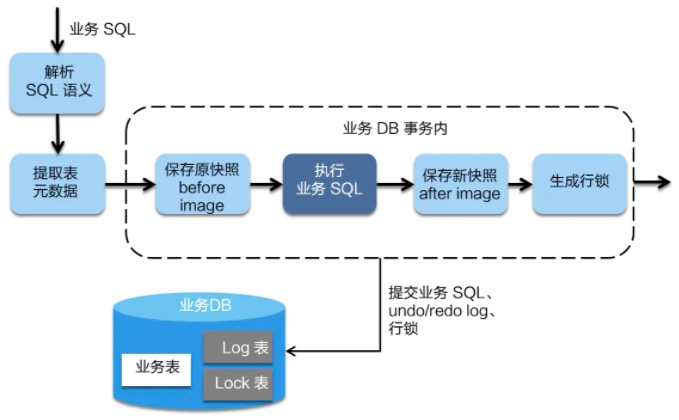
实现上,Seata对数据源做了封装代理,然后对于数据源的操作处理,就由Seata内部逻辑完成了
AT模式二阶段操作
AT是分为两个阶段的,第一阶段,就是各个阶段本地提交操作;第二阶段会根据第一阶段的情况决定是进行全局提交还是全局回滚操作。
全局提交回滚操作由TM发起,具体为,如果Branch执行没有出现异常,那么就表明各个Branch均执行成功,即进行全局提交,如果某个Branch执行时出现异常,那么就需要进行全局回滚。
二阶段提交
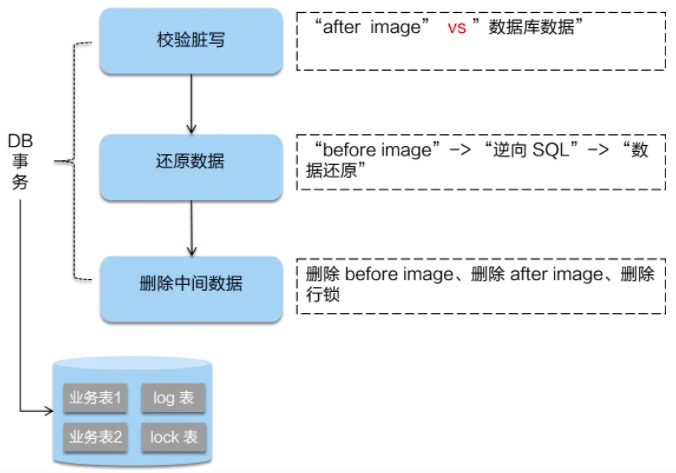
二阶段如果是提交的话,因为“业务 SQL”在一阶段已经提交至数据库, 所以 Seata 框架只需将一阶段保存的快照数据和行锁删掉,完成数据清理即可。
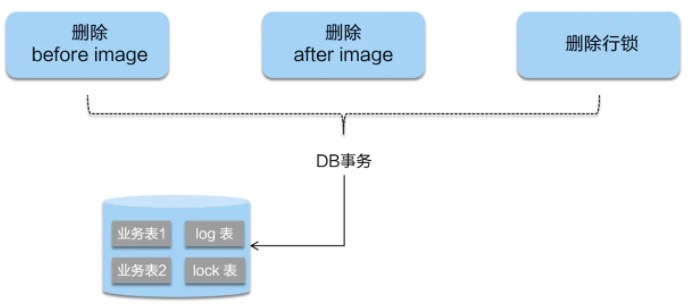
如果所有Branch RM都执行成功了,那么就进行全局Commit。因为此时我们不用回滚,而每个Branch本地数据库操作已经完成了,那么我们其实主要做的事情就是把本地的Undolog删了即可
二阶段回滚
二阶段如果是回滚的话,Seata 就需要回滚一阶段已经执行的“业务 SQL”,还原业务数据。回滚方式便是用“before image”还原业务数据;但在还原前要首先要校验脏写,对比“数据库当前业务数据”和 “after image”,如果两份数据完全一致就说明没有脏写,可以还原业务数据,如果不一致就说明有脏写,出现脏写就需要转人工处理。
总结
AT 模式的一阶段、二阶段提交和回滚均由 Seata 框架自动生成,用户只需编写“业务 SQL”,便能轻松接入分布式事务,AT 模式是一种对业务无任何侵入的分布式事务解决方案。
seata其实就是说,把分布式事务当作一批branch本地事务来执行,branch各自执行,各自提交,假如所有branch都成功,那么commit的时候,维护一个状态即可,因为大家已经提交了;假如某一个branch执行失败,那么进行回滚,回滚的方式是根据之前的undolog生成一个反向的回滚sql,各个branch分别执行自己的回滚sql来达到回滚的效果
与XA的两阶段提交比较,优势:
- 1.不需要数据库支持XA协议,因为这个proxy是在应用层面。限制更少。
- 2.减少了事务持锁时间,seata的AT模式,branch分支事务在一阶段提交完就把锁释放,从而提高了事务的并发度,而XA的锁持有时间是贯穿整个全局事务的,分支事务越多,对数据库的锁持有时间就越长
问题点:由于追求尽量少的持锁时间,二阶段回滚的场景时,branch分支事务提交(一阶段)到回滚sql执行(二阶段)之间是有时间差的,这个时间区间内的数据状态可以认为是一种脏数据(因为分支事务在这个时间差内是没有持有锁,第三方可以修改数据),所以回滚的时候会对比“数据库当前业务数据”和 “after image”是否一致。
2. Seata-Server服务的搭建
安装Seata Server
GitHub: https://github.com/seata/seata
# 搭建TC(Server)的服务端
wget https://github.com/seata/seata/releases/download/v1.0.0/seata-server-1.0.0.tar.gz
wget https://github.com/seata/seata/releases/download/v1.1.0/seata-server-1.1.0.tar.gz
wget https://github.com/seata/seata/releases/download/v1.2.0/seata-server-1.2.0.tar.gz
# 下载后解压
tar -xvf seata-server-1.0.0.tar.gz
第1步 修改conf/registry.conf
# 1.修改registry.conf文件
xjwdeMacBook:seata xjw$ cd seata/conf
xjwdeMacBook:conf xjw$ vim registry.conf
#registry对应注册中心,使用nacos
registry {
  # file 、nacos 、eureka、redis、zk、consul、etcd3、sofa
  type = "nacos" # 使用nacos注册中心

  nacos {
    serverAddr = "139.199.13.139:8848"  # 指定nacos注册中心连接地址
    namespace = ""
    cluster = "default"
  }
  eureka {
    serviceUrl = "http://localhost:8761/eureka"
    application = "default"
    weight = "1"
  }
  redis {
    serverAddr = "localhost:6379"
    db = "0"
  }
  zk {
    cluster = "default"
    serverAddr = "127.0.0.1:2181"
    session.timeout = 6000
    connect.timeout = 2000
  }
  consul {
    cluster = "default"
    serverAddr = "127.0.0.1:8500"
  }
  etcd3 {
    cluster = "default"
    serverAddr = "http://localhost:2379"
  }
  sofa {
    serverAddr = "127.0.0.1:9603"
    application = "default"
    region = "DEFAULT_ZONE"
    datacenter = "DefaultDataCenter"
    cluster = "default"
    group = "SEATA_GROUP"
    addressWaitTime = "3000"
  }
  file {
    name = "file.conf"
  }
}

# config 对应配置中心,使用file.conf配置
config {
  # file、nacos 、apollo、zk、consul、etcd3
  type = "file"

  nacos {
    serverAddr = "localhost"
    namespace = ""
  }
  consul {
    serverAddr = "127.0.0.1:8500"
  }
  apollo {
    app.id = "seata-server"
    apollo.meta = "http://192.168.1.204:8801"
  }
  zk {
    serverAddr = "127.0.0.1:2181"
    session.timeout = 6000
    connect.timeout = 2000
  }
  etcd3 {
    serverAddr = "http://localhost:2379"
  }
  file {
    name = "file.conf"
  }
}
第2步修改file.conf,使用file.conf来进行配置,注意这里又个坑,file.conf一定要参考file.conf.example来配置
# 这个是在注册中心的seata server的服务信息,相当于seata的服务端注册到注册中心
service {
  #transaction service group mapping
  #icodingedu_tx_group:这个稍后要在项目的application.yaml里进行配置
  vgroup_mapping.imall_tx_group = "default"
  #only support when registry.type=file, please don't set multiple addresses
  default.grouplist = "127.0.0.1:8091"
  #degrade, current not support
  enableDegrade = false
  #disable seata
  disableGlobalTransaction = false
}

## transaction log store, only used in seata-server
# 存储到数据库
store {
  ## store mode: file、db
  mode = "db"

  ## file store property
  file {
    ## store location dir
    dir = "sessionStore"
  }

  ## 指定数据库的连接
  db {
    ## the implement of javax.sql.DataSource, such as DruidDataSource(druid)/BasicDataSource(dbcp) etc.
    datasource = "dbcp"
    ## mysql/oracle/h2/oceanbase etc.
    db-type = "mysql"
    driver-class-name = "com.mysql.jdbc.Driver"
    url = "jdbc:mysql://127.0.0.1:3306/seata"
    user = "root"
    password = "gavin"
    min-conn = 1
    max-conn = 10
    global.table = "global_table"
    branch.table = "branch_table"
    lock-table = "lock_table"
    query-limit = 100
  }
}
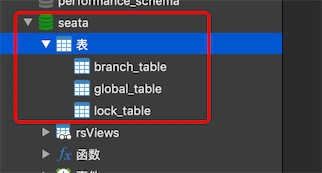
创建Seata的配置数据库
-- seata的配置数据库在seata server v0.9.0这个版本的发布包里有
-- 先创建一个seata库
-- the table to store GlobalSession data
drop table if exists `global_table`;
create table `global_table` (
  `xid` varchar(128)  not null,
  `transaction_id` bigint,
  `status` tinyint not null,
  `application_id` varchar(32),
  `transaction_service_group` varchar(32),
  `transaction_name` varchar(128),
  `timeout` int,
  `begin_time` bigint,
  `application_data` varchar(2000),
  `gmt_create` datetime,
  `gmt_modified` datetime,
  primary key (`xid`),
  key `idx_gmt_modified_status` (`gmt_modified`, `status`),
  key `idx_transaction_id` (`transaction_id`)
);

-- the table to store BranchSession data
drop table if exists `branch_table`;
create table `branch_table` (
  `branch_id` bigint not null,
  `xid` varchar(128) not null,
  `transaction_id` bigint ,
  `resource_group_id` varchar(32),
  `resource_id` varchar(256) ,
  `lock_key` varchar(128) ,
  `branch_type` varchar(8) ,
  `status` tinyint,
  `client_id` varchar(64),
  `application_data` varchar(2000),
  `gmt_create` datetime,
  `gmt_modified` datetime,
  primary key (`branch_id`),
  key `idx_xid` (`xid`)
);

-- the table to store lock data
drop table if exists `lock_table`;
create table `lock_table` (
  `row_key` varchar(128) not null,
  `xid` varchar(96),
  `transaction_id` long ,
  `branch_id` long,
  `resource_id` varchar(256) ,
  `table_name` varchar(32) ,
  `pk` varchar(36) ,
  `gmt_create` datetime ,
  `gmt_modified` datetime,
  primary key(`row_key`)
);
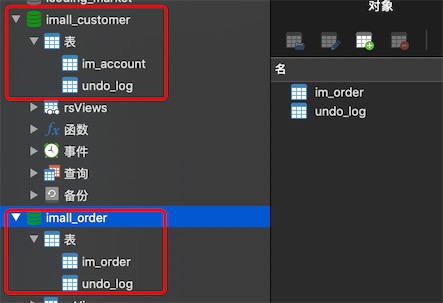
创建业务数据库
为两个module创建数据库,业务数据库都必须包含表undo_log,因为如果seata要回滚事务,每个业务数据库的undo_log表都存储着本地事务回滚的日志信息,这就是seata分布式事务回滚的机制原理。
-
imall_order 订单模块
create table im_order( id bigint(20) not null comment '主键', user_id bigint(20) not null comment '用户id', product_id bigint(20) not null comment '产品id', count_num int(10) not null comment '购买数量', money decimal(10,2) not null comment '花费金额', primary key(id) )ENGINE=innodb default charset=utf8mb4; -- 表undo_log在seata server v0.9.0这个版本的发布包里有 -- 在对应的每个业务数据库还需要创建一个undo_log表 -- the table to store seata xid data -- 0.7.0+ add context -- you must to init this sql for you business databese. the seata server not need it. -- 此脚本必须初始化在你当前的业务数据库中,用于AT 模式XID记录。与server端无关(注:业务数据库) -- 注意此处0.3.0+ 增加唯一索引 ux_undo_log drop table if exists `undo_log` ; CREATE TABLE `undo_log` ( `id` bigint(20) NOT NULL AUTO_INCREMENT, `branch_id` bigint(20) NOT NULL, `xid` varchar(100) NOT NULL, `context` varchar(128) NOT NULL, `rollback_info` longblob NOT NULL, `log_status` int(11) NOT NULL, `log_created` datetime NOT NULL, `log_modified` datetime NOT NULL, `ext` varchar(100) DEFAULT NULL, PRIMARY KEY (`id`), UNIQUE KEY `ux_undo_log` (`xid`,`branch_id`) ) ENGINE=InnoDB AUTO_INCREMENT=1 DEFAULT CHARSET=utf8; -
imall_customer 用户中心服务模块
create table im_account(
	id bigint(20) not null comment '主键',
  user_id bigint(20) not null comment '用户id',
  total decimal(10,2) not null comment '总金额',
  used decimal(10,2) not null comment '已使用',
  residue decimal(10,2) not null comment '余额',
  primary key(id)
)ENGINE=innodb default charset=utf8mb4;

-- 表undo_log在seata server v0.9.0这个版本的发布包里有
-- 在对应的每个业务数据库还需要创建一个undo_log表
-- the table to store seata xid data
-- 0.7.0+ add context
-- you must to init this sql for you business databese. the seata server not need it.
-- 此脚本必须初始化在你当前的业务数据库中,用于AT 模式XID记录。与server端无关(注:业务数据库)
-- 注意此处0.3.0+ 增加唯一索引 ux_undo_log
-- rollback_info 回滚信息,类型longlob
drop table if exists `undo_log`;
CREATE TABLE `undo_log` (
  `id` bigint(20) NOT NULL AUTO_INCREMENT,
  `branch_id` bigint(20) NOT NULL,
  `xid` varchar(100) NOT NULL,
  `context` varchar(128) NOT NULL,
  `rollback_info` longblob NOT NULL,
  `log_status` int(11) NOT NULL,
  `log_created` datetime NOT NULL,
  `log_modified` datetime NOT NULL,
  `ext` varchar(100) DEFAULT NULL,
  PRIMARY KEY (`id`),
  UNIQUE KEY `ux_undo_log` (`xid`,`branch_id`)
) ENGINE=InnoDB AUTO_INCREMENT=1 DEFAULT CHARSET=utf8;
3. 创建业务服务模块
本文使用的版本
Seata Server 版本v1.1.0
spring-cloud-alibaba-dependencies 版本2.2.1
seata-all 版本1.1.0
父项目
1、pom.xml导入依赖(seata-all 1.0.0)
<dependency>
  <groupId>com.alibaba.cloud</groupId>
  <artifactId>spring-cloud-alibaba-dependencies</artifactId>
  <version>2.1.0.RELEASE</version>
  <type>pom</type>
  <scope>import</scope>
</dependency>
2.2.1.RELEASE 引入的seata-all依赖的版本是1.1.0
pom.xml导入依赖(seata-all 1.1.0)
<dependency>
  <groupId>com.alibaba.cloud</groupId>
  <artifactId>spring-cloud-alibaba-dependencies</artifactId>
  <version>2.2.1.RELEASE</version>
  <type>pom</type>
  <scope>import</scope>
</dependency>
moduel项目imall-customer
1、pom.xml导入依赖(seata-all 1.0.0版本)
<dependencies>
  <dependency>
    <groupId>org.springframework.boot</groupId>
    <artifactId>spring-boot-starter-web</artifactId>
  </dependency>
  <dependency>
    <groupId>org.springframework.cloud</groupId>
    <artifactId>spring-cloud-starter-openfeign</artifactId>
  </dependency>
  <dependency>
    <groupId>com.alibaba.cloud</groupId>
    <artifactId>spring-cloud-starter-alibaba-nacos-discovery</artifactId>
  </dependency>
  <dependency>
    <groupId>org.projectlombok</groupId>
    <artifactId>lombok</artifactId>
  </dependency>
  <dependency>
    <groupId>org.mybatis.spring.boot</groupId>
    <artifactId>mybatis-spring-boot-starter</artifactId>
  </dependency>
  <dependency>
    <groupId>mysql</groupId>
    <artifactId>mysql-connector-java</artifactId>
    <scope>runtime</scope>
  </dependency>
  <dependency>
    <groupId>com.alibaba.cloud</groupId>
    <artifactId>spring-cloud-starter-alibaba-seata</artifactId>
    <exclusions>
      <exclusion>
        <groupId>io.seata</groupId>
        <artifactId>seata-all</artifactId>
      </exclusion>
    </exclusions>
  </dependency>
  <dependency>
    <groupId>io.seata</groupId>
    <artifactId>seata-all</artifactId>
    <version>1.0.0</version>
  </dependency>
</dependencies>
pom.xml导入依赖(seata-all 1.1.0版本)
<!--Feign服务调用-->
<dependency>
  <groupId>org.springframework.cloud</groupId>
  <artifactId>spring-cloud-starter-openfeign</artifactId>
</dependency>
<!--Seata分布式事务框架-->
<dependency>
  <groupId>com.alibaba.cloud</groupId>
  <artifactId>spring-cloud-starter-alibaba-seata</artifactId>
</dependency>
2、application.properties 配置加上seata的注册
spring.application.name=imall-customer
server.port=20091
spring.cloud.nacos.discovery.server-addr=127.0.0.1:8848

spring.datasource.driver-class-name=com.mysql.jdbc.Driver
spring.datasource.url=jdbc:mysql://39.99.210.149:3306/imall_order
spring.datasource.username=gavin
spring.datasource.password=123456

# 注意这里与seata server 的conf/file.conf文件里配置的vgroup_mapping.imall_tx_group = "default" 保持一致
spring.cloud.alibaba.seata.tx-service-group=imall_tx_group

# 使用mybatis
mybatis.mapper-locations=classpath:mapper/*.xml
mybatis.type-aliases-package=com.icoding.supermall.pojo

# 使用mybatis-plus
mybatis-plus.mapper-locations=classpath:mapper/*.xml
mybatis-plus.type-aliases-package=com.icoding.supermall.pojo
3、使用seata的DataSourceProxy做数据源代理,数据源必须自己关联配置到druid里
参考博客:https://www.cnblogs.com/victorbu/p/12738556.html
-
使用Mybatis做ORM框架
package com.icoding.supermall.config; import com.alibaba.druid.pool.DruidDataSource; import io.seata.rm.datasource.DataSourceProxy; import org.apache.ibatis.session.SqlSessionFactory; import org.mybatis.spring.SqlSessionFactoryBean; import org.mybatis.spring.transaction.SpringManagedTransactionFactory; import org.springframework.beans.factory.annotation.Value; import org.springframework.boot.context.properties.ConfigurationProperties; import org.springframework.context.annotation.Bean; import org.springframework.context.annotation.Configuration; import org.springframework.context.annotation.Primary; import org.springframework.core.io.support.PathMatchingResourcePatternResolver; import javax.sql.DataSource; @Configuration public class DataSourceProxyConfiguration { @Value("${mybatis.mapper-locations}") private String mapperLocations; @Value("${mybatis.type-aliases-package}") private String typeAliasesPackage; @Bean @ConfigurationProperties(prefix = "spring.datasource") public DataSource druidDataSource(){ return new DruidDataSource(); } //注意:如果spring-cloud-alibaba-dependencies的版本是2.1.0,则需要配置数据源代理,从2.2.0版本开始,数据源代理自动实现了,不需要再手动配置一个代理类。 // 2.1.0 @Bean @Primary public DataSourceProxy dataSourceProxy(DataSource druidDataSource){ return new DataSourceProxy(druidDataSource); } @Bean public SqlSessionFactory sqlSessionFactory(DataSourceProxy dataSourceProxy) throws Exception{ SqlSessionFactoryBean sqlSessionFactoryBean = new SqlSessionFactoryBean(); sqlSessionFactoryBean.setDataSource(dataSourceProxy); sqlSessionFactoryBean.setMapperLocations(new PathMatchingResourcePatternResolver().getResources(mapperLocations)); sqlSessionFactoryBean.setTypeAliasesPackage(typeAliasesPackage); sqlSessionFactoryBean.setTransactionFactory(new SpringManagedTransactionFactory()); return sqlSessionFactoryBean.getObject(); } // 2.2.0 以上 @Bean public SqlSessionFactory sqlSessionFactory(DataSource druidDataSource) throws Exception{ SqlSessionFactoryBean sqlSessionFactoryBean = new SqlSessionFactoryBean(); sqlSessionFactoryBean.setDataSource(druidDataSource); sqlSessionFactoryBean.setMapperLocations(new PathMatchingResourcePatternResolver().getResources(mapperLocations)); sqlSessionFactoryBean.setTypeAliasesPackage(typeAliasesPackage); sqlSessionFactoryBean.setTransactionFactory(new SpringManagedTransactionFactory()); return sqlSessionFactoryBean.getObject(); } } -
使用Mybatis-plus做ORM框架,仅配置 DataSource 即可
@Configuration
public class DataSourceProxyConfiguration {

    @Bean
    @ConfigurationProperties(prefix = "spring.datasource")
    public DataSource druidDataSource(){
        return new DruidDataSource();
    }
}
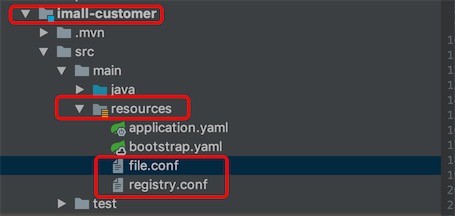
4、将registry.conf和file.conf两个配置好的配置文件导入到resources目录下,注意,这步很重要
5、web层接口的定义AccountController.java
定义一个修改用户钱包金额的接口,后面imall-order模块下订单通过feign调用该接口,产生分布式事务
@RestController
@RequestMapping("/customer/account")
public class AccountController {
	@Autowired
	AccountService accountService;

  @PostMapping("update")
	public R update(@RequestParam(value = "userId") long userId,@RequestParam(value = "used") double used){
		Account account = new Account();
		account.setUserId(userId);
		account.setUsed(new BigDecimal(used));
		accountService.updateAccount(account);
		return  R.ok();
	}
}
moduel项目imall-order
1、配置与imall-customer相同
2、FeignClient接口CustomerClient.java
@FeignClient(name="imall-customer",fallback = CustomerClientHystrixFallback.class)
public interface CustomerClient {
	@PostMapping("/customer/account/update")
	R updateAccount(@RequestParam(value = "userId") long userId, @RequestParam(value = "used") double used);
}
3、业务层接口实现类OrderServiceImpl.java
@Slf4j
@Service
public class OrderServiceImpl extends ServiceImpl<OrderMapper, Order> implements OrderService {
	@Autowired
	CustomerClient customerClient;

  @Transactional  // Spring的事务注解,开启一个事务,只能管理本地事务
	@Override
	public void placeOrder(Order order) {
		log.info("insert order......");
		this.save(order);

		// int i = 1/0;

		log.info("update account......");
		customerClient.updateAccount(order.getUserId(),order.getMoney().doubleValue());
	}
}
4、web层接口的定义OrderController.java
定义一个下订单的接口
@RestController
@RequestMapping("/order")
public class OrderController {
	@Autowired
	OrderService orderService;

	@GetMapping("/placeOrder")
	public R placeOrder(){
		Order order = new Order();
		order.setUserId(10l).setProductId(9l).setCountNum(4).setMoney(new BigDecimal(200));
		orderService.placeOrder(order);
		return R.ok();
	}
}
5、启动类
@SpringBootApplication(exclude = DataSourceAutoConfiguration.class)
@EnableDiscoveryClient
@EnableFeignClients
public class OrderApplication {
	public static void main(String[] args) {
		SpringApplication.run(OrderApplication.class,args);
	}
}
application.yaml 增加feign调用服务连接超时时间
ribbon:
  eureka:
    enabled: true
  eager-load:
    enabled: true
    clients: imall-customer
imall-customer:
  ribbon:
    ConnectTimeout: 3000 #远程调用的连接超时时间
    ReadTimeout: 5000 #远程访问的超时时间
4. 测试
1、启动nacos,seata server
xjwdeMacBook:bin xjw$ pwd
/Users/xjw/Downloads/seata/seata/bin
xjwdeMacBook:bin xjw$ ./seata-server.sh
# 后台启动
nohup seata-server.sh > seata.log 2>&1 &
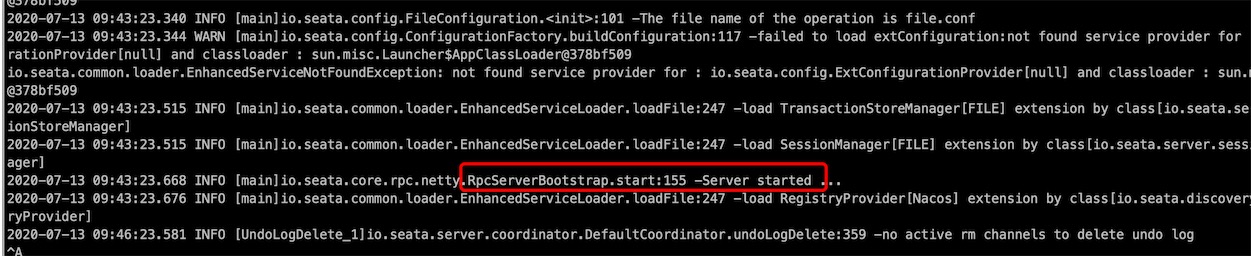
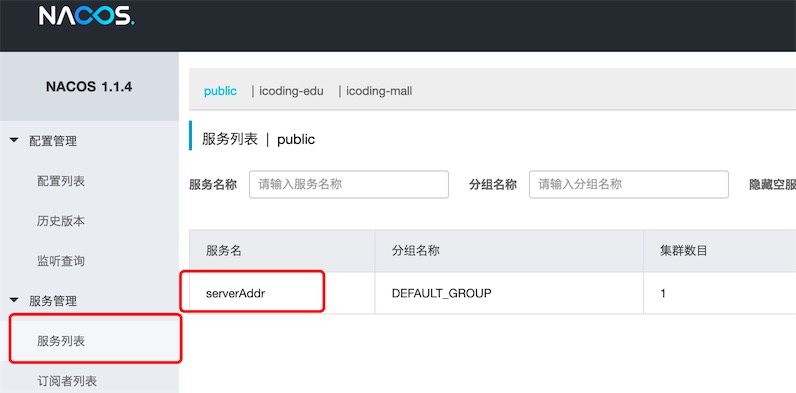
seata server启动成功,并向nacos注册(这是个bug,它注册服务名就是serverAddr)
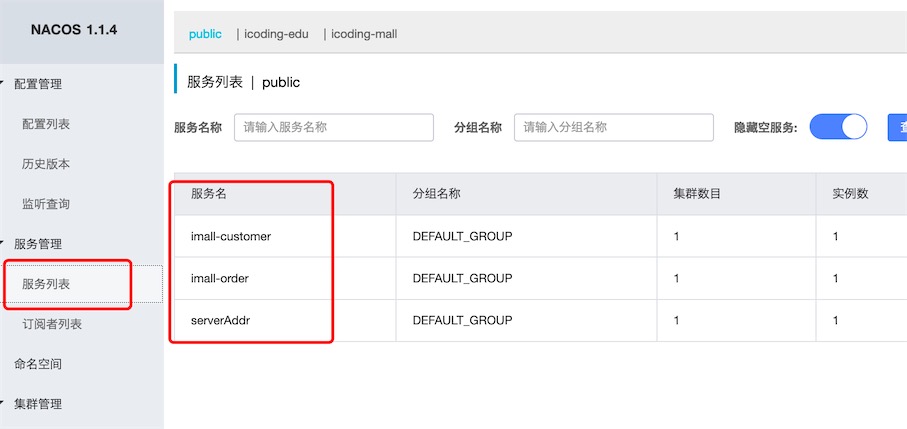
2、启动工程imall-customer、imall-order
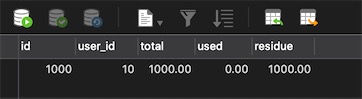
3、建一个用户的钱包金额有1000块钱
测试是否正常调用feign
业务层接口实现类OrderServiceImpl.java的逻辑是先插入订单,再修改金额

-
测试1: 在中间增加异常
	@Override
	public void placeOrder(Order order) {
		log.info("insert order......");
		this.save(order);

		int i = 1/0;  // 异常报错

		log.info("update account......");
		customerClient.updateAccount(order.getUserId(),order.getMoney().doubleValue());
	}
结果:测试发现订单插入成功了,因为没有@Transactional 开启一个事务,所以业务层自动提交了,金额没修改到因为代码还没有走到那一步。
-
测试2: 添加注解@Transactional
  @Transactional  // Spring的事务注解,开启一个事务,但只管理本地事务,跨数据库是无法传递事务的
	@Override
	public void placeOrder(Order order) {
		log.info("insert order......");
		this.save(order);

		int i = 1/0;  // 异常报错

		log.info("update account......");
		customerClient.updateAccount(order.getUserId(),order.getMoney().doubleValue());
	}
结果:测试发现订单插入失败回滚,@Transactional控制着本地事务,只要发生错误就会回滚,金额没修改到因为代码还没有走到那一步
-
测试3:插入订单和修改金额调换位置
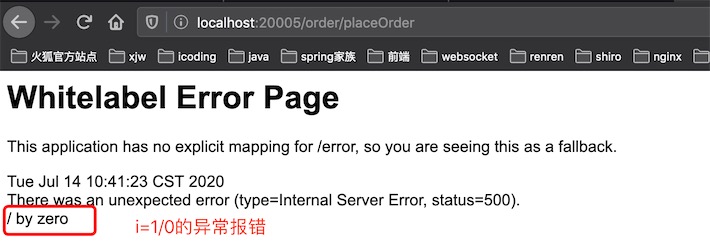
@Transactional  // Spring的事务注解,开启一个事务,只能管理本地事务
@Override
public void placeOrder(Order order) {
  log.info("update account......");
  customerClient.updateAccount(order.getUserId(),order.getMoney().doubleValue());

  int i = 1/0;  // 异常报错

  log.info("insert order......");
  this.save(order);
}

结果:与上面结果不同,发生异常后,修改金额还是成功了并没有回滚,因为imall-order和imall-customer连接的数据源不是同一个数据库,@Transactional只能在同一个数据库传递事务 ,也就是说只能管理本地事务。注解@Transactional 不能解决分布式事务
如何解决:按正常逻辑,插入订单和修改金额应该是一个原子性的操作,要么同时成功,要么同时失败。使用Seata框架分布式事务解决方案
-
测试4:使用seata的全局事务注解
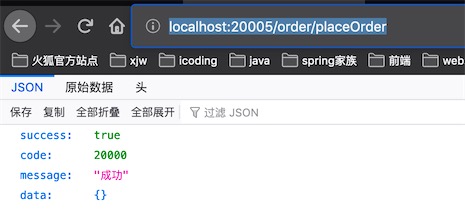
// 开启全局事务,rollbackFor可以指定具体的回滚异常类,我这里回滚所有的异常
@GlobalTransactional(name = "imall.placeOrder",rollbackFor = Exception.class)
@Override
public void placeOrder(Order order) {
  log.info("update account......");
  customerClient.updateAccount(order.getUserId(),order.getMoney().doubleValue());

  int i = 1/0;

  log.info("insert order......");
  this.save(order);
}
验证是否两个数据库都能回滚,重启项目imall-order,再次访问
搞定了,发生异常后,金额没有修改,订单没有新增,正常。
查看seata server 的日志,发现回滚的日志记录

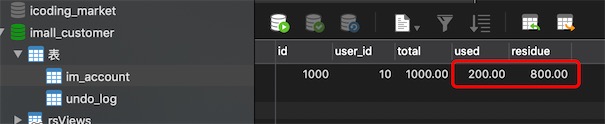
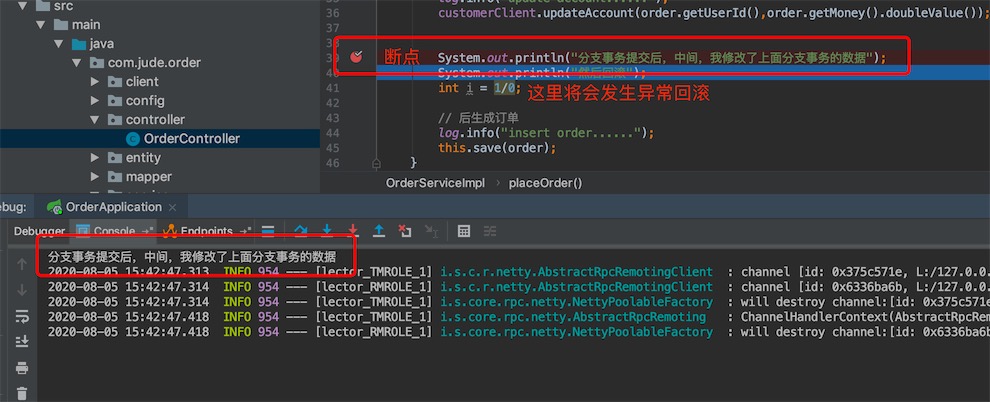
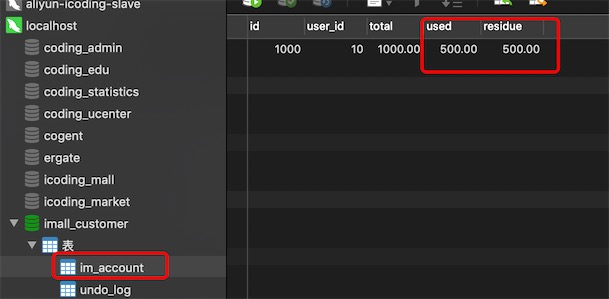
在第一个分支事务update accout执行完后自己提交,通知TC自己提交了,中间我加了个断点
这时我们查看业务DB的account表,发现数据的确修改提交了
查看undo_log表

把account表的数据修改了:
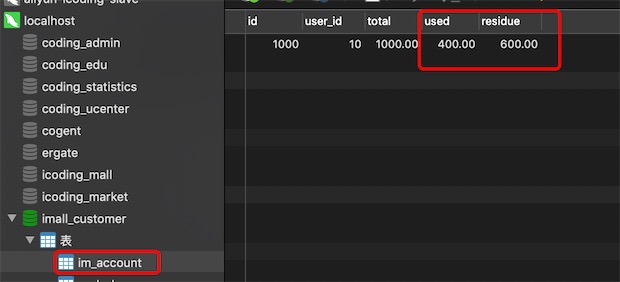
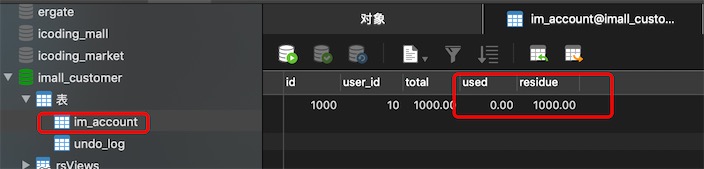
然后报异常回滚,看seata是否回回滚旧数据
查看account表和undo_log表的数据
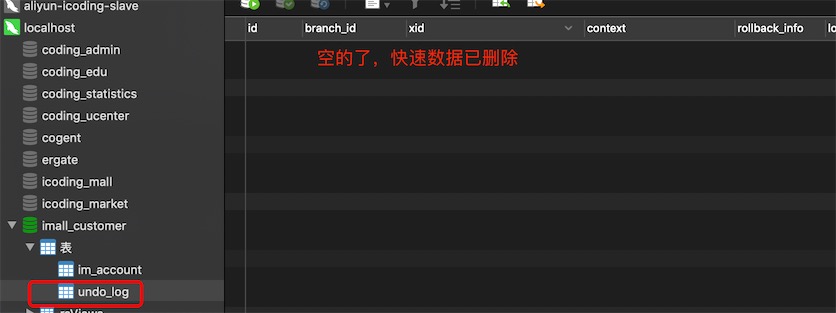
说明seata回滚分支事务的时候对比“数据库当前业务数据”和 “after image”发现不一致的情况下,就不做回滚sql的操作了,只把快速数据删除就完事了。
总结
service调用的时候添加注解@GlobalTransactional就启用seata,在controller或者service层的方法添加注解@GlobalTransactional开启全局事务
@GlobalTransactional(name="imall.placeOrder",rollbackFor = Exception.class)
public int placeOrder(OrderInfo orderInfo){

  log.info("update account......");
  int accountFlag = accountService.updateAccount(orderInfo.getUser_id(),orderInfo.getMoney());

  int i = 1/0;

  log.info("insert order......");
  int flag = orderMapper.insertOrder(orderInfo);

  return flag*accountFlag;
}
需要重点注意的地方:要将registry.conf和file.conf两个配置好的配置文件导入到resources目录下
加@GlobalTransactional注解就解决分布式事务,用到了aop增强和springboot的自动装配,
全局事务的开启流程:
-
springboot启动时去META-INF/spring.factories下的GlobalTransactionAutoConfiguration执行自动配置类
-
通过@Bean 注入GlobalTransactionScanner(全局事务扫描器)
GlobalTransactionScanner实现了InitializingBean(接口),调用afterPropertiesSet()方法初始化 RM 和 TM,GlobalTransactionScanner继承了AbstractAutoProxyCreator(AOP和事务的顶级父类), 通过postProcessAfterInitialization()后置处理器进行加强把标注了@GlobalTransactional注解所在的类生成代理对象,并且注入注解拦截器GlobalTransactionalInterceoer
-
此时请求来了,拦截器拦截下来,再通过反射获取Method,然后解析Method加没加@GlobalTransactional注解,加没加@GlobalLock注解,根据不同注解调用不同的方法
-
如果加了@GlobalTransactional注解,就执行 handleGlobalTransaction() 方法
此方法中,调用了execute方法,这个方法主要做了:
1) 获取或者创建一个全局事务
2) 获取全局事务注解信息
3) 调用beginTransaction() 方法,开启全局事务,这个方法主要做了:
a. 通过transactionManager.()方法去通过TM对象与seata-server通信,然后去数据库中的globalTable表中插入一条记录,然后返回一个全局事务id(xid)
b. 通过GlobalStatus.Begin,标识全局事务开启状态
c. 通过RootContext.bind(xid) 绑定全局事务id
-
TM 和 RM 是作为 seata 的客户端与业务系统集成在一起,TM通过netty和seata-server交互
-
在seata-server中 调用DefaultCoordinator类中的doGlobalBegin(),最终调用DefualtCore类中的begin()方法
这个方法主要做了
a. 创建GlobalSession (全局session)
b. 为GlobalSession添加监听器,通过SPI机制去读取META-INF/service目录下 的DataBaseSessionManager
c. 调用GlobalSession的begin()方法,在此方法中执行监听器的 lifecycleListener.onBegin(this) 方法,监听 onBegin方法开启事务
-
onBegin方法 中 拿到 DatabaseTransactionStoreManager 对象调用writeSession 方法
-
writeSession 方法中拿到 LogStoreDataBaseDAO对象 调用 insertGlobalTransacttion()方法 ,最终通过JDBC原生的语句将全局事务的ID存入global_table表中
分支事务的提交流程:
-
代理数据源拦截sql
seata-server中有一个statementProxy类,有个executeUpdate/executeQuery方法,该方法中通过ExecuteTemplate.execute方法去拦截sql
-
生成对应的sql执行器识别器
-
根据识别器识别类型,生成对应的sql执行器
-
然后跳到executeAutoCommitTrue方法,在此方法中关闭自动提交,然后跳到executeAutoCommitFalse方法执行下面操作
a. 获取本地行锁, 查询生成前置快照(beforeImage)
b. 执行业务sql
c. 查询生成后置快照 afterImage
-
根据beforeImage和afterImage 生成Undolog(日志回滚对象),将undolog对象插入undolog表
-
调用register()方法 注册分支事务, 去拿全局锁
在此方法中会判断是否注册分支事务成功:
a. 如果不成功(全局锁冲突),回滚本地事务,释放本地锁,默认重试十次,每次sleep 30 ms
全局锁表示的是我们操作的数据库表+操作的数据主键(product:1)的记录会保存到seata-server的数据库的lock_table表中。 如果表中有这条数据说明其他事务在操作这条数据,你就不能操作,抛出异常回滚等待重试
b. 如果成功,提交本地事务,在此处会判断是否提交本地事务成功
b1:如果不成功,向seata-server异常一阶段提交上报,释放本地锁
b2:如果成功,向seata-server正常一阶段提交上报,释放本地锁
5. 使用eureka做注册中心
下面使用Eureka做注册中心
新建一个module springboot项目imall-eureka
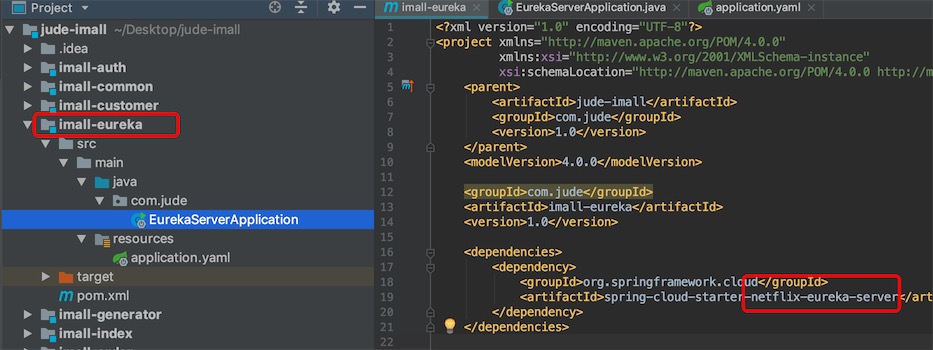
1、导入依赖
<dependency>
  <groupId>org.springframework.cloud</groupId>
  <artifactId>spring-cloud-starter-netflix-eureka-server</artifactId>
</dependency>
2、application.yaml配置
server:
  port: 8761

spring:
  application:
    name: imall-eureka
  profiles:
    active: dev

eureka:
  instance:
    hostname: localhost
  client:
    registerWithEureka: false
    fetchRegistry: false
    serviceUrl:
      defaultZone: http://${eureka.instance.hostname}:${server.port}/eureka/
  # server:
    # 自我保护机制, 默认开启
    enable-self-preservation: true
    # 清理失效的时间 5s,默认60秒
    # eviction-interval-timer-in-ms: 5000
3、主启动类
@SpringBootApplication
@EnableEurekaServer
public class EurekaServerApplication {
	public static void main(String[] args) {
		SpringApplication.run(EurekaServerApplication.class,args);
	}
}
imall-customer、imall-order的注册中心修改为eureka
1、pom.xml注释nacos discovery的依赖,导入eureka client的依赖
<dependency>
  <groupId>org.springframework.cloud</groupId>
  <artifactId>spring-cloud-starter-netflix-eureka-client</artifactId>
</dependency>
2、applicaton.yaml注释nacos discovery的注册中心配置,添加eureka server注册中心的配置
eureka:
  client:
    serviceUrl:
      defaultZone: http://localhost:8761/eureka/
  # instance:
    # 每5秒发送心跳,默认30秒
    #lease-renewal-interval-in-seconds: 5
    # 如果30s 之后,服务端没有收到心跳,就代表微服务挂了!默认90秒
    #lease-expiration-duration-in-seconds: 30
seata server 的conf文件修改
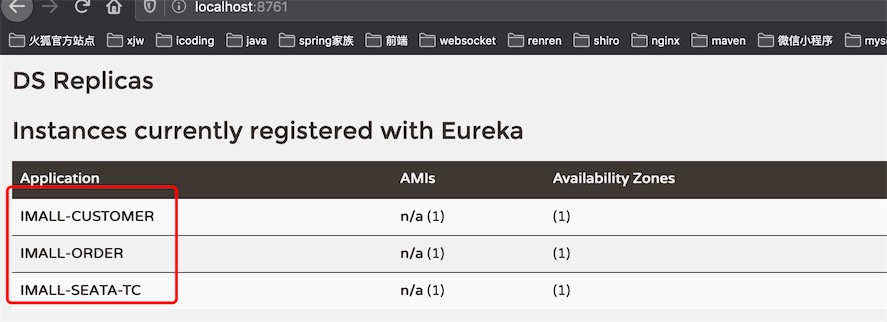
registry.conf配置,有两步:1.将type改为 eureka; 2. 修改eureka配置里的application,自定义一个名称imall-seata-tc
# 将eureka的application进行设置
registry {
  # file 、nacos 、eureka、redis、zk、consul、etcd3、sofa
  type = "eureka"

  nacos {
    serverAddr = "127.0.0.1:8848"
    namespace = ""
    cluster = "default"
  }
  eureka {
    serviceUrl = "http://127.0.0.8761/eureka"
    application = "imall-seata-tc"
    weight = "1"
  }
  redis {
    serverAddr = "localhost:6379"
    db = "0"
  }
  zk {
    cluster = "default"
    serverAddr = "127.0.0.1:2181"
    session.timeout = 6000
    connect.timeout = 2000
  }
  consul {
    cluster = "default"
    serverAddr = "127.0.0.1:8500"
  }
  etcd3 {
    cluster = "default"
    serverAddr = "http://localhost:2379"
  }
  sofa {
    serverAddr = "127.0.0.1:9603"
    application = "default"
    region = "DEFAULT_ZONE"
    datacenter = "DefaultDataCenter"
    cluster = "default"
    group = "SEATA_GROUP"
    addressWaitTime = "3000"
  }
  file {
    name = "file.conf"
  }
}

config {
  # file、nacos 、apollo、zk、consul、etcd3
  type = "file"

  nacos {
    serverAddr = "localhost"
    namespace = ""
  }
  consul {
    serverAddr = "127.0.0.1:8500"
  }
  apollo {
    app.id = "seata-server"
    apollo.meta = "http://192.168.1.204:8801"
  }
  zk {
    serverAddr = "127.0.0.1:2181"
    session.timeout = 6000
    connect.timeout = 2000
  }
  etcd3 {
    serverAddr = "http://localhost:2379"
  }
  file {
    name = "file.conf"
  }
}
file.conf,两步:
-
vgroup_mapping的值要与registry文件的eureka.application保持一致
-
default.grouplist 改为imall-seata-tc.grouplist
# 需要将vgroup_mapping的等号后的内容对应到registry文件的application上
service {
  #transaction service group mapping
  #icodingedu_tx_group:这个稍后要在项目的yaml里进行配置
  vgroup_mapping.imall_tx_group = "imall-seata-tc"
  #only support when registry.type=file, please don't set multiple addresses
  imall-seata-tc.grouplist = "127.0.0.1:8091"
  #degrade, current not support
  enableDegrade = false
  #disable seata
  disableGlobalTransaction = false
}

## transaction log store, only used in seata-server
store {
  ## store mode: file、db
  mode = "db"

  ## file store property
  file {
    ## store location dir
    dir = "sessionStore"
  }

  ## database store property
  db {
    ## the implement of javax.sql.DataSource, such as DruidDataSource(druid)/BasicDataSource(dbcp) etc.
    datasource = "dbcp"
    ## mysql/oracle/h2/oceanbase etc.
    db-type = "mysql"
    driver-class-name = "com.mysql.jdbc.Driver"
    url = "jdbc:mysql://127.0.0.1:3306/seata"
    user = "root"
    password = "gavin"
    min-conn = 1
    max-conn = 10
    global.table = "global_table"
    branch.table = "branch_table"
    lock-table = "lock_table"
    query-limit = 100
  }
}
修改完后将registry.conf和file.conf重新导入到imall-customer和imall-order的resources目录下
测试
依次启动注册中心imall-eureka、seata-server、imall-customer、imall-order
直接测试我们的分布式事务
@GlobalTransactional(name = "imall.placeOrder",rollbackFor = Exception.class)
@Override
public void placeOrder(Order order) {
  log.info("update account......");
  customerClient.updateAccount(order.getUserId(),order.getMoney().doubleValue());

  int i = 1/0;

  log.info("insert order......");
  this.save(order);
}
查看数据库看看金额没有修改,订单没有新增,说明分布式事务生效了
查看seata server的记录了回滚日志

6. 事务补偿机制TCC
TCC:Try、Confirm、Cancel三种操作
- 针对每个操作,都要有一个与其对应的补偿(撤销)操作
- 在执行过程中,如果其中一个环节失败,那么这个环节以前的操作都要调用其回滚操作来恢复
A(DB)->B(Redis)->E(DB)->C(文件)->D(DB)
TCC
- 优点:逻辑清晰,流程简单
- 缺点:数据一致性和性能效率比XA还要差,出错的点比较多
TCC属于应用层的一种补偿方式,需要大量的代码开发,通过中间环节(DB,Redis,Monogo)保存数据的中间状态,对于开发人员的业务和技术要求比较高
建议:TCC只做设计,具体的操作使用人工补偿
参考:
https://blog.csdn.net/a1036645146/article/details/107656671
https://blog.csdn.net/qq_36743888/article/details/112297704