 弹吉他的兔子
1、分布式搜索引擎
分布式的两个基本点
- 可以分摊负载
- 可以水平扩容节点,增强负载能力
什么是搜索引擎?
比如网络爬虫,检索排序,网页处理,大数据技术相关,都要使用到搜索引擎,对于文件信息内容进行检索,通过搜索引擎提供快速,高相关性的信息服务。比如我们用百度搜索时,都是模糊搜索。
分布式存储与搜索
分布式就是通过多个节点构成的服务,可以横向扩张,所扩展的节点可以进行请求的分摊,以及存储的扩展
Lucene - Solr - ElasticSearch
-
Lucene是一个基于Java开发的全文搜索引擎,不是一个应用程序而是一个类库,有很多的API可以调用来实现我们的业务需要,本质上就是一个jar包,本身就不具备分布式、集群、HA等服务特性,如果你要自己通过Luncen实现分布式就比较复杂,基于 lucene 的 api 去开发,要对已有的数据建立索引,lucene 会在本地磁盘上面,给我们组织索引的数据结构。
-
Solr是基于Lucene开发的一个搜索引擎应用,是Apache开源项目,也是Java开发,需要独立部署在tomcat上,可以实现集群和分片,自身不支持集群结构,需要zookeeper来进行集群的支持提供服务注册,进行分布式索引查询,也是可以自己实现故障转移的(3组节点,每组2个solr,互为主从)
- 最大的问题是建立索引的过程中,索引效率下降的及其严重,实时搜索效率不高,使用中索引更新报502,503
- 搭建两套solr集群,用集群互相主备,升级A的时候,使用B,A升级完了切换到A再升级B
- 如果不考虑索引创建的同时,索引更新频率不高的情况下,solr的查询速度是略高于ES
- 支持添加多种数据格式到引擎中的
- 最大的问题是建立索引的过程中,索引效率下降的及其严重,实时搜索效率不高,使用中索引更新报502,503
-
Elasticsearch是基于Lucene的分布式搜索引擎,对外提供了很多restful风格的接口,数据交互使用json格式
可以支持PB级别的搜索,提供近实时的查询,ELK(Elasticsearch、Logstash、Kibana)早期常用于进行日志分析系统的搭建
搜索引擎的选型
- Solr或者ES都封装了Lucene,所以我不直接使用Lucene
- Solr本身不支持集群结构,所以选择ElasticSearch
- ElasticSearch 可以自己在不同服务器部署搭建服务,也可以购买ES云服务,不过目前云服务的ES版本还是v6.x,而官方ES最新的版本是v7.6,所以我选择自己搭建。
2、ElastchSearch简介
概念术语
1、索引index
- 可以和数据库去类比,整个的ES就相当于一个数据库服务
- 数据库中的表可以类比ES中的index 索引,存储的文档doc就相当于每行的记录。
2、类型type
- 相当于一个逻辑类型,比如商品的分类:食品、服饰、电子产品
- ESv7.x以后就不再使用type,默认使用doc,5.x/6.x还有
3、文档document(doc)
ES索引中一条一条的数据,相当于数据库表里的一行一行的数据
4、字段field
数据行的某一列
5、Mappings
相当于表结构的类型定义
6、NRT (Near Real Time)
ES中新的文档(doc)被加入后可查询的时间间隔非常微弱,接近实时
7、shard
-
数据分片的概念,需要进行水平扩展服务节点只需要加入新的机器到集群中即可
-
集群的每个数据节点都是HA的
主分片:承担数据写入的访问的作用
replica备份分片:除了做备份以外,还承担了读数据的水平负载作用
8、节点node
一个ES实例
一个正常的ES集群如下图:
它们的关系
集群cluster,节点node,分片shard,索引index,备份分片replica的关系
-
集群cluster
一个ES集群由一个或多个节点(Node)组成,每个集群都有一个cluster name作为标识
-
节点node
一个ES实例就是一个node,一个机器可以有多个实例,所以并不能说一台机器就是一个node,大多数情况下每个node运行在一个独立的环境或虚拟机上。
-
index
索引,即一系列documents的集合
-
shard
分片,ES是分布式搜索引擎,每个索引有一个或多个分片,索引的数据被分配到各个分片上,相当于一桶水用了N个杯子装,分片有助于横向扩展,N个分片会被尽可能平均地(rebalance)分配在不同的节点上(例如你有2个节点,4个主分片(不考虑备份),那么每个节点会分到2个分片,后来你增加了2个节点,那么你这4个节点上都会有1个分片,这个过程叫relocation,ES感知后自动完成),分片是独立的,对于一个Search Request的行为,每个分片都会执行这个Request.另外,每个分片都是一个Lucene Index,所以一个分片只能存放 Integer.MAX_VALUE - 128 = 2,147,483,519 个docs。[LUCENE-5843] IndexWriter should refuse to create an index with more than INT_MAX docs
-
replica
复制,可以理解为备份分片,相应地有primary shard(主分片),主分片和备分片不会出现在同一个节点上(防止单点故障),默认情况下一个索引创建5个分片一个备份(即5primary+5replica=10个分片),如果你只有一个节点,那么5个replica都无法分配(unassigned),此时cluster status会变成Yellow。replica的作用主要包括:
1.容灾:primary分片丢失,replica分片就会被顶上去成为新的主分片,同时根据这个新的主分片创建新的replica,集群数据安然无恙
2.提高查询性能:replica和primary分片的数据是相同的,所以对于一个query既可以查主分片也可以查备分片,在合适的范围内多个replica性能会更优(但要考虑资源占用也会提升[cpu/disk/heap]),另外index request只能发生在主分片上,replica不能执行index request。 对于一个索引,除非重建索引(reindex)否则不能调整分片的数目(主分片数, number_of_shards),但可以随时调整replica数(number_of_replicas)。
type为什么会去掉
1、为什么会有type?
index库–>type表–>doc记录
如果要对记录进行分组,只需要给doc加一个分组的记录field即可,然后使用ES的分组桶来统计
2、因此在7.x完全去掉type的概念了
数据类型
-
string类型
由text与keyword替代,如果不指定类型,ElasticSearch字符串将默认被同时映射成text和keyword类型,会自动创建下面的动态映射(dynamic mappings):
{
    "foo": {
        "type": "text",
        "fields": {
            "keyword": {
                "type": "keyword",
                "ignore_above": 256
            }
        }
    }
}
ignore_above忽略长度超过256字符串,也就是超过这个长度的字段text值没有对应的keyword类型的值。
没指定type类型,就是造成部分字段还会自动生成一个与之对应的“.keyword”字段的原因。
子字段可以使用不同的分词器进行查询:
POST /index_customer/_mapping
{
    "properties": {
    	"nickname": {
            "type": "text",
            "analyzer": "ik_max_word",
          	"fields": {
              	"pinyin": {
                	"type": "text",
                	"analyzer": "pinyin"
             	 },
              	"keyword":{
                	"type":"keyword",
                	"ignore_above": 256
             	 }
            }
        },
    }
}
搜索
// 搜索的时候同时支持中文,拼音 GET /index_customer/_search { "query":{ "multi_match":{ "query": "chuanzhang", "fields":["nickname","nickname.pinyin"] } } } -
array类型
在ElasticSearch中,没有专门的数组(Array)数据类型,但是,在默认情况下,任意一个字段都可以包含0或多个值,这意味着每个字段默认都是数组类型,只不过,数组类型的各个元素值的数据类型必须相同。在ElasticSearch中,数组是开箱即用的(out of box),不需要进行任何配置,就可以直接使用。
在同一个数组中,数组元素的数据类型是相同的,ElasticSearch不支持元素为多个数据类型:[ 10, “some string” ],常用的数组类型是:
字符数组: [ “one”, “two” ]
整数数组: productid:[ 1, 2 ]
对象(文档)数组:
“user”:[ { “name”: “Mary”, “age”: 12 }, { “name”: “John”, “age”: 10 }],
ElasticSearch内部把对象数组展开为
{“user.name”: [“Mary”, “John”], “user.age”: [12,10]}
举例:
创建索引
put /index_array_test
{
    "settings": {
        "index": {
            "number_of_shards": "1",
            "number_of_replicas": "0"
        }
    },
    "mappings": {
    	"properties": {
    		"pushAppName":{
                "type": "keyword"
            }
    	}
    }
}
插入文档
post /index_array_test/_doc { "pushAppName": ["大运营平台","投策系统","统一APP"] } -
date类型
日期类型表示一般有以下几种方式:
1.日期格式的字符串,比如 “2018-01-13” 或 “2018-01-13 12:10:30”
2.long类型的毫秒数( milliseconds-since-the-epoch,epoch就是指UNIX诞生的UTC时间1970年1月1日0时0分0秒)
3.integer的秒数(seconds-since-the-epoch)
ElasticSearch 内部会将日期数据转换为UTC,并存储为milliseconds-since-the-epoch的long型整数。
mapping结构设置日期格式
"properties": {
        "postdate":{
          "type":"date",
          "format": "yyyy-MM-dd HH:mm:ss||yyyy-MM-dd||epoch_millis"
        }
      }
默认存储的是毫秒数
-
IP类型
ip类型的字段用于存储IPv4或者IPv6的地址
PUT my-index
{
  "mappings": {
    "properties": {
      "ip_addr": {
        "type": "ip"
      }
    }
  }
}

PUT my-index/_doc/1
{
  "ip_addr": "192.168.1.1"
}
IPv4 的 IP 地址含有4个 bytes,而每个 byte 含有8个 digits。/16 即表示前面的 16 位的 digits,也即 192.168。我们可以这么说任何一个 IP 地址位于 192.168.0.0 至 192.168.255.255 都在这个范围内。
GET my-index/_search
{
  "query": {
    "term": {
      "ip_addr": "192.168.0.0/16"
    }
  }
}
3、什么是倒排索引
场景概念
我们不使用搜索引擎可不可以?
Redis在查询的时候:key-value?是通过key来找到的value,是否可以通过value来找key?通过value找到和这个value相似度极高的内容?不可以,所以需要全文搜索引擎,引出倒排索引概念
倒排索引(Inverted Index):比如通过歌词来查歌名,通过内容检索名称,而这个名称在系统中其实就是一个索引,通过歌名来找歌词这是正排索引
比如拿课程学习举例:
文档编号 文档内容
1 艾编程架构师之路
2 艾编程Java成长之路 (分词:艾编程 Java 成长 之路)
3 ES成长学习入门
得到以下倒排索引:
| 搜索的关键词 | 这个分词在哪个文档中出现 | 文档编号:次数:位置 |
|---|---|---|
| 成长 | 2,3 | 2:1:<3>,3:1:<2> |
倒排索引就是关键词到文档ID的映射,例子2:
| DocId | Doc |
|---|---|
| 1 | 谷歌地图之父跳槽 Facebook |
| 2 | 谷歌地图之父加盟 Facebook |
| 3 | 谷歌地图创始人拉斯离开谷歌加盟 Facebook |
| 4 | 谷歌地图之父跳槽 Facebook 与 Wave 项目取消有关 |
| 5 | 谷歌地图之父拉斯加盟社交网站 Facebook |
对文档进行分词之后,得到以下倒排索引。
| 文档 | More Actions搜索的关键词 | 关键词出现的文档 |
|---|---|---|
| 1 | 谷歌 | 1, 2, 3, 4, 5 |
| 2 | 地图 | 1, 2, 3, 4, 5 |
| 3 | 之父 | 1, 2, 4, 5 |
| 4 | 跳槽 | 1, 4 |
| 5 | 1, 2, 3, 4, 5 | |
| 6 | 加盟 | 2, 3, 5 |
| 7 | 创始人 | 3 |
| 8 | 拉斯 | 3, 5 |
| 9 | 离开 | 3 |
| 10 | 与 | 4 |
要注意倒排索引的两个重要细节:
- 倒排索引中的所有词项对应一个或多个文档;
- 倒排索引中的词项根据字典顺序升序排列
4、ElasticSearch单机部署
安装
# 下载地址
# 官方网站进行下载:https://www.elastic.co/cn/downloads/elasticsearch
# https://artifacts.elastic.co/downloads/elasticsearch/elasticsearch-7.5.2-linux-x86_64.tar.gz
# 1、下载,解压
tar -zxvf elasticsearch-7.5.2-linux-x86_64.tar.gz
# elasticsearch-7.5.2-linux-x86_64.tar.gz
# ES整体的生态强依赖于ES的主版本,如果要安装logstash、kibana、中文分词器,版本必须一致

# 2、移动,创建数据文件夹、日志文件夹
cd /usr/local
[root@helloworld local]# mv elasticsearch-7.5.2 /usr/local/elasticsearch
[root@helloworld local]# mkdir /usr/local/elasticsearch/esdata
[root@helloworld local]# mkdir /usr/local/elasticsearch/eslogs

# 3、修改ES config目录下的elasticsearch.yml,注意格式是yaml
[root@helloworld config]# vi elasticsearch.yml
cluster.name: icoding-es # 给集群设置一个名字,如果是集群,所有在这个集群中的节点集群名都要一样
node.name: es-node-1 # 如果是集群,集群中每个节点的名字都不能一样
path.data: /usr/local/elasticsearc/esdata
path.logs: /usr/local/elasticsearc/eslogs
network.host: 0.0.0.0 # 不限制ip访问 ES,生产环境应该要设置可以访问的ip
http.port: 9200 # 访问 服务端口,节点通信的端口是9300
cluster.initial_master_nodes: ["es-node-1"] # master节点服务发现,和上面的节点名一致

# 4、改小java的堆内存,这个自己设置,默认是1g内存
[esuser@helloworld config]$ vi jvm.options
-Xms512m
-Xmx512m
启动elasticsearch
# 在bin目录下
[root@helloworld bin]# ./elasticsearch
# ERROR: [1]
# org.elasticsearch.bootstrap.StartupException: java.lang.RuntimeException: can not run elasticsearch as root
# 1、不能用root启动,创建用户esuser,授权,重新启动
[root@helloworld bin]# adduser esuser
# 给esuser授权 /usr/local/elasticsearch 目录的权限,与mysql一样需要授权
[root@helloworld bin]# chown -R esuser:esuser /usr/local/elasticsearch/
[root@helloworld bin]# su esuser
[root@helloworld bin]# ./elasticsearch
# ERROR: [2] bootstrap checks failed
# [1]: max virtual memory areas vm.max_map_count [65530] is too low, increase to at least [262144]

# 2、修改资源限制信息
# 查看
[root@helloworld bin]# ulimit -a
# 修改配置,需要root用户
[root@helloworld bin]# vi /etc/secuirty/limits.conf
# *代表所有用户
* soft nofile 65536
* hard nofile 65536
* soft nproc 2048
* hard nproc 4096
# 修改sysctl.conf文件
[root@helloworld bin]# vi /etc/sysctl.conf
vm.max_map_count=262145
# 修改后刷新生效
[root@helloworld bin]# sysctl -p

# 3、切回esuser,启动elasticsearch
su esuser
./elasticsearch #在线启动
./elasticsearch -d #后台启动
安装成功:
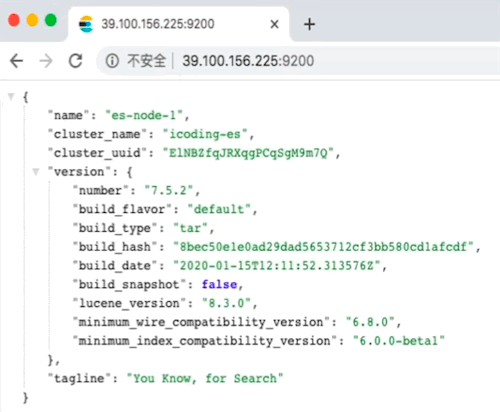
9200:http协议,用于外部通信,提供服务
9300:Tcp协议,ES集群之间及内部服务通信的端口
发现配置文件少了个空格,yml文件
# 少了个空格会报错,无法启动
cluster.name:icoding-es
# 修改后
cluster.name: icoding-es
配置用户名和密码
# 切换到用户esuser
[root@helloworld config]# su esuser
# 修改elasticsearch的配置文件,开启xpack验证
[esuser@helloworld config]$ vi elasticsearch.yml
http.cors.enabled: true
http.cors.allow-origin: "*"
http.cors.allow-headers: Authorization,X-Requested-With,Content-Length,Content-Type # 避免es-header 无法连接
xpack.security.enabled: true
xpack.security.transport.ssl.enabled: true
# cd 到elasticsearch的bin目录下,重启es
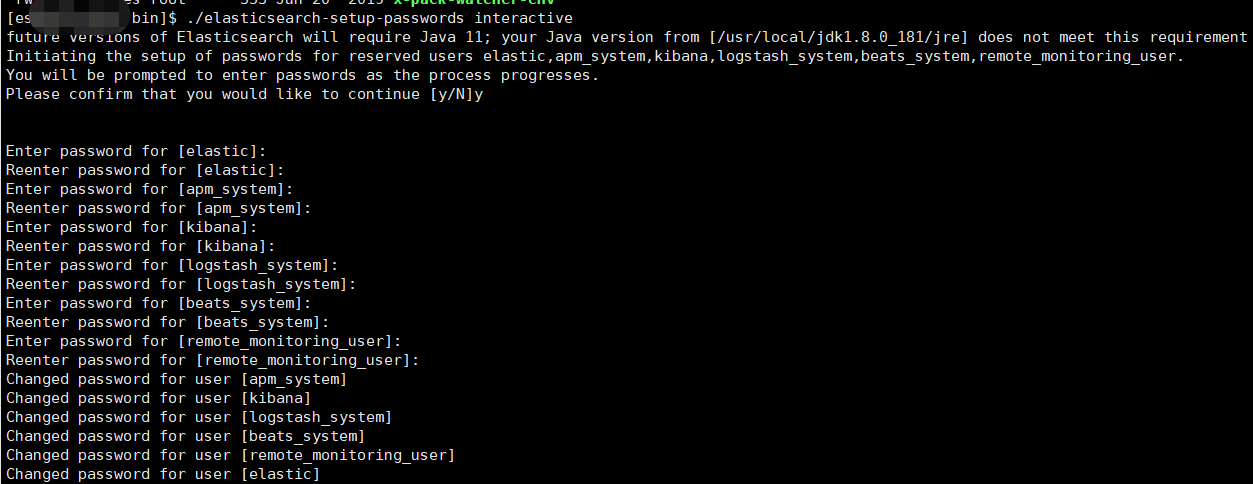
[esuser@helloworld bin]$ ./elasticsearch -d
# cd 到elasticsearch的bin目录下,执行设置用户名和密码的命令,
# 需要为4个用户分别设置密码:elastic、kibana、logstash_system、beats_system
[esuser@helloworld bin]$ ./elasticsearch-setup-passwords interactive
Elasticsearch配置了用户密码,SpringBoot连接配置也要修改,SpringBoot2.2.x版本才开始支持ElasticSearch7.x
修改配置文件application.yml
spring:
  elasticsearch:
    #es配置
    rest:
      #最新配置方式使用restful风格,端口从9300 -> 9200
      uris: xx.xx.xx.xx:9200
      username: elastic
      password: xxx
补充
// 导入依赖spring-boot-starter-data-elasticsearch连接ES
// springboot 2.2.x 可以使用ElasticsearchTemplate 和 ElasticsearchRestTemplate 模版类操作es
// springboot 2.3.x 建议使用ElasticsearchRestTemplate
@Autowired
private ElasticsearchRestTemplate elasticsearchRestTemplate;
如果es配置了用户验证,还使用https加密通信,springboot客户端连接需要做修改
第一步,修改application.yml
spring:
  elasticsearch:
    #es配置
    rest:
      #最新配置方式使用restful风格,端口从9300 -> 9200
      uris: https://xx.xx.xx.xx:9200
      username: elastic
      password: xxx
第二步,禁用掉SSL验证
因为springboot客户端尝试在ssl握手的时候会验证es发来的证书,会报unable to find valid certification path to requested target异常,解决方法是禁用ssl验证
1、导入依赖
<!-- ES配置账号密码且开启https加密通信不验证SSL  -->
<dependency>
    <groupId>io.github.hakky54</groupId>
    <artifactId>sslcontext-kickstart</artifactId>
    <version>7.1.0</version>
</dependency>
2、增加配置类
springboot 项目使用 spring-boot-starter-data-elasticsearch整合elasticsearch
/**
 * @author xiejinwei02
 * @date 2022/8/22 17:02
 */
@Configuration
@EnableConfigurationProperties({ElasticsearchRestClientProperties.class})
public class ElasticsearchConfiguration {
    @Resource
    RestClientBuilder builder;

    @Bean
    public RestHighLevelClient restHighLevelClient(ElasticsearchRestClientProperties properties){
        SSLFactory sslFactory = SSLFactory.builder()
                .withUnsafeTrustMaterial()
                .withUnsafeHostnameVerifier()
                .build();

        final CredentialsProvider credentialsProvider = new BasicCredentialsProvider();
        credentialsProvider.setCredentials(AuthScope.ANY, new UsernamePasswordCredentials(properties.getUsername(), properties.getPassword()));

        builder = builder.setHttpClientConfigCallback(httpClientBuilder -> httpClientBuilder.setDefaultCredentialsProvider(credentialsProvider)
                .setSSLContext(sslFactory.getSslContext())
                .setSSLHostnameVerifier(sslFactory.getHostnameVerifier()));

        return new RestHighLevelClient(builder);
    }
}
elasticsearch配置了用户密码和https加密通信,rest api 访问要修改,使用ApiPost访问如下:

5、界面工具
ElasticSearch Head
GitHub: https://github.com/mobz/elasticsearch-head
# 服务器要安装node 环境
# 在服务器上运行elasticsearch-head
git clone git://github.com/mobz/elasticsearch-head.git
cd elasticsearch-head
npm install --registry=https://registry.npm.taobao.org
npm run start
# 启动后本地访问及端口:http://localhost:9100

# 2、elasticsearch修改配置,开放访问ip
# No 'Access-Control-Allow-Origin'
# 在elasticsearch.yaml里加入
http.cors.enabled: true
# 开放所有ip访问,线上这样设置不安全,建议head与elasticsearch在同一台服务器上
http.cors.allow-origin: "*"
如果elasticsearch配置了用户名密码,访问连接要加上用户名和密码
如:http://localhost:9100/?auth_user=elastic&auth_password=elastic666

Kibana
更全,提供报表,安装到服务器上
# 下载地址
https://artifacts.elastic.co/downloads/kibana/kibana-7.5.2-linux-x86_64.tar.gz

# 1、解压
[esuser@helloworld ~]$ tar -zxvf kibana-7.6.1-linux-x86_64.tar.gz
# 改名字
[esuser@helloworld ~]$ mv kibana-7.6.1-linux-x86_64 kibana-7.6.1
# 2、修改kibana的yaml配置,
[esuser@helloworld config]$ cd kibana-7.6.1
[esuser@helloworld config]$ vi kibana.yml
server.port: 5601 # 默认端口5601,可以不修改
server.host: "0.0.0.0" # 开放ip访问,默认localhost
elasticsearch.hosts: ["http://localhost:9200"] # es实例节点,默认localhost:9200
# es集群
elasticsearch.hosts: ["http://localhost:9200","http://localhost:9201","http://localhost:9202"]
i18n.locale: "zh-CN"  # 汉化
# 3、启动,cd到kibana的bin目录,不能用root用户启动
# 在线运行
[esuser@helloworld bin]$ ./kibana
# 后台运行
[esuser@helloworld bin]$ nohup kibana > kibana.log 2>&1 &
# 注意,云服务器防火墙和安全组要开放5601端口,
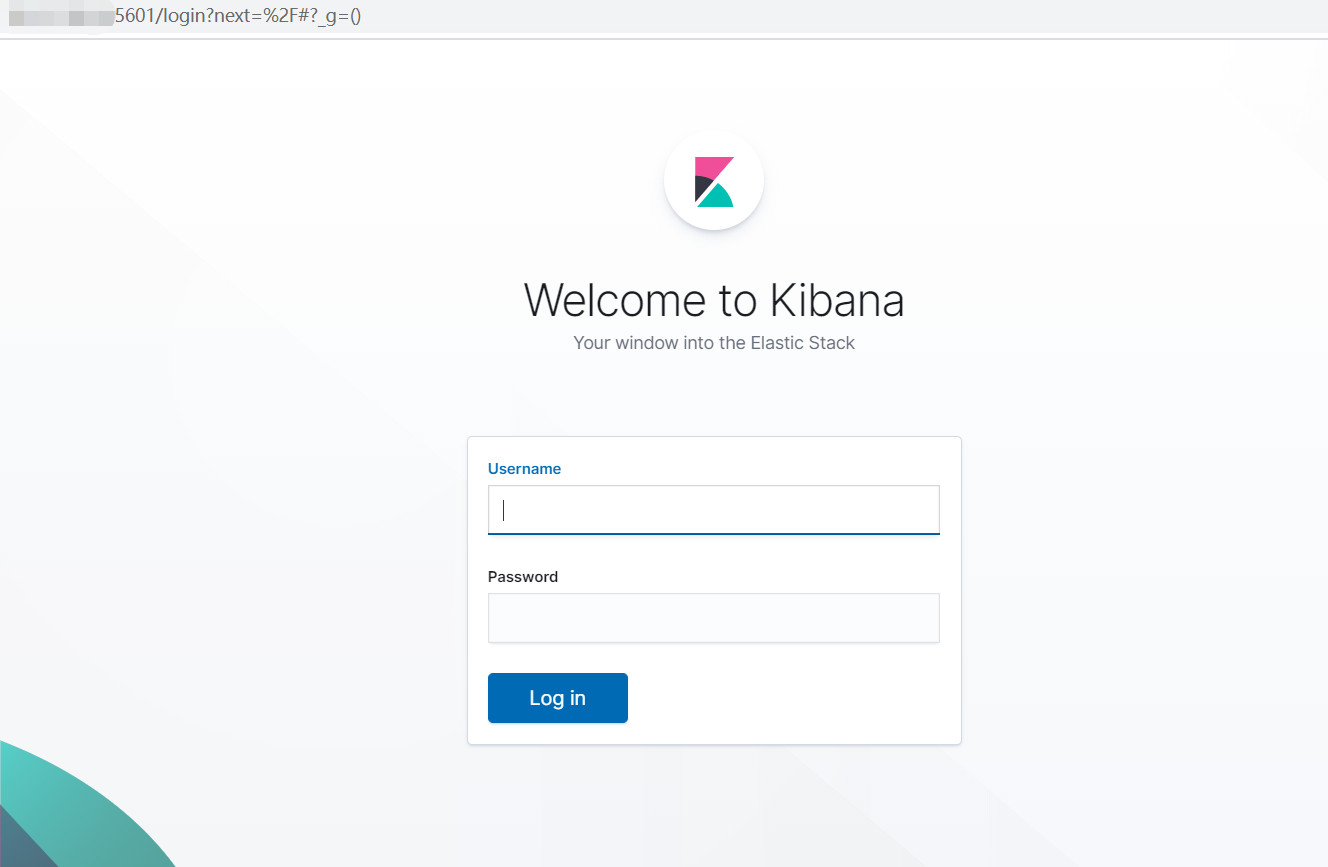
访问:http://localhost:5601/app/kibana#/home
es配置了用户名和密码访问,需要修改kibana.yml
#进入kibana安装目录
cd /usr/local/kibana-7.6.1/config
# 1、修改配置文件,增加elastic的密码
vim kibana.yml
elasticsearch.username: "elastic"
elasticsearch.password: "xxx"

# 2、重启kibana服务
ps -ef|grep kibana
# 杀进程
kill pd
# 启动
nohup kibana > kibana.log 2>&1 &
上面是填写明文密码,如果觉得不安全,可以使用通过keystore配置es的加密用户名和密码进行访问
[esuser@helloworld kibana-7.6.1]$ cd bin
# 1、创建keystore
[esuser@helloworld bin]$ ./kibana-keystore create
Created Kibana keystore in /home/esuser/kibana-7.6.1/data/kibana.keystore

# 2、设置kibana访问es的用户名
[esuser@helloworld bin]$ ./kibana-keystore add elasticsearch.username
Enter value for elasticsearch.username: *******  # 输入用户名 elastic

# 3、设置kibana访问es的密码
[esuser@helloworld bin]$ ./kibana-keystore add elasticsearch.password
Enter value for elasticsearch.password: **********
6、索引CRUD
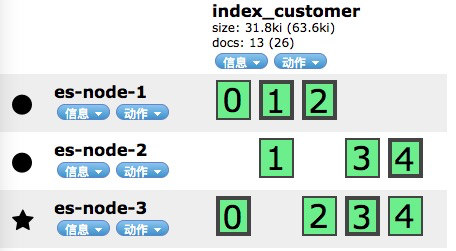
3节点,索引index_customer创建了5个分片,每个分片1个备份节点
获取集群健康值
GET http://127.0.0.1/_cluster/health

{
  "cluster_name": "icoding-es",
  "status": "green",
  "timed_out": false,
  "number_of_nodes": 1,
  "number_of_data_nodes": 1,
  "active_primary_shards": 1,
  "active_shards": 1,
  "relocating_shards": 0,
  "initializing_shards": 0,
  "unassigned_shards": 0,
  "delayed_unassigned_shards": 0,
  "number_of_pending_tasks": 0,
  "number_of_in_flight_fetch": 0,
  "task_max_waiting_in_queue_millis": 0,
  "active_shards_percent_as_number": 100
}
# 1、创建索引,发起PUT请求
PUT /index_test
{
    "settings": {
        "index": {
            "number_of_shards": "3",
            "number_of_replicas": "0"
        }
    }
}

# 2、删除索引,发起delete请求
DELETE /index_test

# 3、查询索引的相关信息
GET http://39.100.156.225:9200/_cat/indices?v
mappings自定义
PUT /index_test2
{
    "settings": {
        "index": {
            "number_of_shards": "3",
            "number_of_replicas": "0"
        }
    },
    "mappings": {
    	"properties": {
    		"username": {
    			"type": "text",
    			"index": true
    		},
    		"password": {
    			"type": "keyword",
    			"index": false  # 否,不能被查询
    		}
    	}
    }
}
字段type 的10种类型
- text 文字类型,内容需要被分词被倒排索引
- keyword 文字类型,不会被分词,精确匹配,比如qq号,微信号
- long,integer,short,byte
- double,float
- boolean
- date
如果在创建完索引后没有创建mapping,可以后续添加,已有的字段properties不会修改。
POST /index_test3/_mapping
{
    "properties": {
        "username": {
            "type": "text",
            "index": true
        },
        "password": {
            "type": "keyword",
            "index": false	 # 否,不能被查询
        }
    }
}
document文档
# 作为索引来讲,他更关心的是doc,而mapping没有,他会默认方式来添加
POST /index_test3/_doc/1001
{
	"id": 1001,
	"name": "icoding-elasticsearch",
	"desc": "艾编程非常不错,很好",
	"create_date": "2020-2-15"
}

# 查询
GET /index_test3/_doc/2

# 删除
DELETE /index_test3/_doc/2

# 更新
POST /index_test3/_doc/1/_update
{
    "doc": {
        "desc": "架构师课程非常不错"
    }
}
查询返回的元数据分析
"_index": "index_test3", #属于哪个索引
"_type": "_doc", #type类型,7.x固定是_doc
"_id": "1", #文档的唯一标识
"_version": 2, #数据版本
"_seq_no": 1,
"_primary_term": 1,
"found": true, #是否查询到
_score: #查询的相关度
# 返回需要的数据列
GET /index_test3/_doc/1?_source=name,id
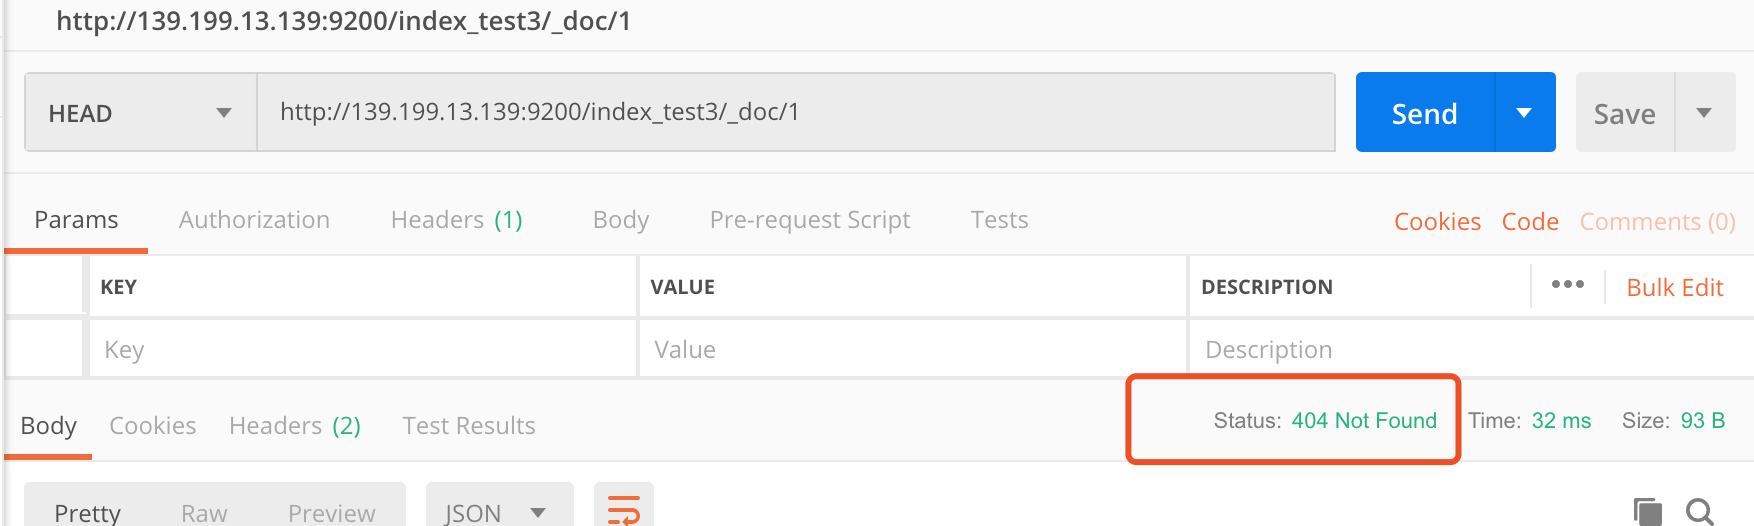
# Head请求,查询某个文档是否存在
HEAD /index_test3/_doc/1
httpcode:200 存在 404不存在
乐观锁
doc默认带有version字段,支持乐观锁操作,我们在写入的时候比对一下version是否一致再更新
GET /index_test3/_doc/1?version=2
# 通过version来进行处理
7、ES中的分词器
analyze分词器
GET /index_test2/_analyze
{
	"field": "text",
	"text": "icoding is very well!"
}
分词器类型
- standard:默认分词器,大写转小写,按照空格拆分
- simple:按照非字母分词,大写转小写
- whitespace:按照空格拆分,不进行大小写转换
- stop:按照空格分词,去除无意义单词:a an is
- keyword:不分词
standard 分词器
# 对内容进行分词
POST /_analyze
{
	"analyzer": "standard",
	"text": "Icoding is Very Well 1234 5678"
}
中文分词器:IK分词器
Github地址:
#安装unzip
yum -y install unzip
# 下载完解压到elasticsearch的plugin/ik目录下
unzip elasticsearch-analysis-ik-7.5.2.zip -d /usr/local/elasticsearch/elasticsearch-7.5.2/plugins/ik
# 重启elasticsearch
# 新增分词器后,先加的记录是不能被匹配出来的,要后加的记录才能匹配,因为文档在新增的时候就进行了分词,可以重建索引,对所有的文档记录重新分词,但相对会损耗些资源。
- ik_max_word:最细粒度的分词,会在词上再次拆分
- ik_smart:只拆分一次
自定义词库
# 自定义词库
cd /{es-root}/plugins/ik/config
vi IKAnalyzer.cfg.xml
# 修改 <entry key="ext_dict">customer.dic</entry>
# 在同目录下创建customer.dic
# 可以添加自定义词语了
奋斗吧
艾编程
骚年
# 加完重启Elasticsearch