 弹吉他的兔子
前面写过一篇文章介绍springboot整合多数据源,依赖dynamic-datasource-spring-boot-starter在业务层类或方法上添加@DS注解切换数据源,/springboot/2021/02/25/one-app-two-datasource.html
如果我的数据源是根据request传参appCode或租户参数动态切换数据源,怎么实现?
最近看了一个项目,使用Spring的AbstractRoutingDataSource抽象类动态路由到物理数据源实现切换,我把它放到了自己的gitee仓库上了
地址:https://gitee.com/jacobmj/study-demo/tree/master/bgy-auth
1、什么是多数据源
最常见的单一应用中最多涉及到一个数据库,即是一个数据源(Datasource)。那么顾名思义,多数据源就是在一个单一应用中涉及到了两个及以上的数据库了。
    @Bean(name = "dataSource")
    public DataSource dataSource() {
        DruidDataSource druidDataSource = new DruidDataSource();
        druidDataSource.setUrl(url);
        druidDataSource.setUsername(username);
        druidDataSource.setDriverClassName(driverClassName);
        druidDataSource.setPassword(password);
        return druidDataSource;
    }
url、username、password这三个属性已经唯一确定了一个数据库了,DataSource则是依赖这三个创建出来的。则多数据源即是配置多个DataSource(暂且这么理解)。
2、整合单一的数据源
本文使用阿里的数据库连接池druid,添加依赖如下:
<!--druid连接池-->
<dependency>
   <groupId>com.alibaba</groupId>
   <artifactId>druid-spring-boot-starter</artifactId>
   <version>1.1.9</version>
</dependency>
阿里的数据库连接池非常强大,比如数据监控、数据库加密等等内容,本文仅仅演示与Spring Boot整合的过程,一些其他的功能后续可以自己研究添加。
Druid连接池的starter的自动配置类是DruidDataSourceAutoConfigure,类上标注如下一行注解:
@EnableConfigurationProperties({DruidStatProperties.class, DataSourceProperties.class})
@EnableConfigurationProperties这个注解使得配置文件中的配置生效并且映射到指定类的属性。
DruidStatProperties中指定的前缀是spring.datasource.druid,这个配置主要是用来设置连接池的一些参数。
DataSourceProperties中指定的前缀是spring.datasource,这个主要是用来设置数据库的url、username、password等信息。
因此我们只需要在全局配置文件中指定数据库的一些配置以及连接池的一些配置信息即可,前缀分别是spring.datasource.druid、spring.datasource,以下是个人随便配置的(application.properties):
spring.datasource.url=jdbc\:mysql\://120.26.101.xxx\:3306/xxx?useUnicode\=true&characterEncoding\=UTF-8&zeroDateTimeBehavior\=convertToNull&useSSL\=false&allowMultiQueries\=true&serverTimezone=Asia/Shanghai
spring.datasource.username=root
spring.datasource.password=xxxx
spring.datasource.type=com.alibaba.druid.pool.DruidDataSource
spring.datasource.driver-class-name=com.mysql.jdbc.Driver
#初始化连接大小
spring.datasource.druid.initial-size=0
#连接池最大使用连接数量
spring.datasource.druid.max-active=20
#连接池最小空闲
spring.datasource.druid.min-idle=0
#获取连接最大等待时间
spring.datasource.druid.max-wait=6000
spring.datasource.druid.validation-query=SELECT 1
#spring.datasource.druid.validation-query-timeout=6000
spring.datasource.druid.test-on-borrow=false
spring.datasource.druid.test-on-return=false
spring.datasource.druid.test-while-idle=true
#配置间隔多久才进行一次检测,检测需要关闭的空闲连接,单位是毫秒
spring.datasource.druid.time-between-eviction-runs-millis=60000
#置一个连接在池中最小生存的时间,单位是毫秒
spring.datasource.druid.min-evictable-idle-time-millis=25200000
#spring.datasource.druid.max-evictable-idle-time-millis=
#打开removeAbandoned功能,多少时间内必须关闭连接
spring.datasource.druid.removeAbandoned=true
#1800秒,也就是30分钟
spring.datasource.druid.remove-abandoned-timeout=1800
#<!-- 1800秒,也就是30分钟 -->
spring.datasource.druid.log-abandoned=true
spring.datasource.druid.filters=mergeStat
另外一种方式
在全局配置文件application.properties文件中配置以上的信息即可注入一个数据源到Spring Boot中。其实这仅仅是一种方式,下面介绍另外一种方式。
在自动配置类中DruidDataSourceAutoConfigure中有如下一段代码:
  @Bean(initMethod = "init")
    @ConditionalOnMissingBean
    public DataSource dataSource() {
        LOGGER.info("Init DruidDataSource");
        return new DruidDataSourceWrapper();
    }
@ConditionalOnMissingBean和@Bean这两个注解的结合,意味着我们可以覆盖,只需要提前在IOC中注入一个DataSource类型的Bean即可
因此我们在自定义的配置类中定义如下配置即可:
/* @Bean:向IOC容器中注入一个Bean
     * @ConfigurationProperties:使得配置文件中以spring.datasource为前缀的属性映射到Bean的属性中
     * @return
     */
    @ConfigurationProperties(prefix = "spring.datasource")
    @Bean
    public DataSource dataSource(){
        //做一些其他的自定义配置,比如密码加密等......
        return new DruidDataSource();
    }
以上介绍了两种数据源的配置方式,第一种比较简单,第二种适合扩展,按需选择。
3、整合Mybatis
Spring Boot 整合Mybatis其实很简单,简单的几步就搞定,首先添加依赖:
<dependency>
     <groupId>org.mybatis.spring.boot</groupId>
     <artifactId>mybatis-spring-boot-starter</artifactId>
     <version>2.0.0</version>
</dependency>
第二步找到自动配置类MybatisAutoConfiguration,有如下一行代码
@EnableConfigurationProperties(MybatisProperties.class)
老套路了,全局配置文件中配置前缀为mybatis的配置将会映射到该类中的属性。
可配置的东西很多,比如XML文件的位置、类型处理器等等,如下简单的配置:
mybatis.type-handlers-package=com.demo.typehandler
mybatis.configuration.map-underscore-to-camel-case=true
如果需要通过包扫描的方式注入Mapper,则需要在配置类上加入一个注解:@MapperScan,其中的value属性指定需要扫描的包。
直接在全局配置文件配置各种属性是一种比较简单的方式,其实的任何组件的整合都有不少于两种的配置方式,下面来介绍下配置类如何配置。
MybatisAutoConfiguration自动配置类有如下一断代码:
@Bean
  @ConditionalOnMissingBean
  public SqlSessionFactory sqlSessionFactory(DataSource dataSource) throws Exception {}
@ConditionalOnMissingBean和@Bean真是老搭档了,意味着我们又可以覆盖,只需要在IOC容器中注入SqlSessionFactory(Mybatis六剑客之一生产者)。
因此我们在自定义的配置类中定义如下配置即可:
 /**
     * 注入SqlSessionFactory
     */
    @Bean("sqlSessionFactory1")
    public SqlSessionFactory sqlSessionFactory(DataSource dataSource) throws Exception {
        SqlSessionFactoryBean sqlSessionFactoryBean = new SqlSessionFactoryBean();
        sqlSessionFactoryBean.setDataSource(dataSource);
        sqlSessionFactoryBean.setMapperLocations(new PathMatchingResourcePatternResolver().getResources("classpath*:/mapper/**/*.xml"));
        org.apache.ibatis.session.Configuration configuration = new org.apache.ibatis.session.Configuration();
        // 自动将数据库中的下划线转换为驼峰格式
        configuration.setMapUnderscoreToCamelCase(true);
        configuration.setDefaultFetchSize(100);
        configuration.setDefaultStatementTimeout(30);
        sqlSessionFactoryBean.setConfiguration(configuration);
        return sqlSessionFactoryBean.getObject();
    }
以上介绍了配置Mybatis的两种方式,其实在大多数场景中使用第一种已经够用了,至于为什么介绍第二种呢?当然是为了多数据源的整合而做准备了。
在MybatisAutoConfiguration中有一行很重要的代码,如下:
@ConditionalOnSingleCandidate(DataSource.class)
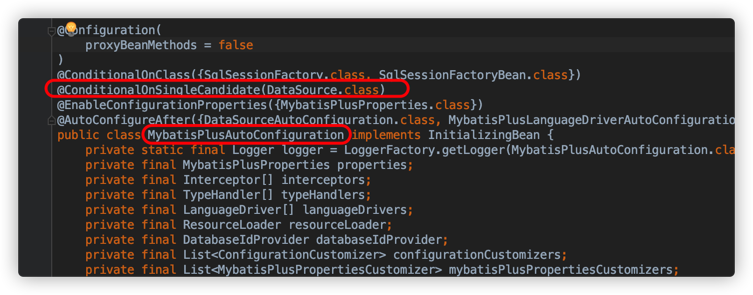
@ConditionalOnSingleCandidate这个注解的意思是当IOC容器中只有一个候选Bean的实例才会生效。
4、整合多数据源
多数据源的情况下并不是多个数据源并存的,Spring提供了AbstractRoutingDataSource这样一个抽象类,使得能够在多数据源的情况下任意切换,相当于一个动态路由的作用,作者称之为动态数据源。因此Mybatis只需要配置这个动态数据源即可。
什么是动态数据源
动态数据源简单的说就是能够自由切换的数据源,类似于一个动态路由,Spring 提供了一个抽象类AbstractRoutingDataSource,有一个属性targetDataSource
private Map<Object, Object> targetDataSources;
targetDataSources是一个Map结构,所有需要切换的数据源都存放在其中,根据指定的KEY进行切换。当然还有一个默认的数据源。
AbstractRoutingDataSource这个抽象类中有一个抽象方法需要子类实现,如下:
protected abstract Object determineCurrentLookupKey();
determineCurrentLookupKey()这个方法返回切换数据源的KEY,根据这个KEY从targetDataSources取值(数据源)。
数据源切换如何保证线程隔离
数据源属于一个公共的资源,在多线程的情况下如何保证线程隔离呢?不能我这边切换了影响其他线程的执行
说到线程隔离,自然会想到
ThreadLocal了,将切换数据源的KEY(用于从targetDataSources中取值)存储在ThreadLocal中,执行结束之后清除即可。
单独封装了一个DataSourceHolder,内部使用ThreadLocal隔离线程,代码如下:
/**
 * 使用ThreadLocal存储切换数据源后的KEY
 */
public class DataSourceHolder {

    //线程  本地环境
    private static final ThreadLocal<String> dataSources = new InheritableThreadLocal();

    //设置数据源
    public static void setDataSource(String datasource) {
        dataSources.set(datasource);
    }

    //获取数据源
    public static String getDataSource() {
        return dataSources.get();
    }

    //清除数据源
    public static void clearDataSource() {
        dataSources.remove();
    }
}
如何构造一个动态数据源?
继承抽象类AbstractRoutingDataSource,重写方法determineCurrentLookupKey()即可。代码如下:
/**
 * 动态数据源,继承AbstractRoutingDataSource
 */
public class DynamicDataSource extends AbstractRoutingDataSource {

    /**
     * 返回需要使用的数据源的key,将会按照这个KEY从Map获取对应的数据源(切换)
     * @return
     */
    @Override
    protected Object determineCurrentLookupKey() {
        //从ThreadLocal中取出KEY
        return DataSourceHolder.getDataSource();
    }

    /**
     * 构造方法填充Map,构建多数据源
     */
    public DynamicDataSource(DataSource defaultTargetDataSource, Map<Object, Object> targetDataSources) {
        //默认的数据源,可以作为主数据源
        super.setDefaultTargetDataSource(defaultTargetDataSource);
        //目标数据源
        super.setTargetDataSources(targetDataSources);
        //执行afterPropertiesSet方法,完成属性的设置
        super.afterPropertiesSet();
    }
}
上述代码很简单,分析如下:
- 一个多参的构造方法,指定了默认的数据源和目标数据源。
- 重写
determineCurrentLookupKey()方法,返回数据源对应的KEY,这里是直接从ThreadLocal中取值,就是上文封装的DataSourceHolder。
定义一个注解
为了操作方便且低耦合,不能每次需要切换数据源的时候都要手动调一下接口,可以定义一个切换数据源的注解,如下:
/**
 * 切换数据源的注解
 */
@Target(value = ElementType.METHOD)
@Retention(value = RetentionPolicy.RUNTIME)
@Documented
public @interface SwitchSource {

    /**
     * 默认切换的数据源KEY
     */
    String DEFAULT_NAME = "hisDataSource";

    /**
     * 需要切换到数据的KEY
     */
    String value() default DEFAULT_NAME;
}
注解中只有一个value属性,指定了需要切换数据源的KEY。
当然还要有切面类,代码如下:
@Aspect
//优先级要设置在事务切面执行之前
@Order(1)
@Component
@Slf4j
public class DataSourceAspect {

  // 切入点
    @Pointcut("@annotation(SwitchSource)")
    public void pointcut() {
    }

    /**
     * 在方法执行之前切换到指定的数据源
     * @param joinPoint
     */
    @Before(value = "pointcut()")
    public void beforeOpt(JoinPoint joinPoint) {
        /*因为是对注解进行切面,所以这边无需做过多判定,直接获取注解的值,进行环绕,将数据源设置成远方,然后结束后,清楚当前线程数据源*/
        Method method = ((MethodSignature) joinPoint.getSignature()).getMethod();
        SwitchSource switchSource = method.getAnnotation(SwitchSource.class);
        log.info("[Switch DataSource]:" + switchSource.value());
        DataSourceHolder.setDataSource(switchSource.value());
    }

    /**
     * 方法执行之后清除掉ThreadLocal中存储的KEY,这样动态数据源会使用默认的数据源
     */
    @After(value = "pointcut()")
    public void afterOpt() {
        DataSourceHolder.clearDataSource();
        log.info("[Switch Default DataSource]");
    }
}
这个ASPECT很容易理解,beforeOpt()在方法之前执行,取值@SwitchSource中value属性设置到ThreadLocal中;afterOpt()方法在方法执行之后执行,清除掉ThreadLocal中的KEY,保证了如果不切换数据源,则用默认的数据源。
与Mybatis整合
单一数据源与Mybatis整合上文已经详细讲解了,数据源DataSource作为参数构建了SqlSessionFactory,同样的思想,只需要把这个数据源换成动态数据源即可。注入的代码如下:
/**
     * 创建动态数据源的SqlSessionFactory,传入的是动态数据源
     * @Primary这个注解很重要,如果项目中存在多个SqlSessionFactory,这个注解一定要加上
     */
    @Primary
    @Bean("sqlSessionFactory2")
    public SqlSessionFactory sqlSessionFactoryBean(DynamicDataSource dynamicDataSource) throws Exception {
        SqlSessionFactoryBean sqlSessionFactoryBean = new SqlSessionFactoryBean();
        sqlSessionFactoryBean.setDataSource(dynamicDataSource);
        sqlSessionFactoryBean.setMapperLocations(new PathMatchingResourcePatternResolver().getResources("classpath*:/mapper/**/*.xml"));
        org.apache.ibatis.session.Configuration configuration = new org.apache.ibatis.session.Configuration();
        configuration.setMapUnderscoreToCamelCase(true);
        configuration.setDefaultFetchSize(100);
        configuration.setDefaultStatementTimeout(30);
        sqlSessionFactoryBean.setConfiguration(configuration);
        return sqlSessionFactoryBean.getObject();
    }
与Mybatis整合很简单,只需要把数据源替换成自定义的动态数据源DynamicDataSource。
那么动态数据源如何注入到IOC容器中呢?看上文自定义的DynamicDataSource构造方法,肯定需要两个数据源了,因此自定义配置类中必须先注入两个或者多个数据源到IOC容器中,如下:
 /**
     * @Bean:向IOC容器中注入一个Bean
     * @ConfigurationProperties:使得配置文件中以spring.datasource为前缀的属性映射到Bean的属性中
     */
    @ConfigurationProperties(prefix = "spring.datasource")
    @Bean("dataSource")
    public DataSource dataSource(){
        return new DruidDataSource();
    }

    /**
     * 向IOC容器中注入另外一个数据源
     * 全局配置文件中前缀是spring.datasource.his
     */
    @Bean(name = SwitchSource.DEFAULT_NAME)
    @ConfigurationProperties(prefix = "spring.datasource.his")
    public DataSource hisDataSource() {
        return DataSourceBuilder.create().build();
    }
以上构建的两个数据源,一个是默认的数据源,一个是需要切换到的数据源(targetDataSources),这样就组成了动态数据源了。数据源的一些信息,比如url,username需要自己在全局配置文件中根据指定的前缀配置即可,代码不再贴出。
这里还有一个问题:IOC中存在多个数据源了,那么事务管理器怎么办呢?它也懵逼了,到底选择哪个数据源呢?因此事务管理器肯定还是要重新配置的。
事务管理器此时管理的数据源将是动态数据源DynamicDataSource,配置如下:
   /**
     * 重写事务管理器,管理动态数据源
     */
    @Primary
    @Bean(value = "transactionManager2")
    public PlatformTransactionManager annotationDrivenTransactionManager(DynamicDataSource dataSource) {
        return new DataSourceTransactionManager(dataSource);
    }
至此,Mybatis与多数据源的整合就完成了。
演示
使用也是很简单,在需要切换数据源的方法上方标注@SwitchSource切换到指定的数据源即可,如下
   //不开启事务
    @Transactional(propagation = Propagation.NOT_SUPPORTED)
    //切换到HIS的数据源
    @SwitchSource
    @Override
    public List<DeptInfo> list() {
        return hisDeptInfoMapper.listDept();
    }
这样只要执行到这方法将会切换到HIS的数据源,方法执行结束之后将会清除,执行默认的数据源就不加@SwitchSource注解
5、实战项目
gitee demo实践项目与上面的实现方式差不多,不同的是它使用了拦截器给线程变量set值的,下面是数据源的配置与切换逻辑流程。
gitee地址:https://gitee.com/jacobmj/study-demo/tree/master/bgy-auth
1、application.yaml做好默认数据源master与切换数据源的配置
# 数据源配置
datasource:
  master:
    name: master
    driverClassName: com.mysql.cj.jdbc.Driver
    url: jdbc:mysql:replication://${DRUID.HOST:localhost}:${DRUID.PORT:3306}/${DRUID.DATABASE:xxxx}?zeroDateTimeBehavior=convertToNull&allowMultiQueries=true&useSSL=true&useUnicode=true&characterEncoding=utf8&autoReconnect=true&failOverReadOnly=true&serverTimezone=GMT%2B8
    username: ${DRUID.USERNAME:xxx}
    password: ${DRUID.PASSWORD:xxx}
    initialSize: ${DRUID.INITIAL_SIZE:4}
    maxActive: ${DRUID.MAX_ACTIVE:20}
    minIdle: ${DRUID.MIN_IDLE:4}
    maxWait: ${DRUID.MAX_WAIT:30000}
    useUnfairLock: true
    notFullTimeoutRetryCount: 2
    validationQuery: SELECT 1 FROM DUAL
    validationQueryTimeout: 1 #单位(秒)
    testOnBorrow: false #申请连接时执行validationQuery检测连接是否有效,做了这个配置会降低性能。
    testOnReturn: false
    testWhileIdle: true #不影响性能,并且保证安全性
    poolPreparedStatements: true
    maxOpenPreparedStatements: 100
    maxPoolPreparedStatementPerConnectionSize: 10
    queryTimeout: 180 #执行查询超时时间(秒),与MyBatis保持一致
    transactionQueryTimeout: 60 #执行事务超时时间
    timeBetweenEvictionRunsMillis: 60000 #有两个含义: 1) Destroy线程会检测连接的间隔时间2) testWhileIdle的判断依据
    maxEvictableIdleTimeMillis: 1800000
    minEvictableIdleTimeMillis: 600000
    removeAbandoned: true
    removeAbandonedTimeoutMillis: 300000
    filters: stat,mergeStat,slf4j
    extFilters:
      - wallFilter
  # 多租户多数据库
  multi-tenant:
    enable: true
    dbConfigList:
    # 测试时配置
    - key: "测试库01"
      appCodeList: YY_AuthMaintenance,YY_WFDesigner
      # replication不能用于xa事务
      # url: jdbc:mysql://${DRUID.HOST:localhost}:${DRUID.PORT:3306}/${DRUID.DATABASE:goods}?allowMultiQueries=true&useSSL=false&allowPublicKeyRetrieval=true&useUnicode=true&characterEncoding=utf8&autoReconnect=true&failOverReadOnly=true&serverTimezone=GMT%2B8
      url: jdbc:mysql:replication://10.222.11.21:13306/bgy_auth?zeroDateTimeBehavior=CONVERT_TO_NULL&allowMultiQueries=true&useSSL=false&allowPublicKeyRetrieval=true&useUnicode=true&characterEncoding=utf8&autoReconnect=true&failOverReadOnly=true&serverTimezone=GMT%2B8
      username: ${DRUID.USERNAME:root}
      password: ${DRUID.PASSWORD:bpcUser@}
    - key: "测试库02"
      appCodeList: YY_WF,YY_WWF-UNITTEST,YY_JAVA_DEMOYY_outapplication
      # replication不能用于xa事务
      # url: jdbc:mysql://${DRUID.HOST:localhost}:${DRUID.PORT:3306}/${DRUID.DATABASE:goods}?allowMultiQueries=true&useSSL=false&allowPublicKeyRetrieval=true&useUnicode=true&characterEncoding=utf8&autoReconnect=true&failOverReadOnly=true&serverTimezone=GMT%2B8
      url: jdbc:mysql:replication://127.0.0.1:3306/wdauth?zeroDateTimeBehavior=CONVERT_TO_NULL&allowMultiQueries=true&useSSL=false&allowPublicKeyRetrieval=true&useUnicode=true&characterEncoding=utf8&autoReconnect=true&failOverReadOnly=true&serverTimezone=GMT%2B8
      username: ${DRUID.USERNAME:root}
      password: ${DRUID.PASSWORD:123456}
2、自定义DatasourceConfig配置类
@Configuration
@MapperScan(basePackages = {"${mybatis.type-dao-package:com.bgy.auth.dao.adapter}"}, sqlSessionFactoryRef = "sqlSessionFactory")
@EnableTransactionManagement
@AutoConfigureOrder(-100)
@AutoConfigureAfter({MybatisPlusAutoConfiguration.class})
public class DatasourceConfig extends AbsDataSourceConfig {
  ...

    /**
     * +定义主数据源
     *
     * @return 主数据源(动态库)
     */
    @ConditionalOnExpression("${datasource.multi-tenant.enable:false}==true")
    @Bean(name = "dataSource"/*, destroyMethod = "close"*/)
    @Primary
    public DynamicDataSource dynamicDataSource(@Qualifier("dataSourcePropertiesMaster") DataSourceProperties properties,
                                               @Qualifier("dataSourceConfigInfoCollect") DataSourceConfigInfoCollect dataSourceConfigInfoCollect) throws Exception {
        CommonDataSource commonDataSource = createDataSource(properties);
        DataSource dataSource = (DataSource) commonDataSource;
        if (dataSource == null) {
            throw new Exception("Init DataSource Error!");
        }

        DynamicDataSource dynamicDataSource = new DynamicDataSource();
    // 默认数据库
        dynamicDataSource.setDefaultTargetDataSource(dataSource);
    // 切换的目标数据库
        dynamicDataSource.setTargetDataSources(getDataSourceMap(properties, dataSourceConfigInfoCollect));

        return dynamicDataSource;
    }
  ...
}
其中DynamicDataSource继承AbstractRoutingDataSource
public class DynamicDataSource extends AbstractRoutingDataSource {
    @Override
    protected Object determineCurrentLookupKey() {
        // 获取当前动态数据源
        return DynamicDataSourceHolder.get();
    }
}
DynamicDataSourceHolder定义了一个线程变量
public class DynamicDataSourceHolder {
    public static final ThreadLocal<String> DATA_SOURCE_NAME = new ThreadLocal<>();

    public static void set(String name){
        DATA_SOURCE_NAME.set(name);
    }

    public static void clear(){
        DATA_SOURCE_NAME.remove();
    }

    public static String  get(){
        return DATA_SOURCE_NAME.get();
    }
}
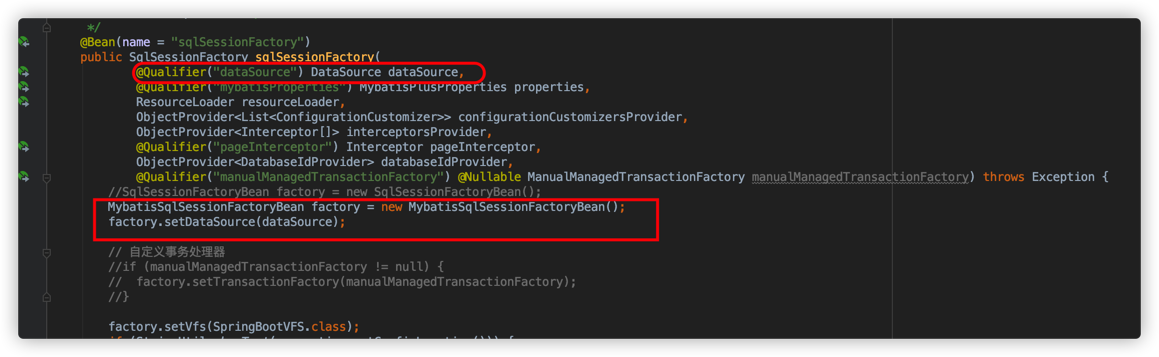
自定义SqlSessionFactory 的Bean使用上面的dynamicDataSource
3、切换数据源拦截器
@Configuration
public class DynamicDataSourceInterceptor implements HandlerInterceptor {
    protected static Log logger = LogFactory.getLog("DAO.LOG");
    @Autowired
    private DataSourceConfigInfoCollect dataSourceConfigInfoCollect;
    @Value("${datasource.multi-tenant.enable:false}")
    private Boolean dataSourceEnableMultiTenant;

    @Override
    public boolean preHandle(HttpServletRequest request, HttpServletResponse response, Object handler) throws Exception {
        if (!dataSourceEnableMultiTenant) {
            return true;
        }

        final String appCode = request.getParameter("appCode");
        if (StringUtils.isBlank(appCode)) {
            logger.error("appCode can not be null!");
            throw new UnsupportedOperationException("appCode can not be null!");
        }

        String dataSourceKey = null;
        for (DataSourceConfigInfo configInfo : dataSourceConfigInfoCollect.getDbConfigList()) {
            if (configInfo.getAppCodeList().contains(appCode)) {
                dataSourceKey = configInfo.getKey();
                break;
            }
        }

        // 没该行代码就访问到了datasource.master的default数据源(datasource[master])
        if (StringUtils.isBlank(dataSourceKey)) {
            logger.error("There is no database mapped to the appCode(" + appCode + ")!");
            throw new UnsupportedOperationException("There is no database mapped to the appCode(" + appCode + ")!");
        }

        DynamicDataSourceHolder.set(dataSourceKey);
        return true;
    }

    @Override
    public void afterCompletion(HttpServletRequest request, HttpServletResponse response, Object handler, Exception ex) throws Exception {
        DynamicDataSourceHolder.clear();
    }
}
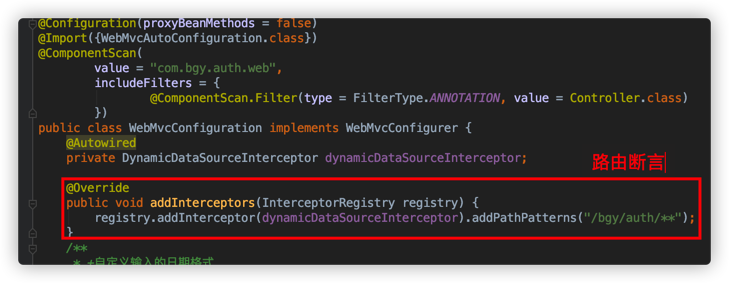
WebMvcConfigurer注册该拦截器